Decor – Decorating a China Cabinet

There is one item in a house that we normally do not think of as a decorative piece of furniture; it is the dining room china cabinet.  Most people would think the only function of a china cabinet is to store their fine china dinnerware, crystal glasses or silver serving pieces when they are not being used for a formal luncheon or dinner in the dining room.  In this post I am going to show how I display the items in our china cabinet and also how I change some of the decorative items seasonally throughout the year for many different holiday styles.

Decorating a china cabinet

Shown below is a photo of how I have decorated our china cabinet and this is how it looks during most of the year and I am sure it looks a lot like a typical china cabinet display.  Inside on the top two shelves of the china cabinet I have displayed pieces from our Noritake Rothschild china; each of the eight place settings has a dinner plate, luncheon plate, salad or dessert plate, soup bowl and cup/saucer.  The china is very special to me because it was a wedding gift from my mother.  To add some interest to the cabinet I have displayed the dinner plates on edge so the delicate floral pattern of the plate is shown, there is a groove on the glass shelf to prevent the plates from moving.  I also have added eight glass and silver plate chargers that are displayed beneath each of the stacked place settings.

China Cabinet display

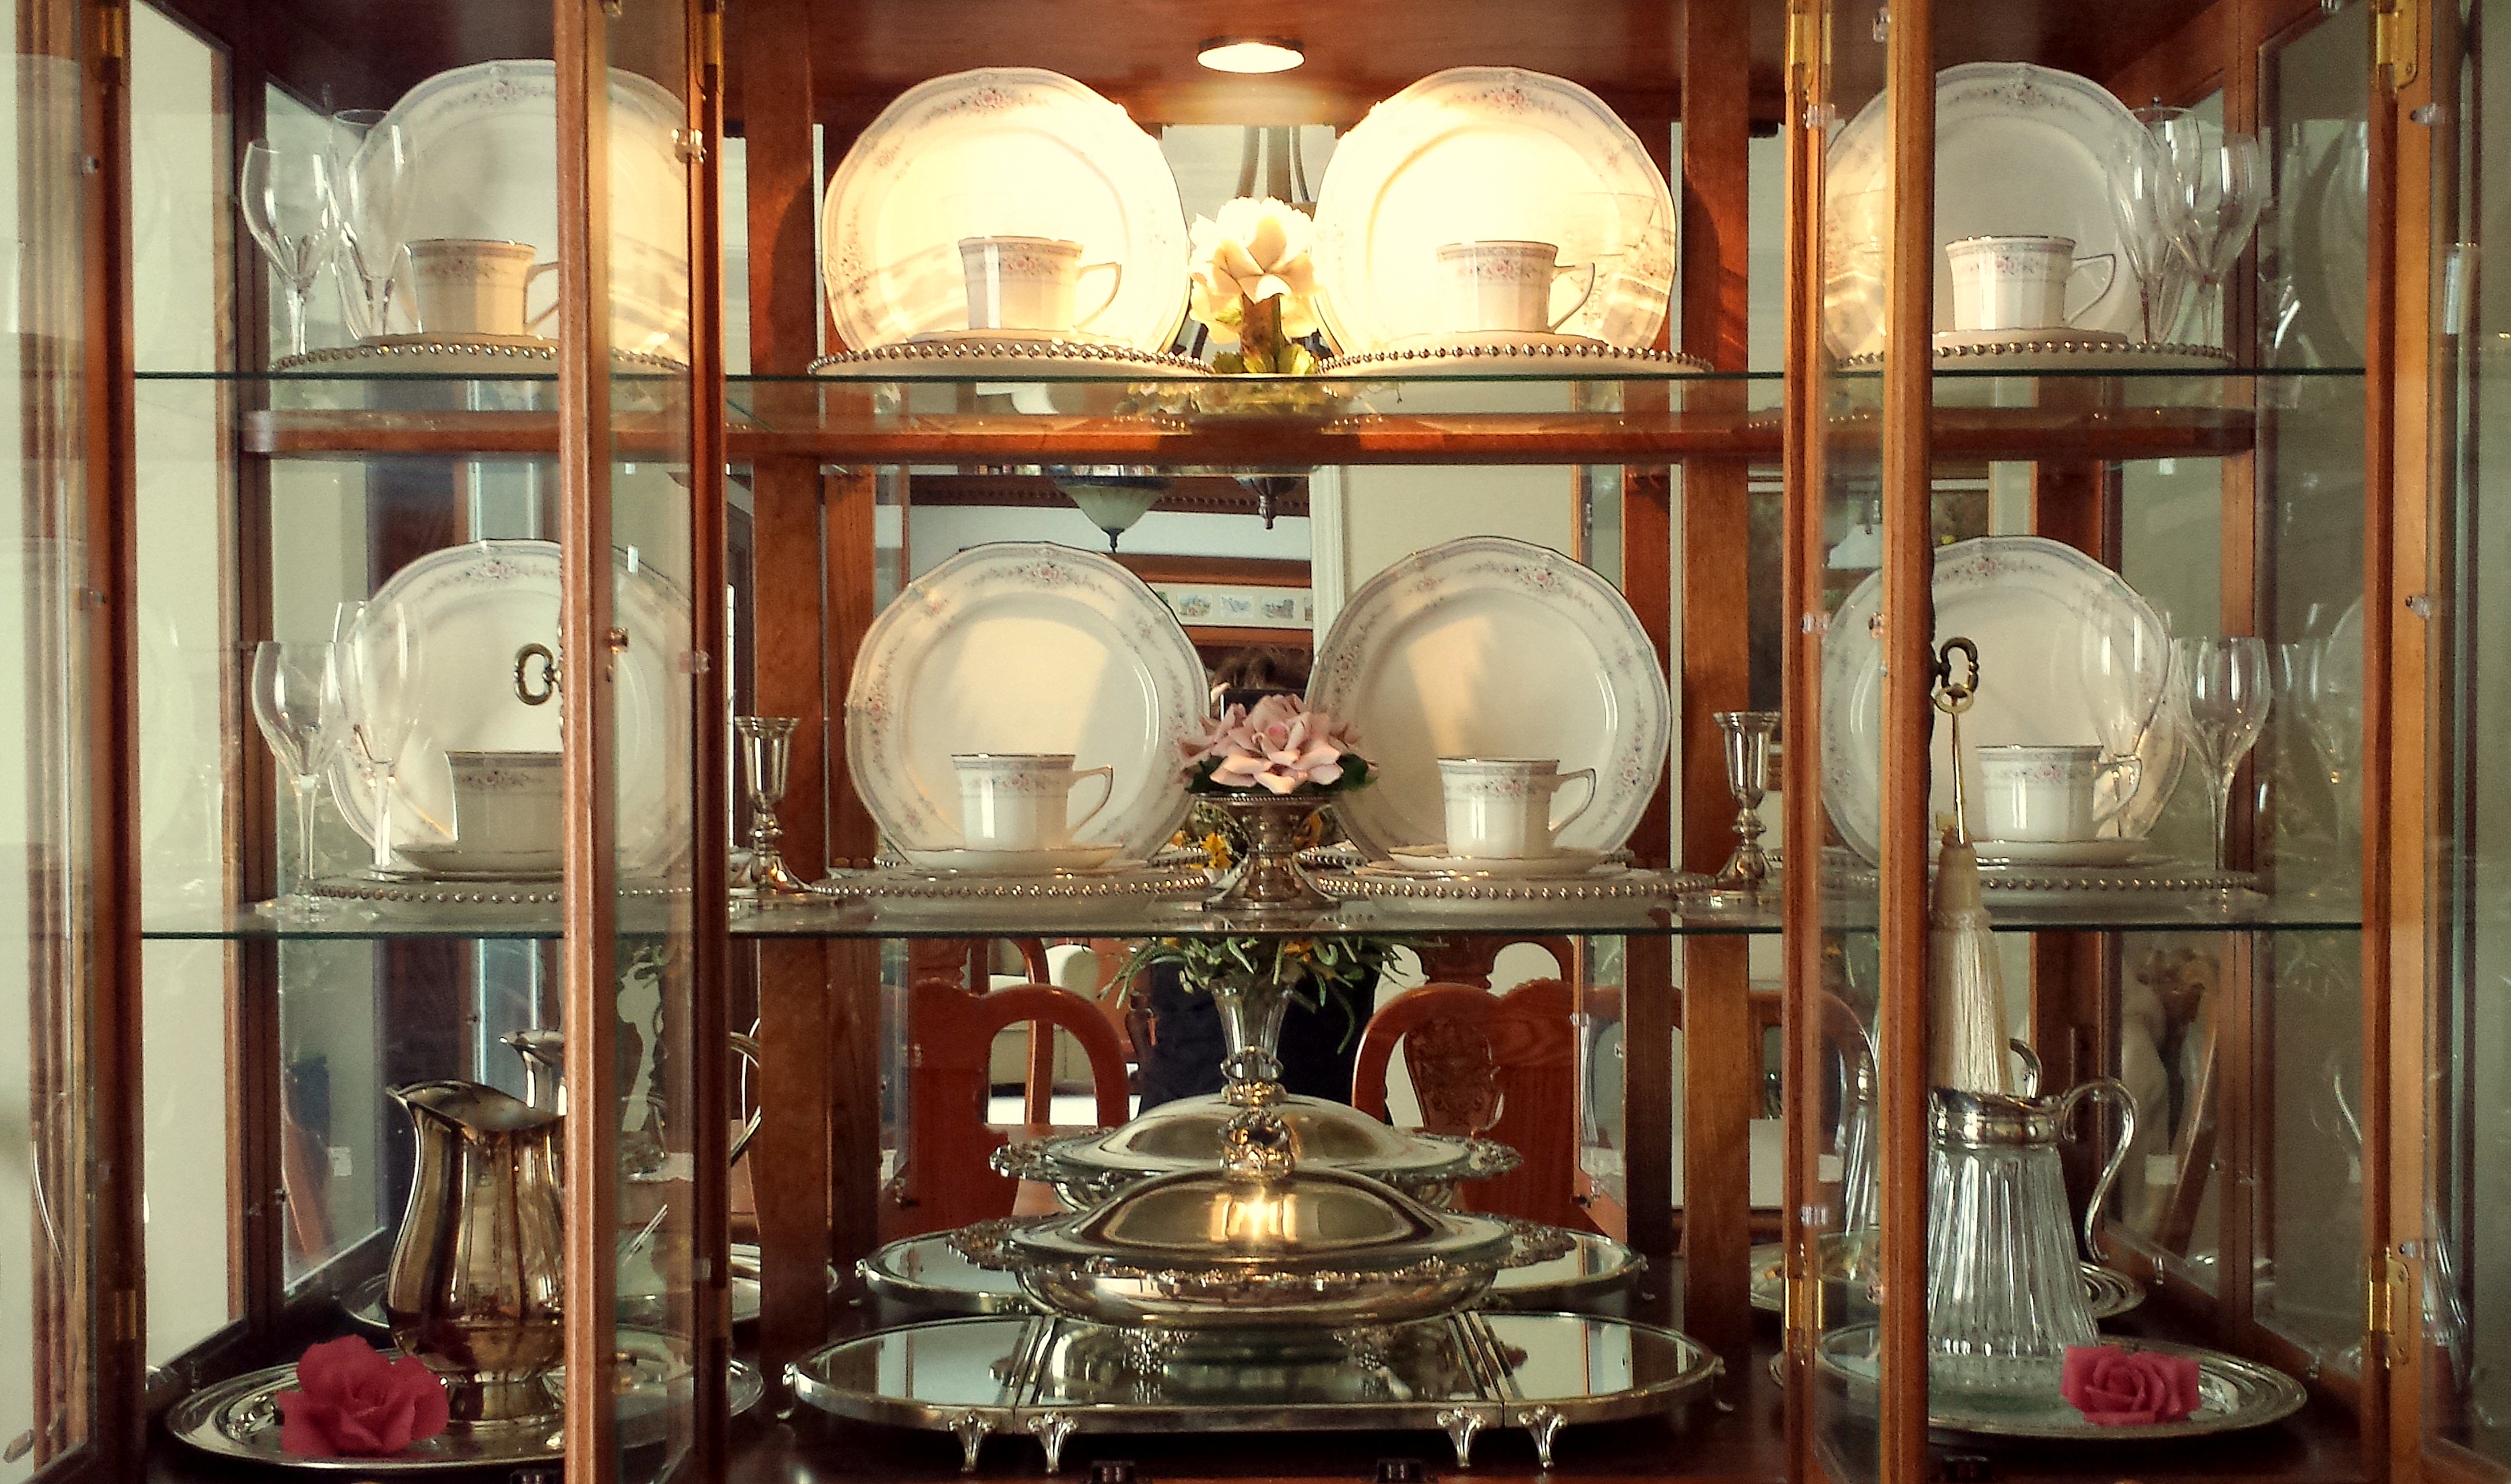
Displayed with the china are four sets of Tiffany crystal glasses that were a wedding present from a good friend, each set has a champagne glass and a wine glass.  On the top shelf I have displayed two vintage crystal champagne glasses that were given to me by my mother.  I have a very sentimental idea that when my children get married I will loan them the set as the “something old” from their maternal grandparents and it can be used as their wedding “toasting glasses”. (Unfortunately, in the photo above the bright light shining on the top shelf does not allow the vintage glasses to be seen)

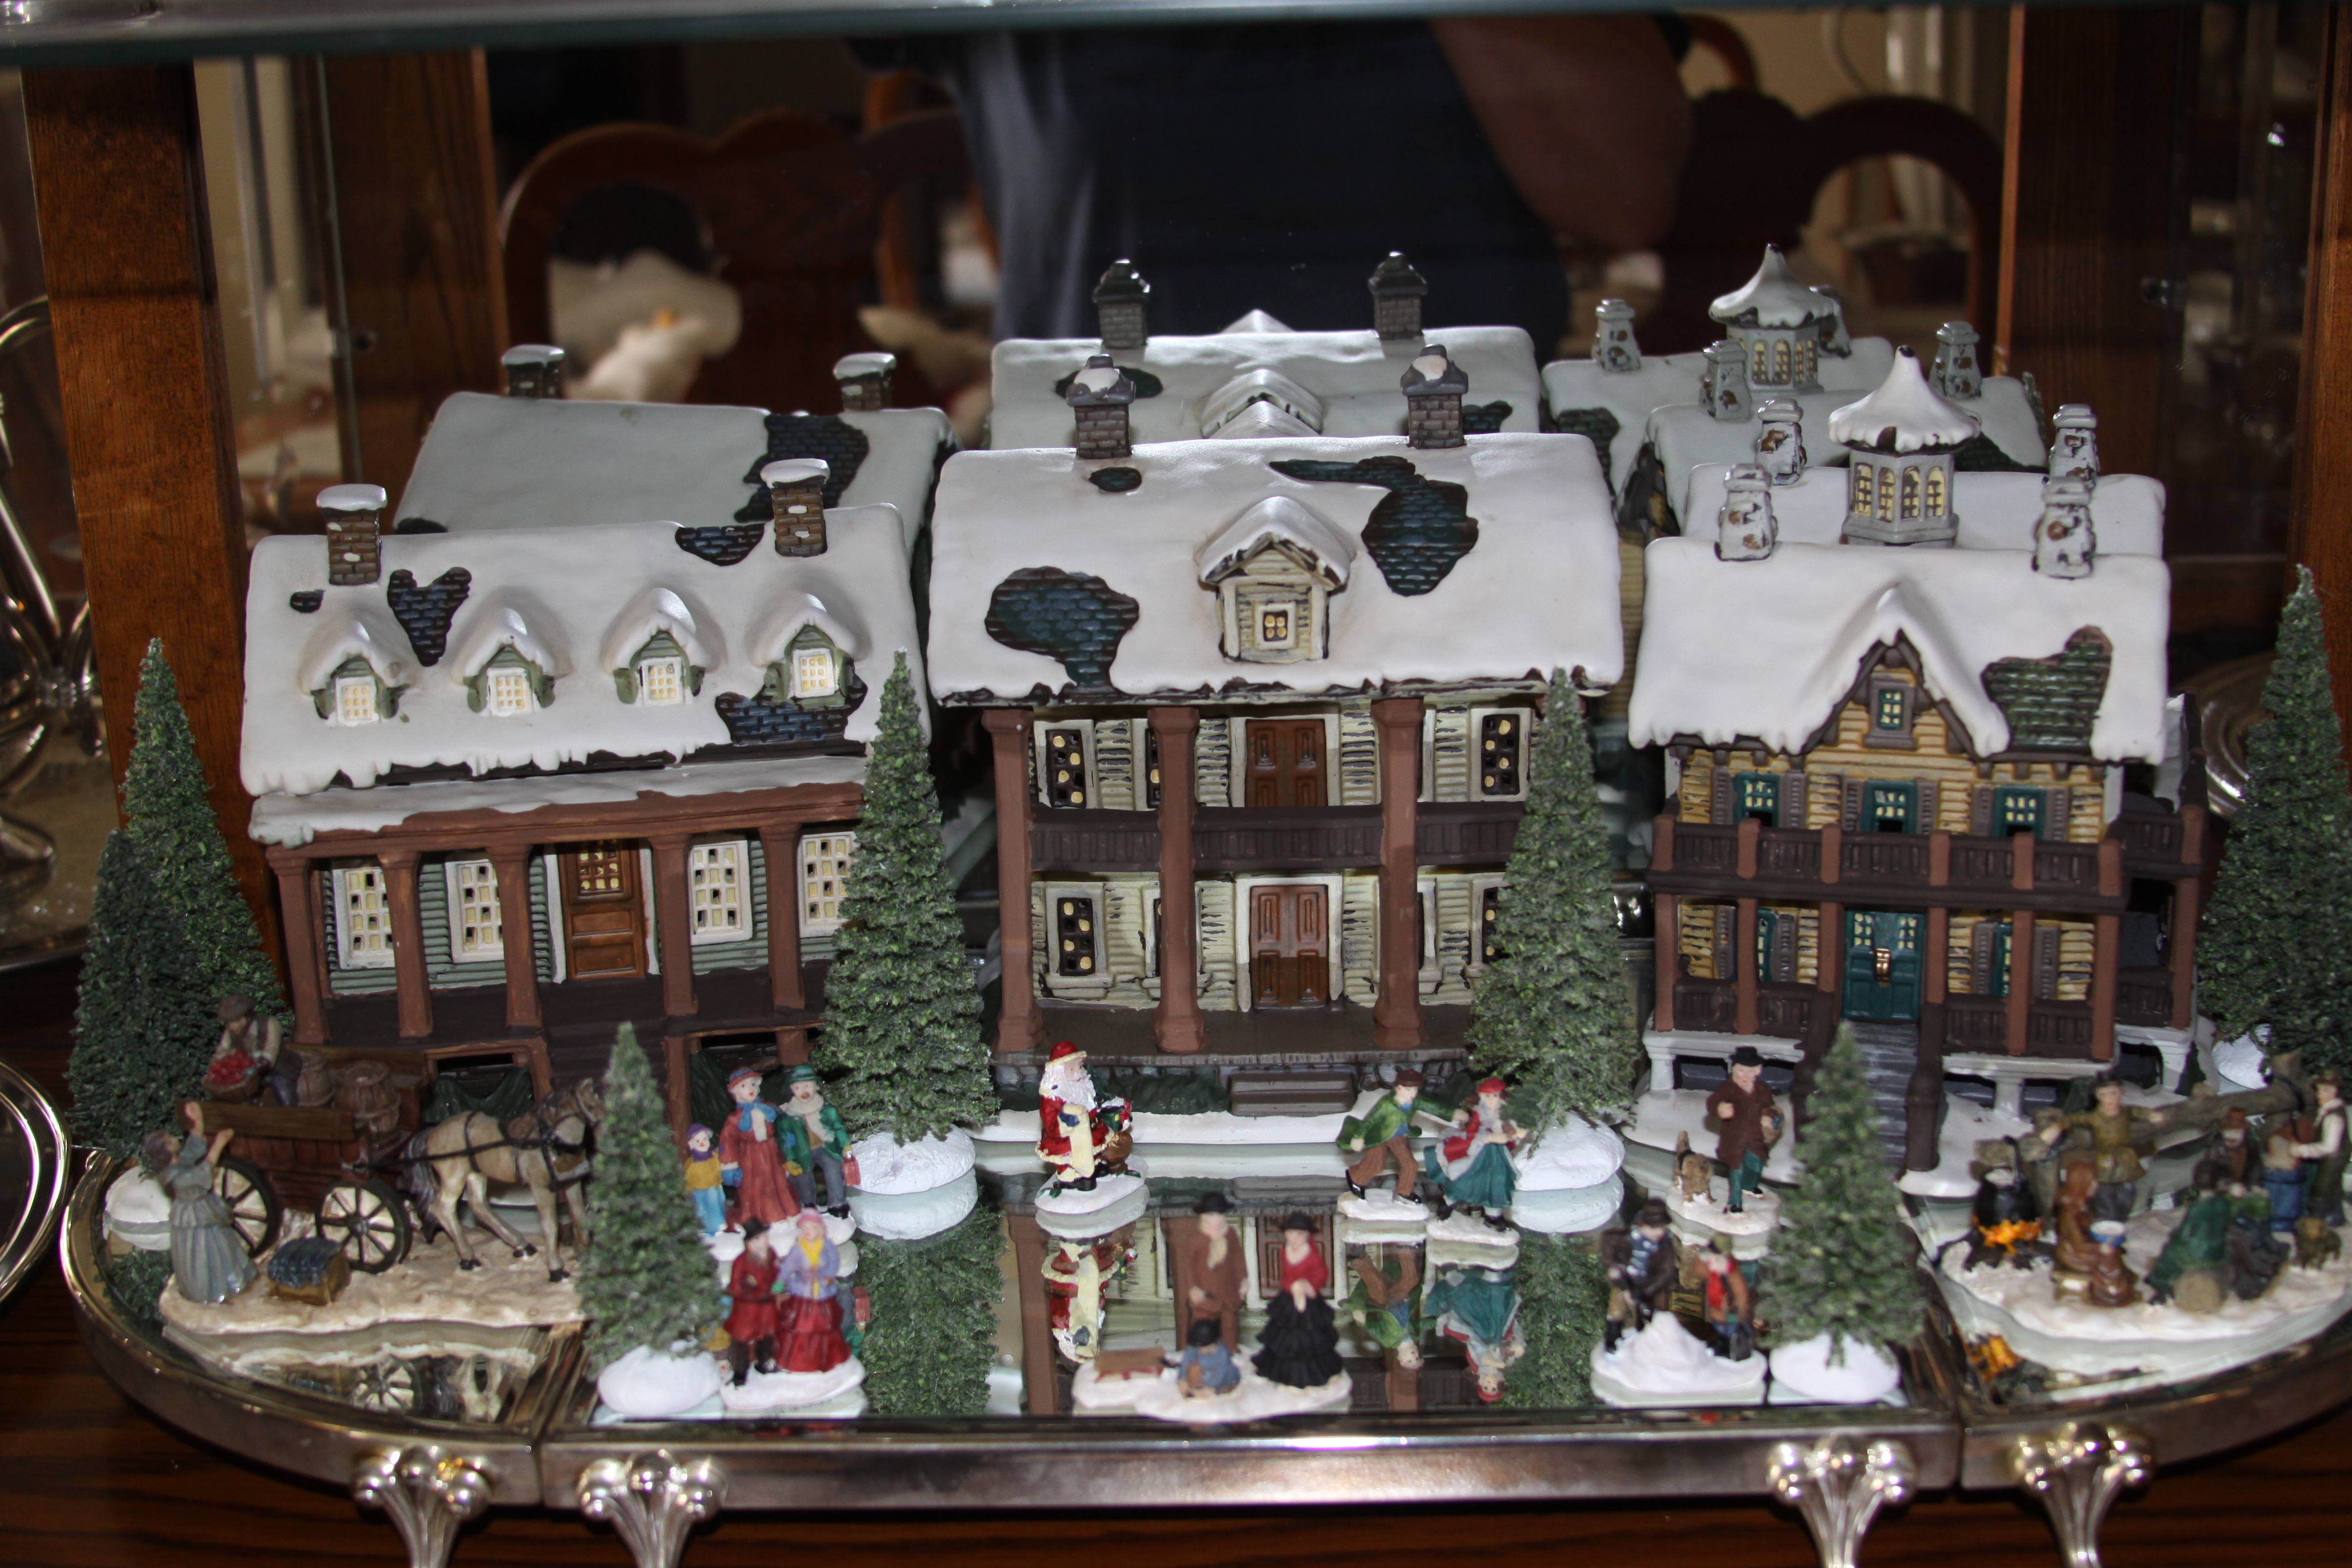
Inside the china cabinet I have also displayed several silver serving pieces.  On the second shelf there are two small silver candlesticks.  On the bottom shelf there are two round silver serving trays and placed on top on the left is a silver pitcher and on the right is a silver and glass pitcher.  In the middle of the bottom shelf there is a mirrored silver stand that is made in three sections, one square piece and two half rounded pieces.  I really like the versatility of stand since I can displayed the three pieces together for one long surface or separately, the square piece can be used as one stand or the two half pieces can be joined together to form a round stand.  During most of the year I displayed a silver oval-shaped covered serving piece on the top of the silver stand using all three pieces.  Shown below are two photos of how I have used the mirrored silver stand in other displays.  The photo on the right shows the stand used during the fall/winter season, I have displayed a set of three Currier and Ives porcelain house complete with small pine trees and several figurines.  The photo on the left shows the stand when it was used a couple of years ago on the dining room table as part of a New Year’s Party buffet, displayed on top of the stand is a beautiful floral arrangement of white poinsettias and crystal sprays in a silver bowl.  (For more information and photos about the other decorations for the party, please check out the Décor post New Year’s Party decorations)

2012 Christmas Currier and Ives 1a    New Year's Eve Dinner centerpeice

The last decorative items that are displayed in the china cabinet are several Napoleon Capodimonte porcelain rose figurines.  On the top shelf is a Napoleon white porcelain rose figurine which I had given to my mother as a birthday present many years ago because white roses were her favorite flower.  When she died recently the piece came back to me and it is displayed near my mother’s vintage glasses.  On the second shelf I have displayed another Napoleon porcelain rose figurine, the cluster of roses are a beautiful pale pink and the figurine is set on a small silver candleholder which I’ve used as a stand.  On the bottom shelf of the china cabinet I have displayed two more Napoleon porcelain rose figurines, these two figurines are a lovely deep shade of pink roses with stems and they are placed on top of the round silver trays on the left and right.

Seasonal china cabinet decorations

When decorating a china cabinet for the different holidays you will want to take into consideration that it is already filled with china, crystal and silver pieces so select just a few simple but elegant decorative seasonal items the compliment the colors of the china.  I am lucky because the Nortitake Rothschild pattern of my china is very neutral in color and the season items that I use blend very well with the other items already on display.

Spring/Easter –

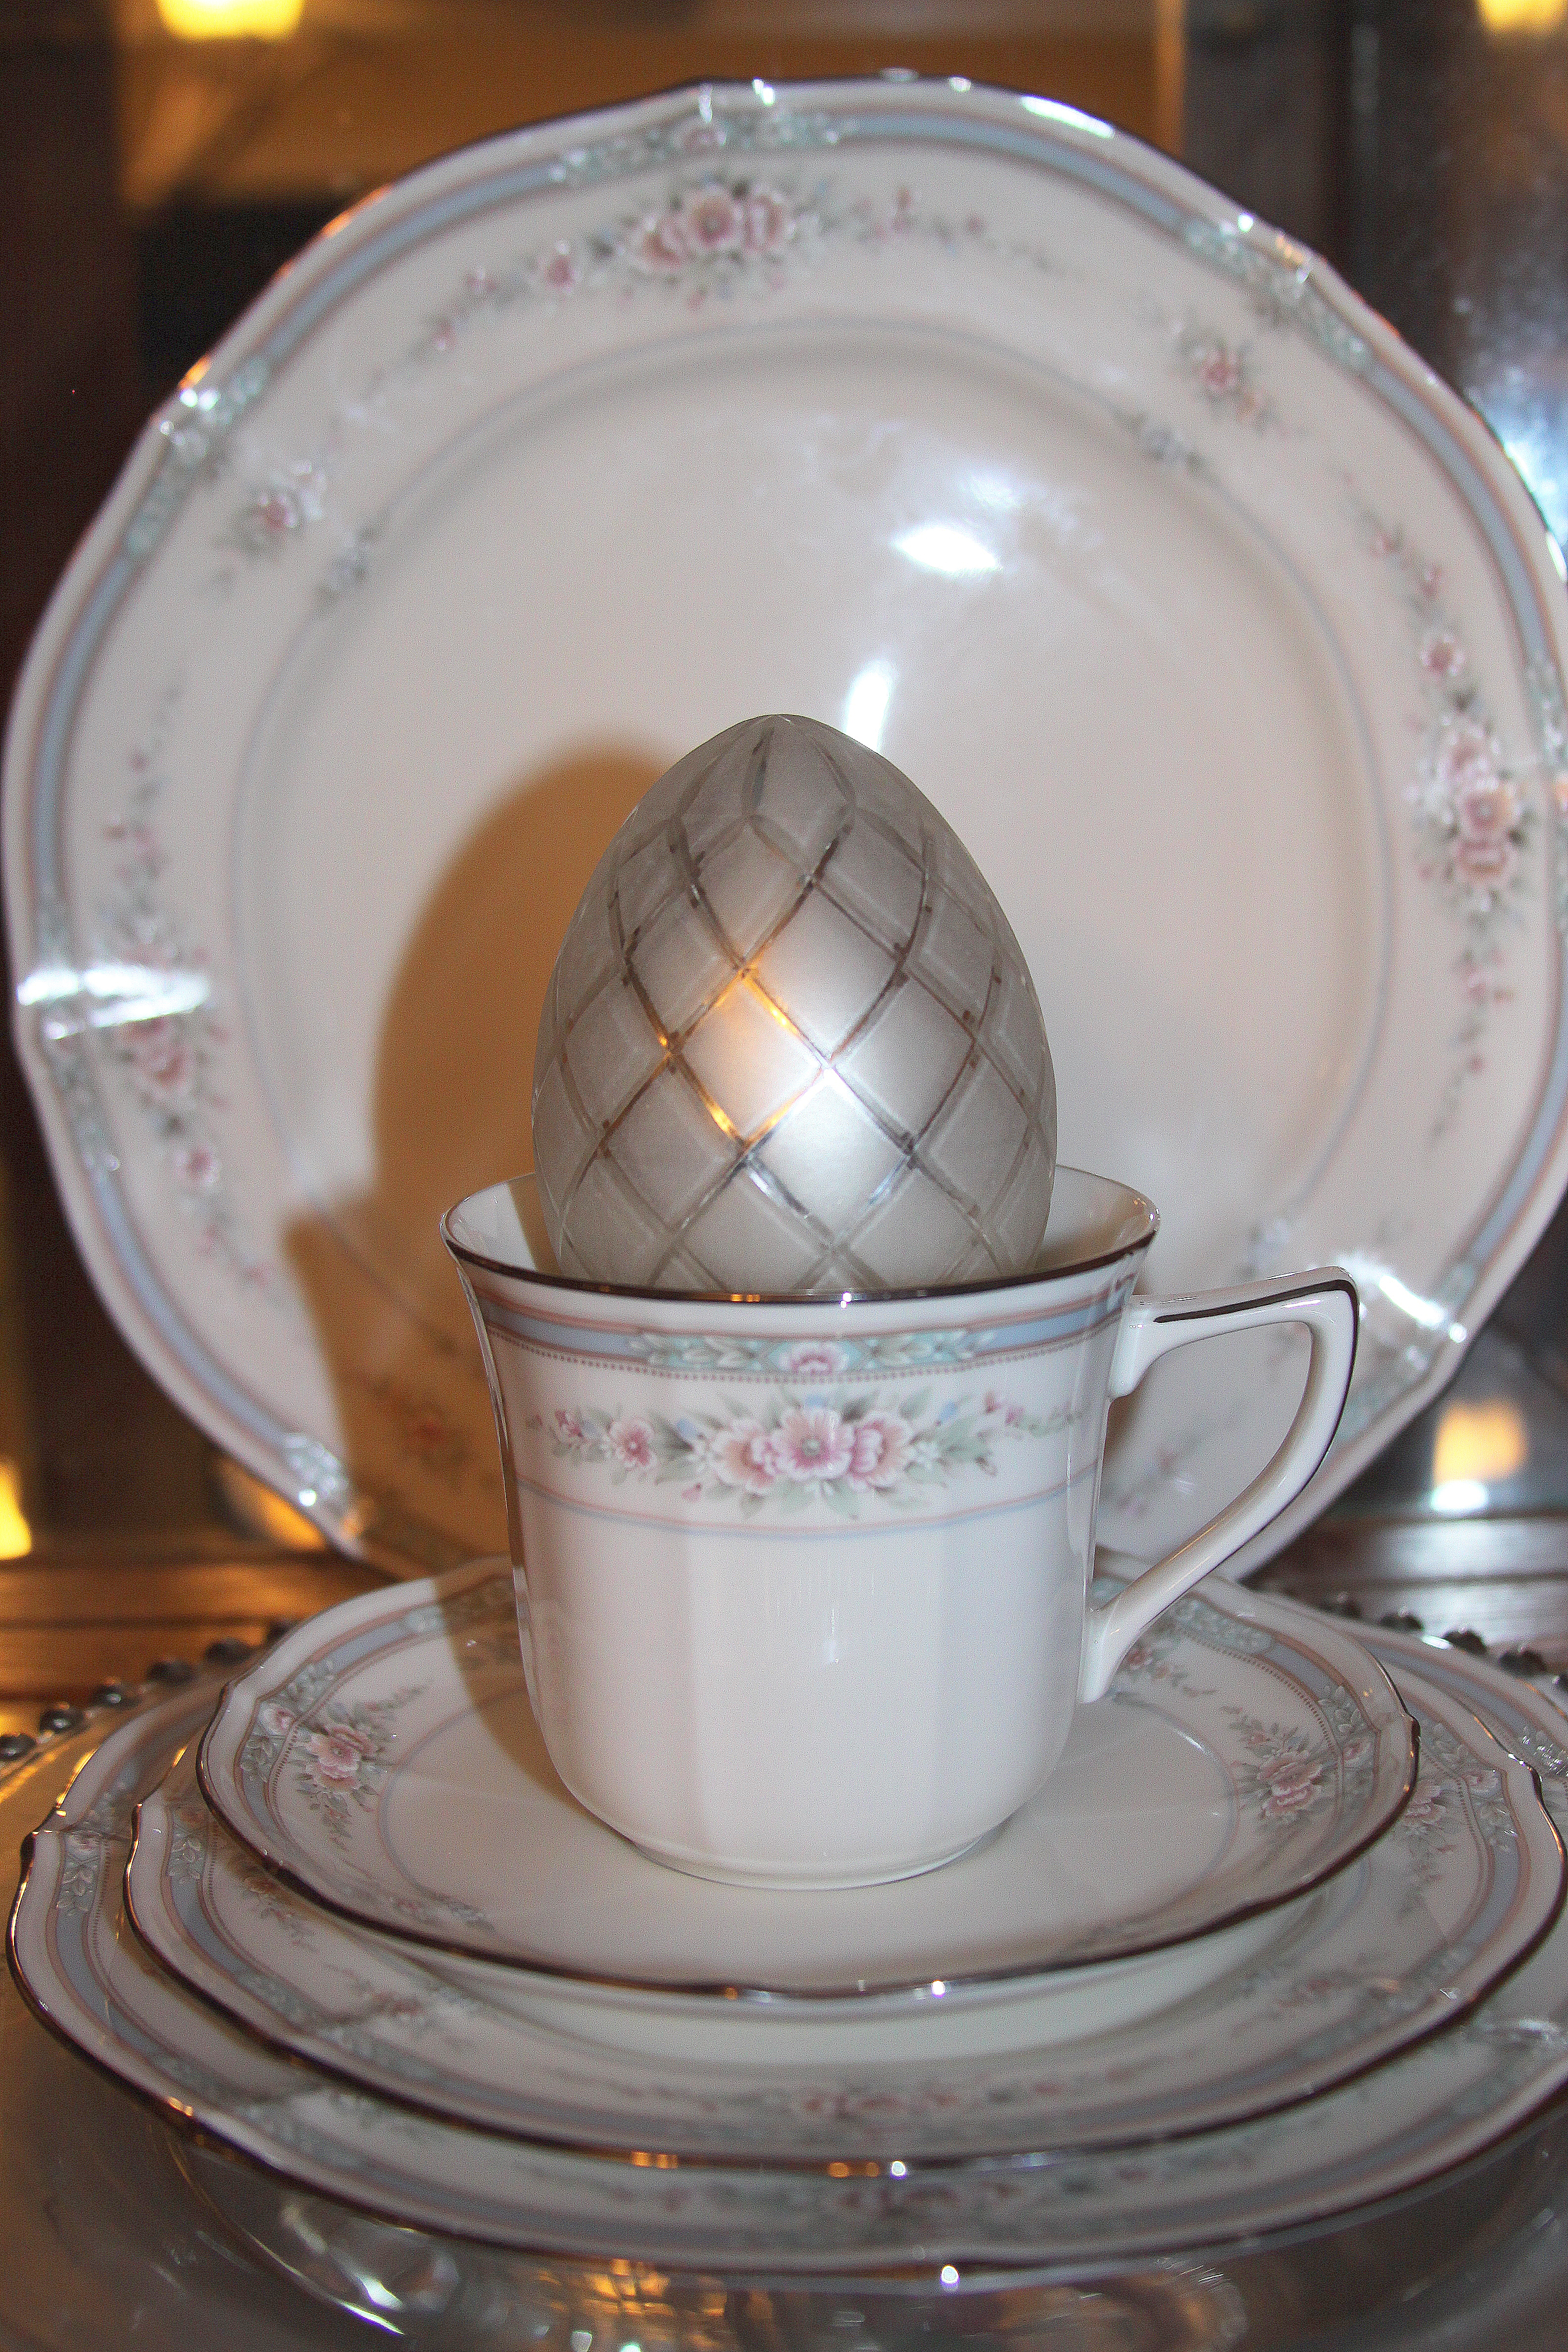
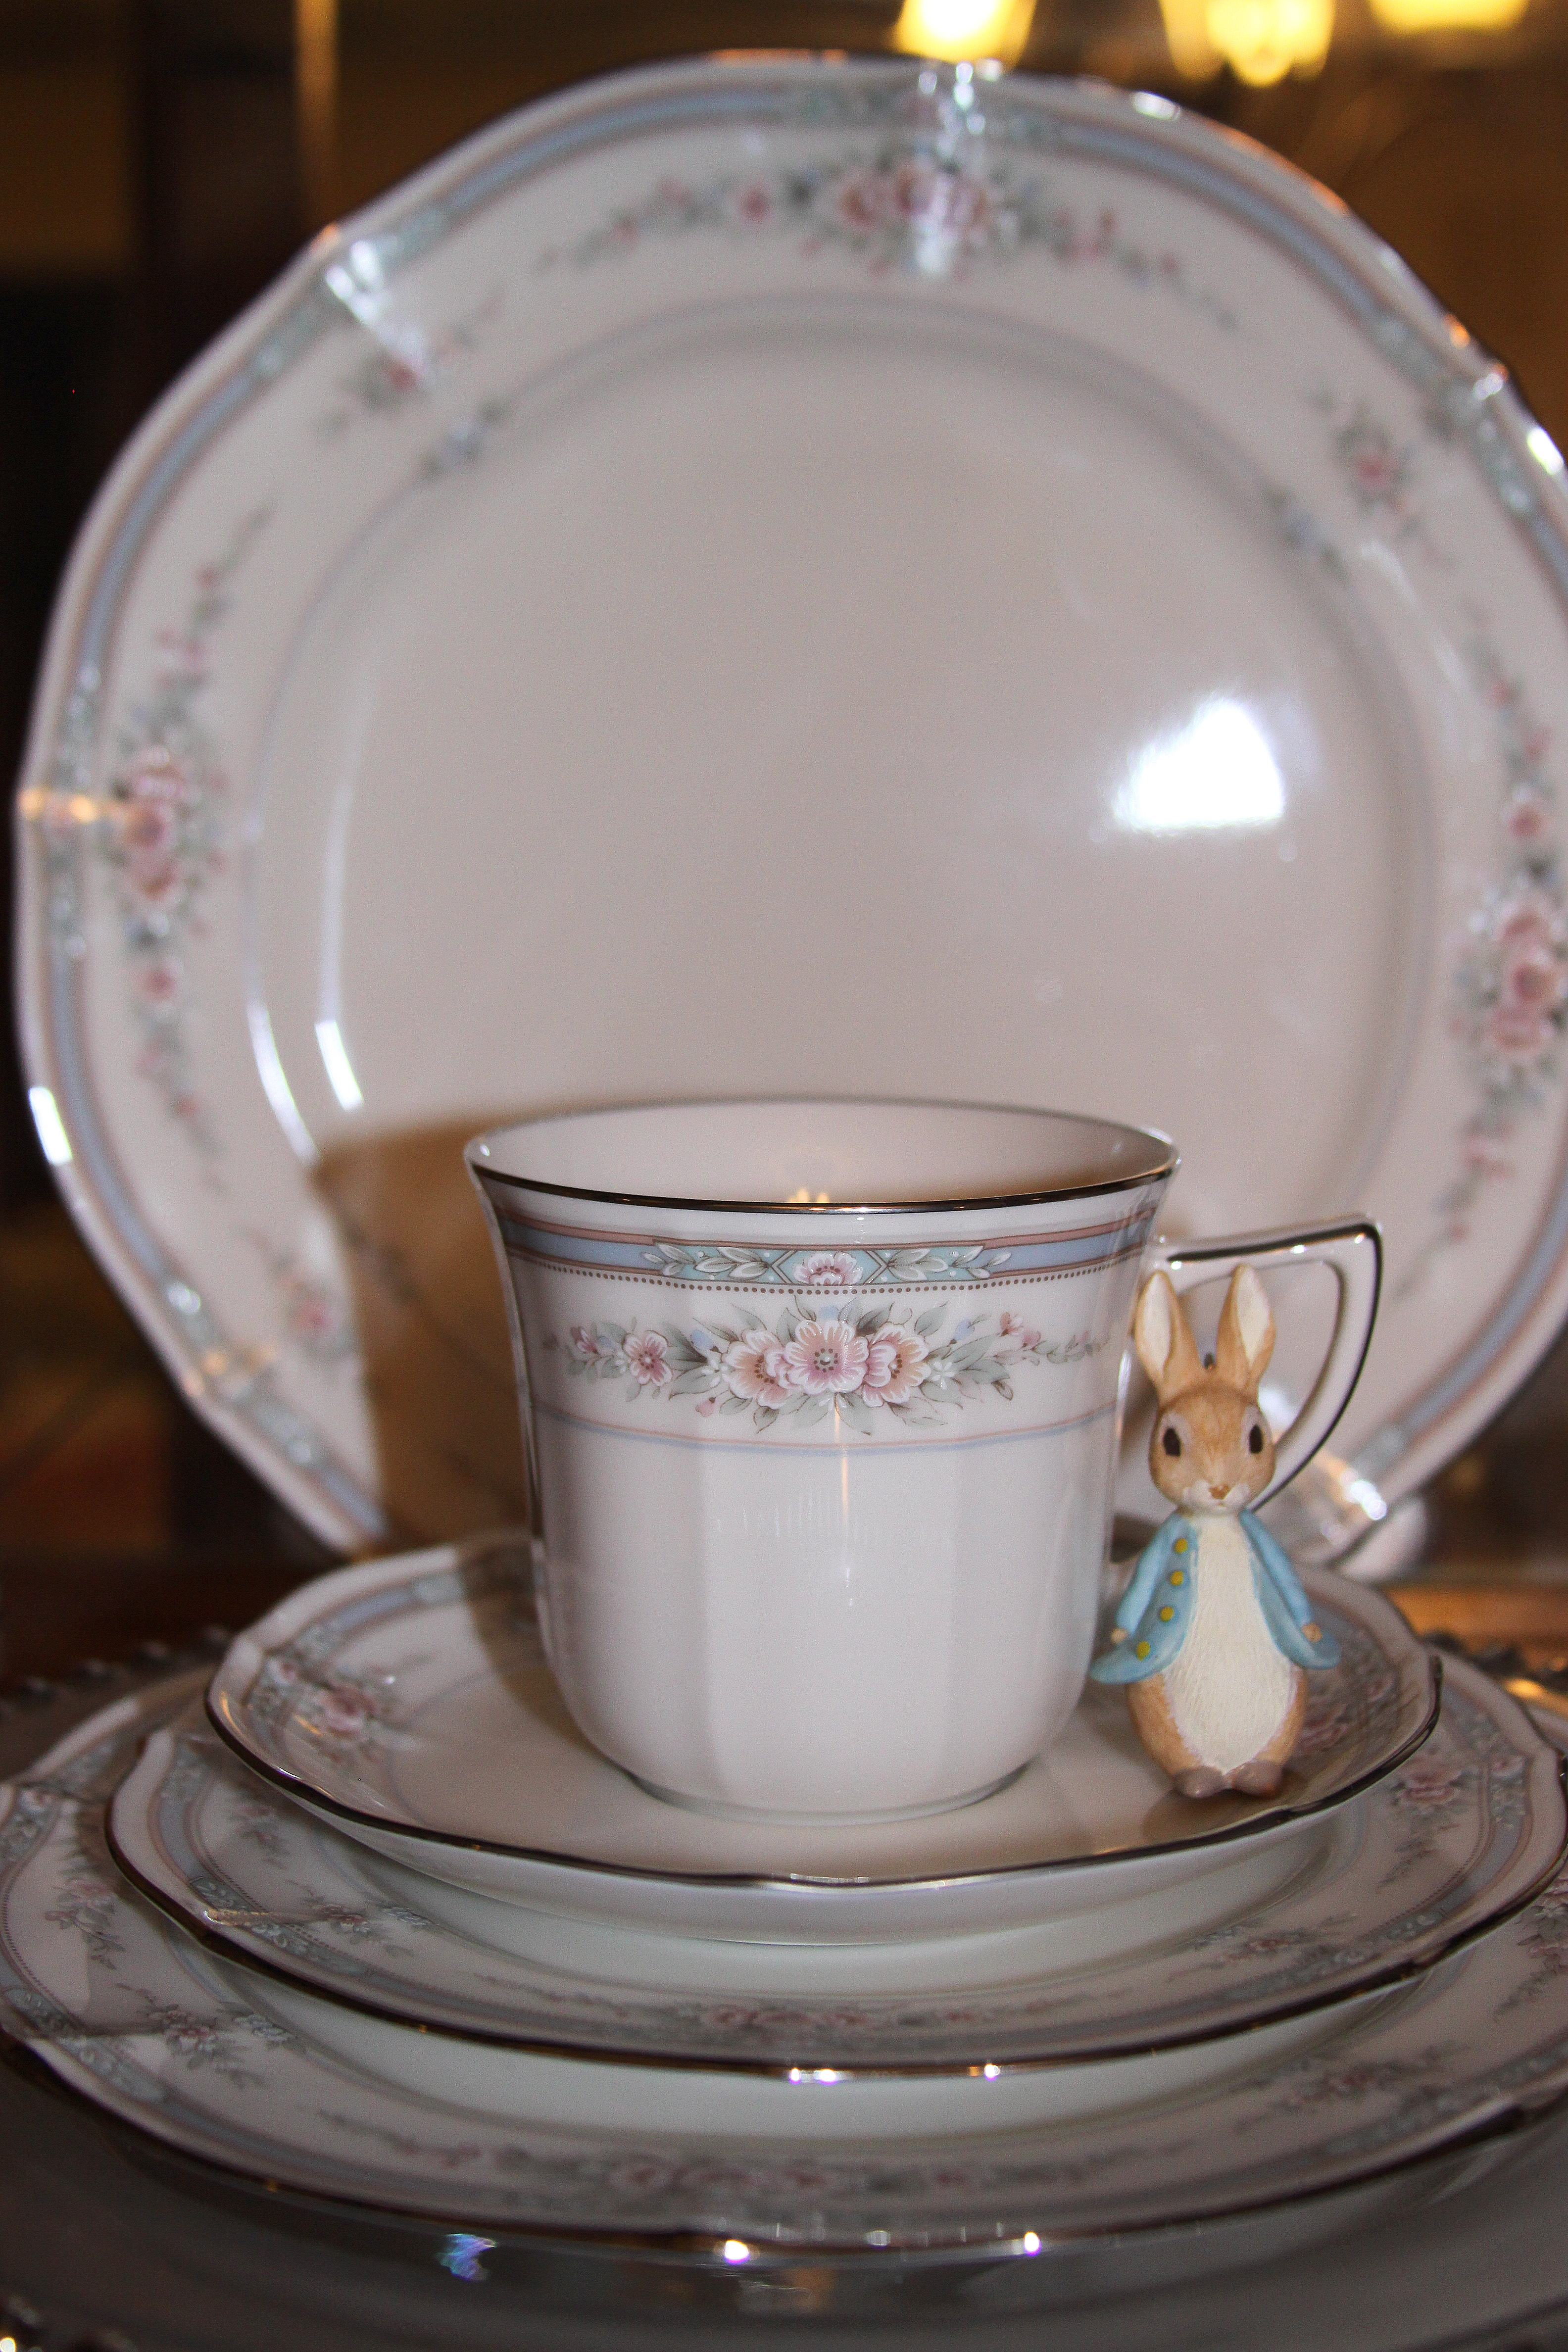
Several years ago I found four large silver and white glass eggs in a local retail store and for the Easter holiday I set the eggs inside four of the Noritake china tea cups which sit atop the stacked china place settings.  I also have collected a Hallmark series of Peter Rabbit themed ornaments over the years and I display these around the china cabinet resting against some of the teacups.  I think these Easter decorations add the perfect touch to decorating the china cabinet for the season.
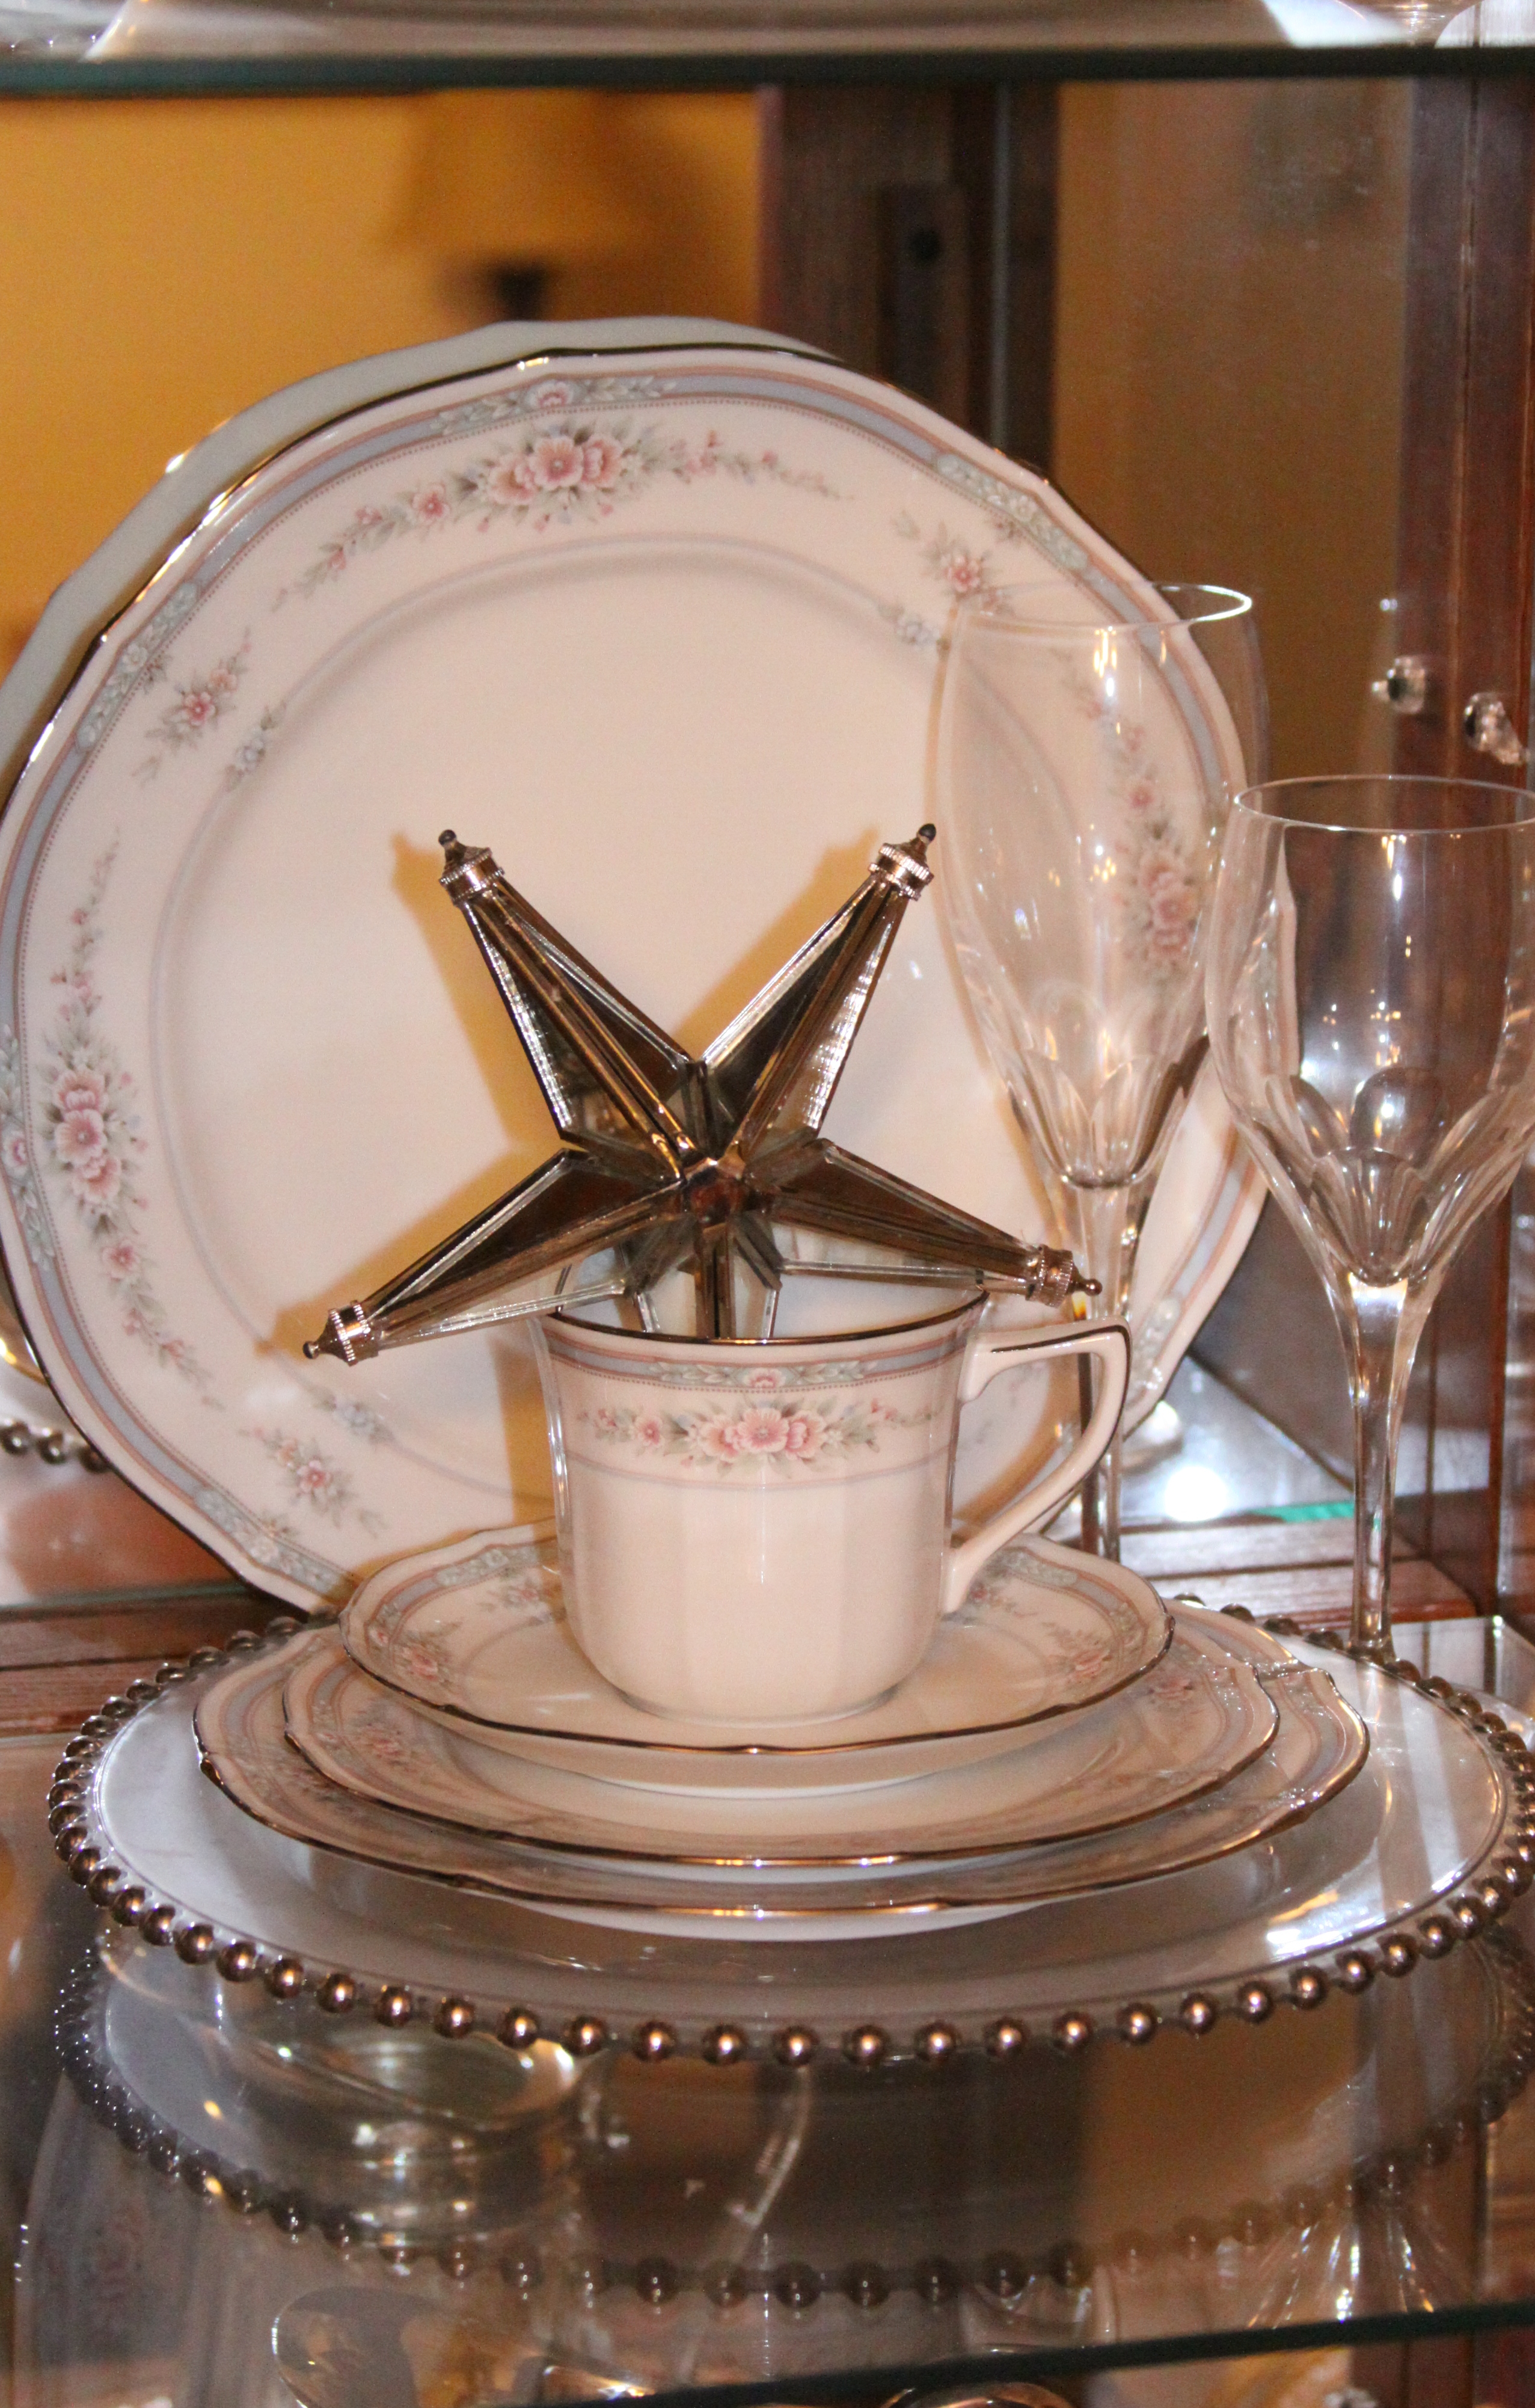
2013 Easter china cabinet closeup 2    2013 Easter china cabinet closeup 1

Patriotic –

For the Fourth of July holiday I was looking for some patriotic decorations for the china cabinet.  I wanted something that would match the elegance of the china, crystal and silver items already displayed in the cabinet.  A few years ago I had purchased four large stars made out of mirrors and trimmed in silver and they looked wonderful placed in the china tea cups and are a simple and the perfect patriotic touch.
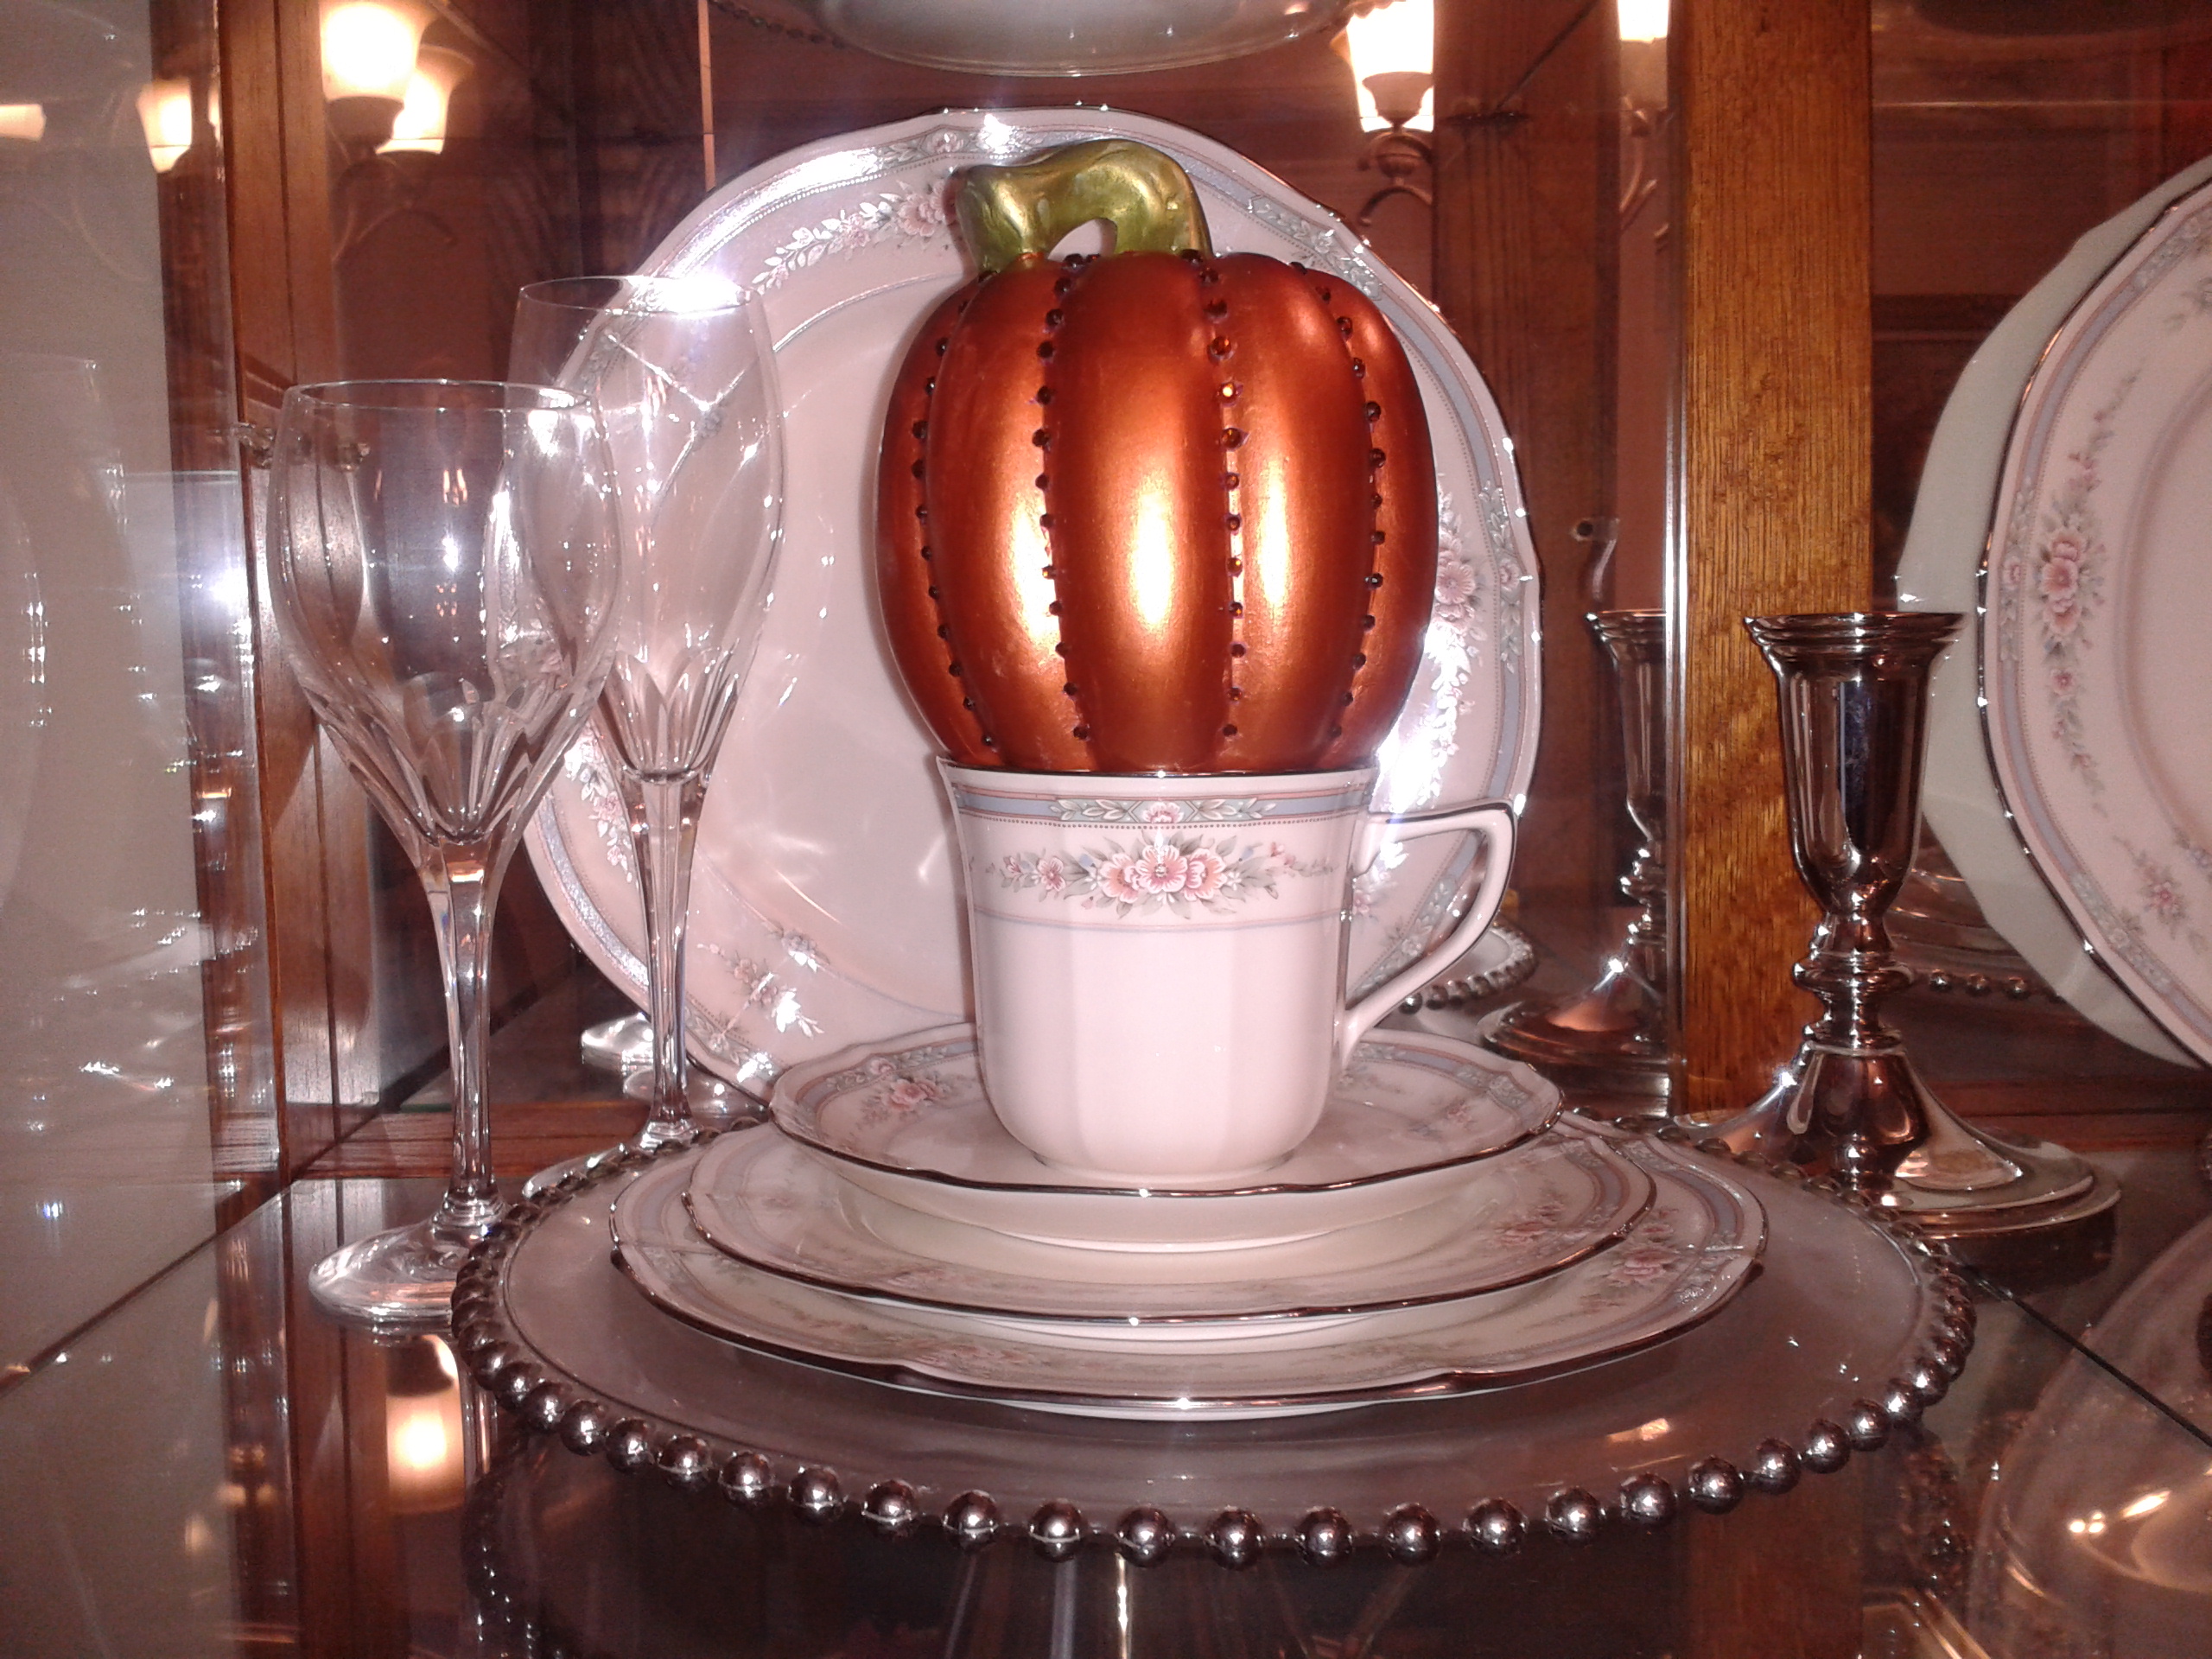
IMG_3666a

Fall/Autumn –

Once again I was looking for simple yet elegant decorative items to add to the china cabinet for the Halloween and Thanksgiving seasons.  I couldn’t find anything that I like in my local retail stores so I decided to make them.  I found two small ceramic pumpkins in my local craft store that I painted orange with green stems and decorated them with small topaz-colored crystals.  I placed the pumpkins on the two of the china tea cups and they looked wonderful in the china cabinet with the light reflecting off the crystals.  (For a supply list and instructions on making the jeweled pumpkins, please check out the Craft post link Jeweled Pumpkins)

2013-09-11 08.46.25

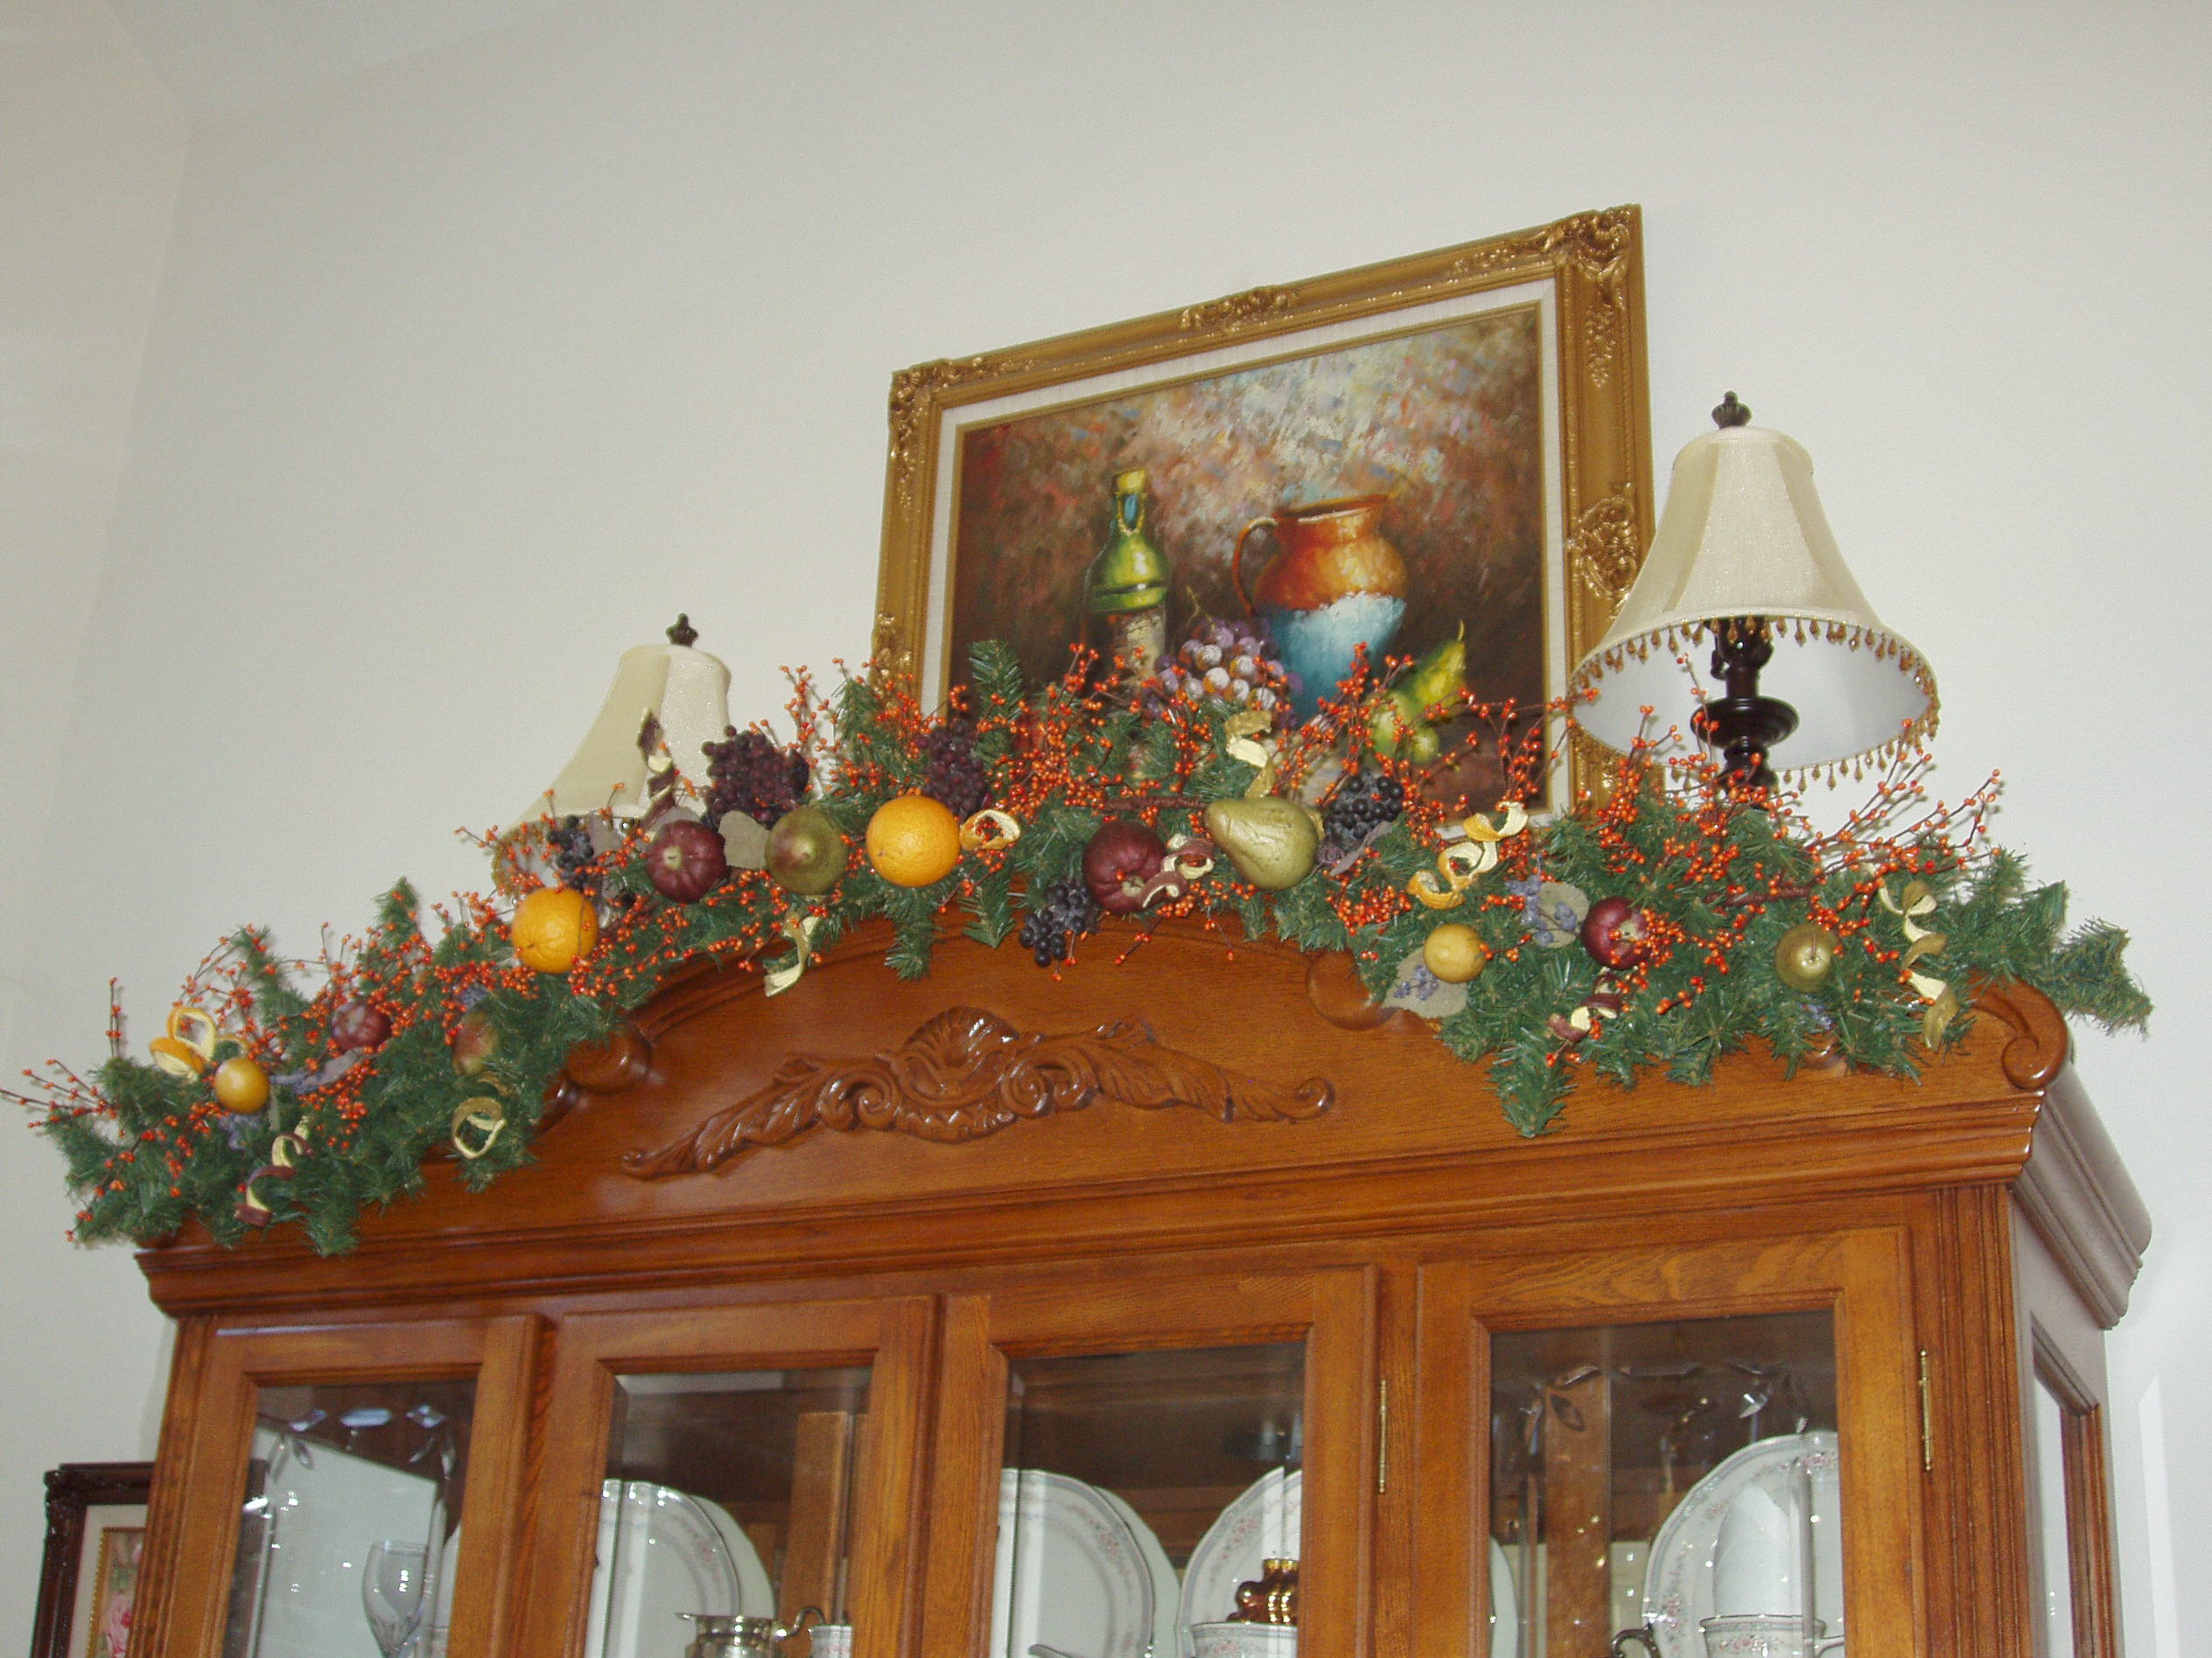
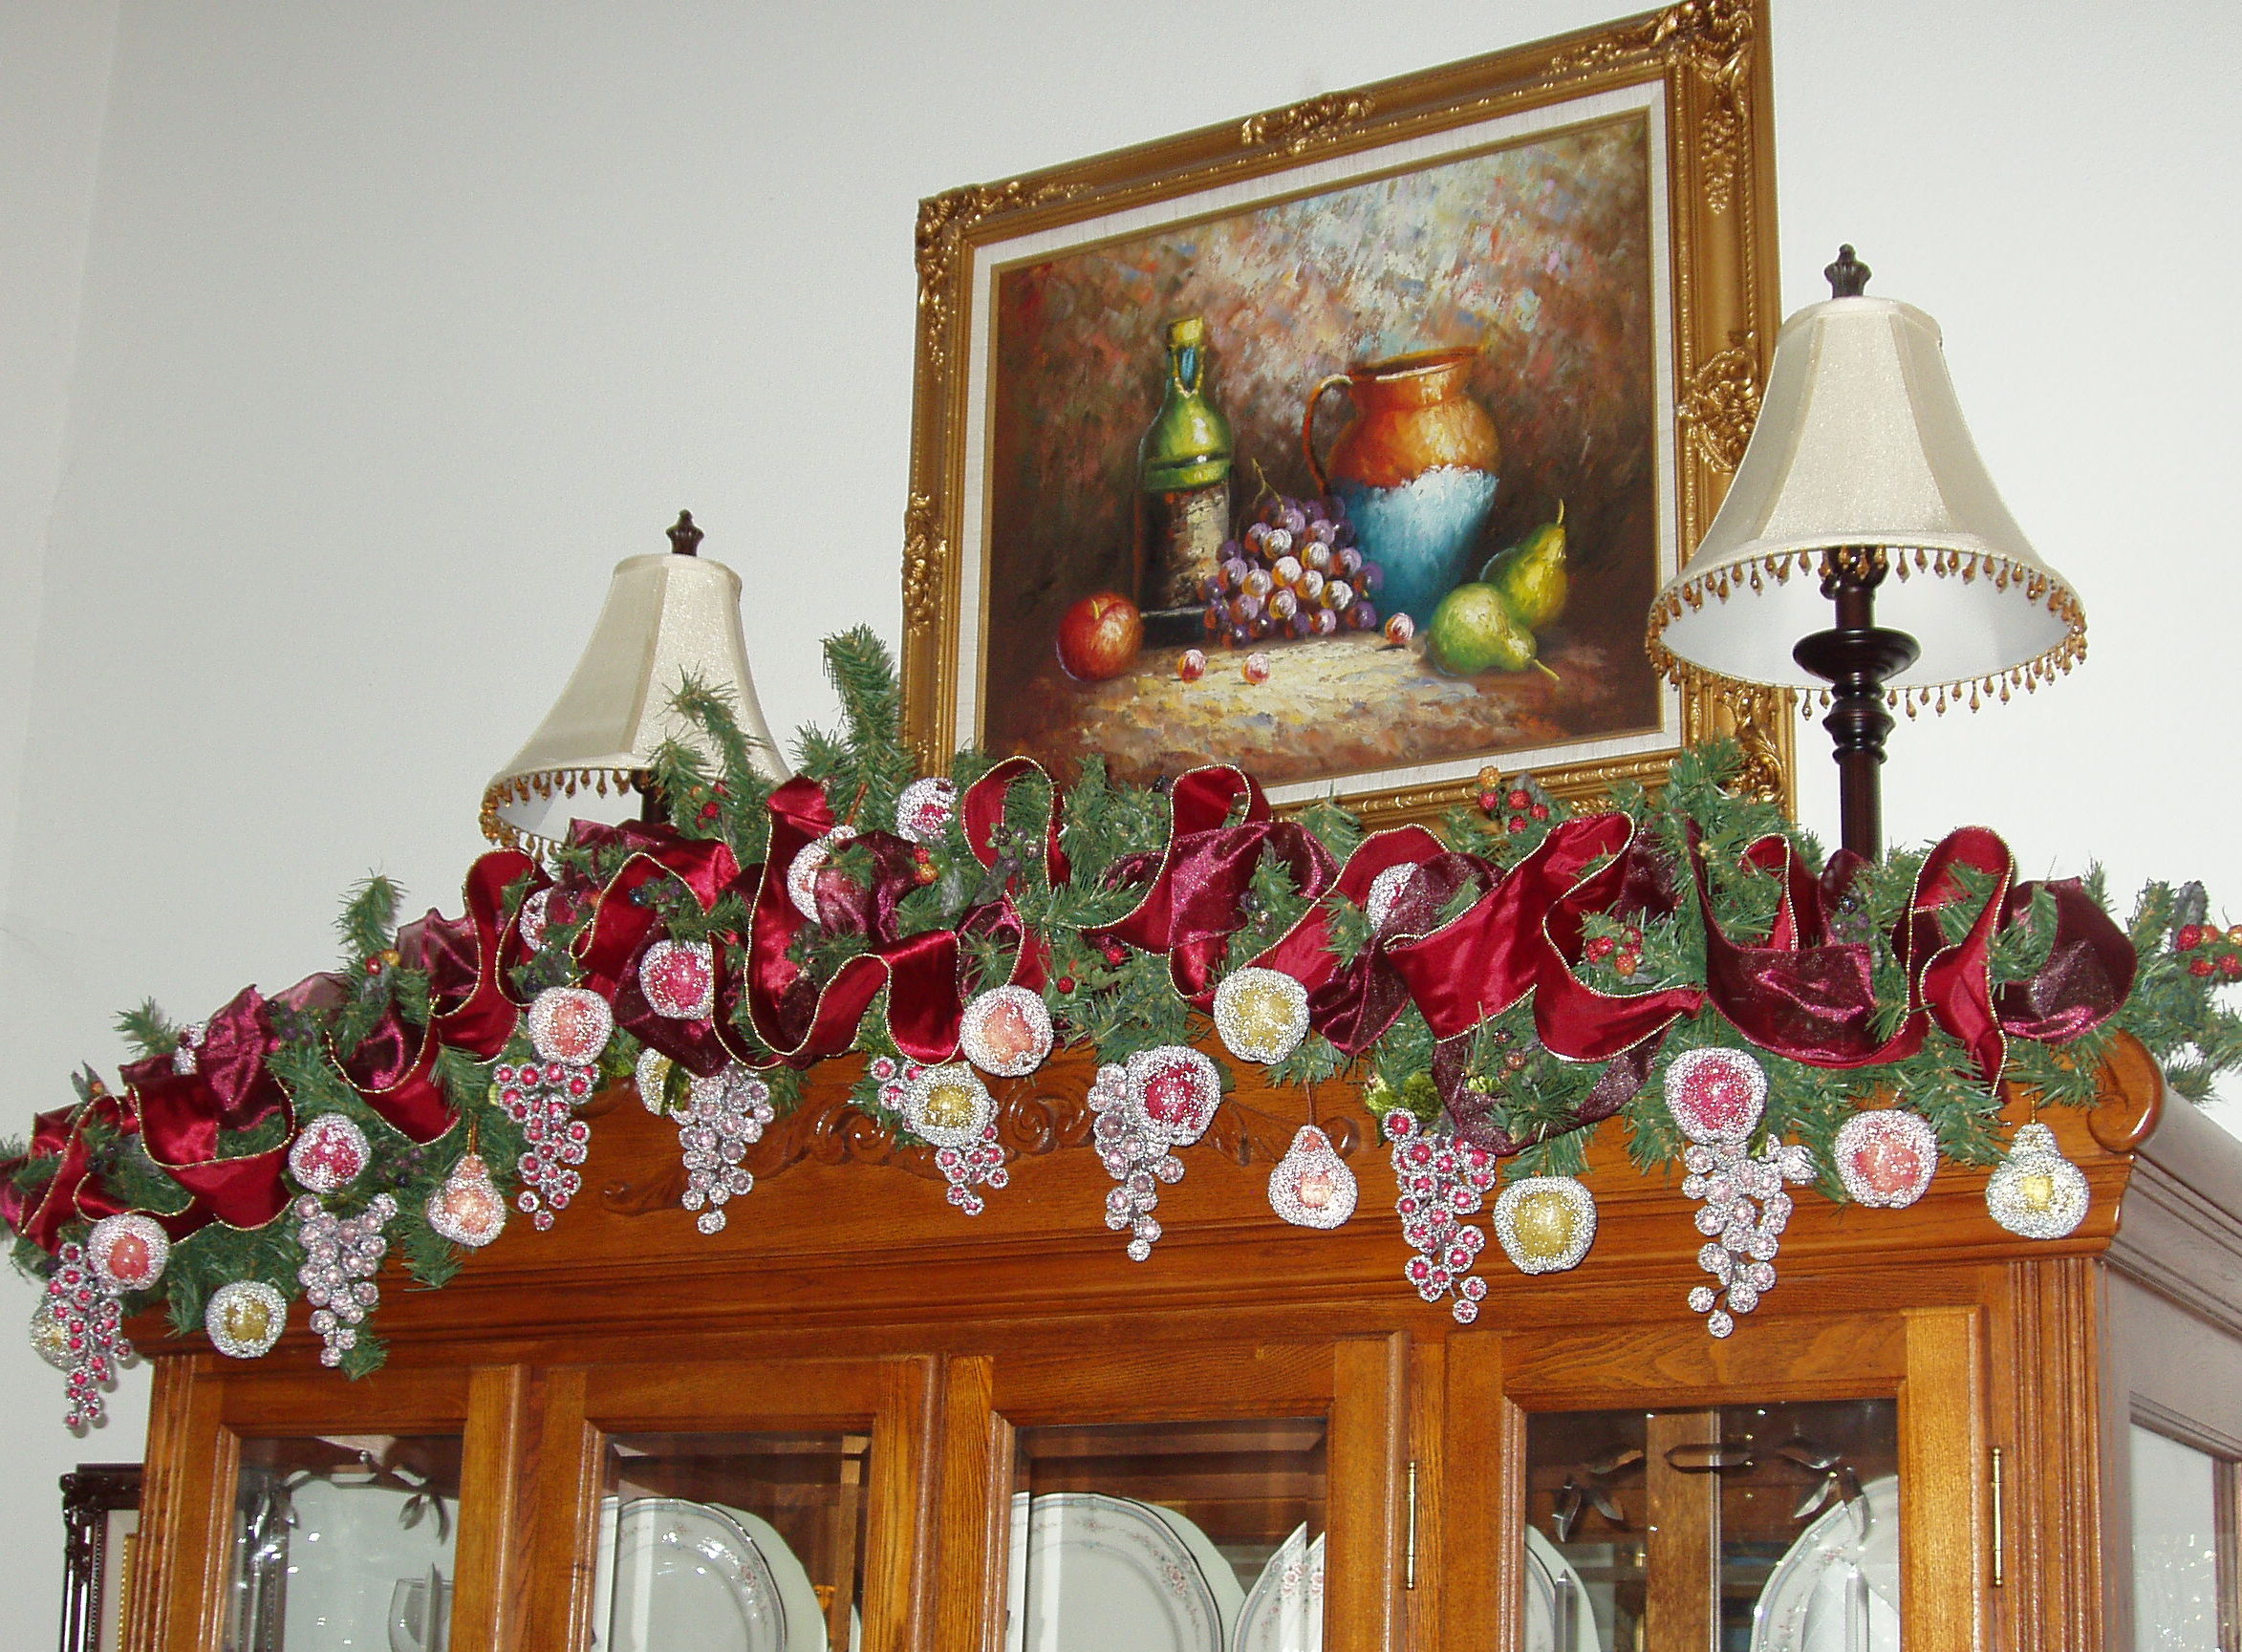
Finally, when decorating a china cabinet think about using the area outside of the cabinet to incorporate some design elements for the holiday seasons.  Shown below are three photos of the china cabinet decorated for the Fall and Christmas seasons.  When we lived in California our dining room had very high ceiling and I wanted to take advantage of that height by decorating the top of the cabinet with a pine garland.  The first photo was taken during Christmas 2002 and features the pine garland decorated with red poinsettias and holly leaves.  The second photo was taken during the Fall season in 2003 and it featured the pine garland decorated with a variety of fruit and berries.  The third photo was taken during Christmas 2003 and it features sugared fruit accented with a red silk ribbon.  (For more information about these decorations, check out the Décor post My Christmas Decorations from Past Years)

OLYMPUS DIGITAL CAMERA

2003 Fall - Dining Room China Cabinet    OLYMPUS DIGITAL CAMERA

As you can see, there are a variety of ways to decorate a china cabinet.  The important thing to remember is to keep the decorations to a minimum since the china, crystal and silver are the stars of the show!!

Decor – Christmas Home Decorations

CHRISTMAS… the weather has turned a little frosty and there might even be snow on the ground. (if you are lucky!)  If you live in a warmer climate, don’t worry about it because as soon as you put on some Christmas music to set the mood and start to unpack those Christmas decoration boxes you will definitely get into the holiday spirit!

After Thanksgiving, I pack up all the fall decorations and the boxes are stored down in the basement. Then, my husband brings up the Christmas decorations and it can take awhile because I have several boxes!  The process of decorating our house for Christmas can take several days but I enjoy every minute of it!  The interior house Christmas decorations I have collected over the years are not specific to a certain room and I can be creative with the different accessories, so I’m not limited to the same decorations in the same place every year and this keeps things interesting and fun!  I have fewer exterior house decorations and generally they are the same every year.  For the last couple of years we have decided not to decorate the outside of the house with lights to save both time and money – please don’t call us Scrooge!!

Like most holidays when I start the decorating process for the holiday season, I begin with setting up the Christmas decorations outside on the front porch.  Living in the Midwest the weather conditions can get very harsh and I usually keep all my exterior decorations under the roof of the porch to keep everything safe from the elements.  I start with a couple of pre-lite artificial Christmas trees and for the last couple of years I have added a pre-lite snowman bought at a Target after holiday sale.  I liked the size of the snowman but embellished him a little by gluing on larger black buttons, topped it off with an old black winter hat and this year I’m going to change the wire nose and add a large artificial carrot instead!  To complete the front porch, I hang a Christmas wreath on the front door.  I have three different wreaths that I rotate from year to year. One is a large pine wreath decorated with pinecones and red berry sprays, another is a wreath covered completely in velvet holly leaves and the third one is a pine cone wreath accented with holly leaves and red berries.

With the outside of the house done I can now start decorating the inside of the house.  In the entry hall I set up a whimsical 24” Santa displayed with two elves hanging onto the branches of a small Christmas tree.  Nearby I have a pair of black ice skates hanging from an antique sled with a Boyd’s moose named Mortimer.  Whenever I am shopping in the antique stores, I always look for holiday items – on my wish list is a set of old skis and poles and hopefully I will be able to find it before next year.  This year I have added a Christmas Kissing Ball and I think it will be fun for our guests’ arrival and departures this holiday season!  (Please look for the December Craft post for instructions on how to make your own Christmas Kissing Ball)


The next room of the house is our library; this is the room where all our books and vacation memorabilia are in bookshelves that fill up an entire wall.  On the other side of the room, I keep my Boyd’s Bear collection year-round in a small lawyer’s bookcase.  I add my Boyd’s Christmas figurines and I decorate the two shelves with pine branches to give it a festive Christmas look.  The bottom shelf holds the Boyd’s Bear Village and I decorate the display with winter trees and tiny snowflakes.  I also add a Boyd’s Bear Santa to one of the ivory chairs in the library.  On another side of the room, I have displayed for the last a couple of years our Fontanini Nativity set on an antique table that my husband’s Grandmother kindly gave us.  This heirloom table is very special to us because it has been in the family for a very long time. (Please see a previous December Décor post for more detailed information on the Fontanini Nativity Display)

The next room to decorate is the family room.  One wall of the room has a fireplace and mantel flanked by two bookcases/cabinets.  For the past few years I have displayed our Department 56 North Pole Village in the bookshelf but this year I will be doing something new and it will be displayed across the fireplace mantel.  The fireplace mantel is also the place where we traditionally hang our Christmas stockings.  Next, to complete the family room, I will set-up a display on the fireplace hearth with a traditional 29” Santa, his two reindeers and a small Christmas tree. (Please check out my previous December Décor posts for more detailed information on the Department 56 North Pole Village display and the Christmas stockings and Fireplace Mantel decorations

In the dining room, the Memory Tree set out for Thanksgiving will be moved to the family room.  (Please refer to last month’s Craft post for ideas and tips on how to create your own family Memory Tree)  In November I had displayed in the china cabinet three Currier and Ives porcelain houses I purchased at a local craft store a few years ago.  Our china cabinet has a mirrored back so you are able to see both the back and the front of the display of the houses.  I add a few small pine trees and additional figurines and these are set-up on a beautiful elongated mirror and silver stand.    This display is an example of a decoration that works for both Thanksgiving and Christmas seasons – I love when that happens!  This year I have added two new Craft projects to our dining room decorations – a Victorian inspired fruit arrangement that I made last month for our Thanksgiving table and a Cranberry topiary inspired by one I had seen in a past HGTV White House Christmas shows.  I think they are great additions to our traditional dining room design.  (Please look for full instructions on making both projects – the Fall Victorian Centerpiece is a November Craft post and the Cranberry Topiary is a December Craft post)

The last room on the main floor of the house to decorate for the holidays is the kitchen.  Now, this can get a little tricky because the room needs to function as a full service kitchen, so the counters need to stay clear of decorations because food and meals are being prepared and eaten at the table on a daily basis.  We have a fairly large kitchen that is open to the family room and these two rooms of the house are where we spend most of our time.

Several years ago I found the perfect Christmas theme for the holiday decorations in the kitchen – gingerbread and candy canes!!  Since there are several areas in the kitchen that I decorate for Christmas, I start with an area that has a long chair height counter with upper and lower cabinets.  This is the area my daughter does her homework and the counter needs to stay free of clutter.  So, in the space above the upper cabinets I usually set-up a Department 56 gingerbread train that is displayed with pine boughs, red berry sprays and this year I have added “white icing” snowflakes to give it a different look.  I also hang two holly wreaths with red berries and gingerbread snowflakes on the cabinet doors.


The last area that needs some Christmas attention is the area by the stove and oven.  Please be careful with the holiday decorations in this area because with the extreme heat from cooking you don’t want anything that is flammable or a fire hazard.  I have a basket of artificial vegetables on the counter and I add a cute “North Pole Candy Canes” container that holds some wooden candy canes and pine sprays.  I also hang some Santa towels from the oven bar handle.

I hope you enjoyed the tour of our house decorated for the holiday season and I try to create decorations that are classic and traditional but fun and interesting.  Please let me know your comments or suggestions; I would love to hear what you think.

Decor – Fall Home Decorations

FALL … the weather turns a little cooler; there is a fire in the fireplace, and steaming hot chocolate in mugs to drink!  It is now the time to change out the spring/summer decorations and replace them with fall decorations.

Due to the unpredictable Midwest weather, I usually keep the exterior decorations of the house simple.  This year I decided to embellish a simple wooden pumpkin sign I used as a front door decoration from a previous year.  Because of the shape of the sign, I choose an oval wreath to match and added some gold chrysanthemums and fall leaves that I already had.

Since the fall season has two holidays, I have two different signs for our front porch.  For Halloween I have a “Trick or Treat” wooden black cat and for Thanksgiving I have a resin Scarecrow on a wooden stick tied with a raffia bow.  To complete the porch, I set out four pumpkins.

This year, I am excited to add one of my recent Craft projects.  The Corncob Luminaries were very easy to make and a great way to use recycled water bottles. On Thanksgiving Day, these luminaries will be placed on the walkway leading to our front door and will set a festive mood to greet our Thanksgiving dinner guests.

Now, it is time to decorate the interior of our house.

In our entry, I have a low bench and I place a wooden “scarecrow” crow (funny!) with a sign that reads, “Welcome, Happy Harvest”.  On a pedestal next to the bench, I have a white rose floral arrangement and with the addition of some peasant feathers it changes to a fall festive look!  (Another idea is to add fall leaves or peacock feathers to an existing arrangement – these simple ideas can really stretch a holiday decorating budget – maybe you can buy a fabulous fall sweater with the money saved!)

In the family room, I arrange several pine sprays on the mantel over the fireplace and add several ceramic fall leaves and red berry sprays.  The pine sprays usually stay on the mantel and I will remove the Fall decorations and replace them with the Christmas decorations later – this saves time and expenses.  I also place two charming scarecrows on the fireplace mantel to complete this area.


In the library, I have a small glass front lawyer’s bookcase which displays my Boyd’s Bear Collection.  On the top shelf, I add my seasonal figurines which for Thanksgiving are a set of Pilgrim and Indians Boyd’s Bears.  On the middle shelf, I add fall leaves to my existing Bear figurine collection.  The bottom shelf holds my Boyd’s Bear Village.  I usually decorate this for every season and for fall I replace the summer/spring trees with bare branch trees.  I add a pumpkin patch and a couple of turkeys to give this display the look of a crisp fall afternoon!


In the dining room, the main decoration will be a lovely Fall Victorian Centerpiece for the table.  This is another one of my recent projects for fall.  (Please, look for this week’s Craft post for full instructions)  Since I am using this new centerpiece, I have moved the floral arrangement I use year round in the dining room to a table in the family room and add peasant feathers to give it a great fall look.  I love when my decorations are versatile, not specific to one area, and can be used in other rooms of the house.  This allows me to be creative with my holiday decorations and it keeps the process fresh every year!

In the china cabinet, I arrange three Currier and Ives porcelain house that I bought several years ago from a local craft store.  These are arranged on a mirrored silver display stand.  I add several small figurines and pine trees to create a charming display that transitions from Fall to Christmas.  I love when my holiday decorations can be used for more then one season!

To complete the dining room, I place a “memory tree” on the tea table.  During the Fall season this small tabletop pine tree is decorated with small family photo frames and golden feathers.  Thanksgiving is a time to give thanks and with this special decoration it is a wonderful way to honor and remember our families.  (Please, look for an upcoming Craft post with full instructions on creating your own Memory Tree or Wreath)

In the kitchen, I have a basket of artificial vegetables placed in the corner and it usually stays there year-round.  For the Fall season, I add a resin pumpkin carved with the words, “Harvest Welcome”.   Above the kitchen cabinets, I have a picture frame that reads, “Celebrate family, friends, traditions” which is perfect for Thanksgiving.  Normally it is displayed with a trio of decorative green plates and ceramic tea pots but I replace the teapots with two ceramic pumpkins for Fall.  Once again, I love to multi-purpose the items in the house by adding simple decorative items to an existing display and this saves both time and expenses.  (You’ve got to love that idea, right?)