Celebration – Gift Wrap 101

After several trips to a favorite retail store or braving the crowds at the local mall, you’ve made your purchases for family and friends, everyone is checked off the Christmas list and the shopping is finally done!  Now, with some simple materials and a few suggestions and tips the presents can be wonderfully gifted wrapped in some unique ways to make your presents very memorable.

When gift wrapping presents for the holiday season, be creative with style, color and the use of embellishments.  Don’t limit yourself to the rolls of gift wrap paper in the Christmas aisle in your local retail store.  The local craft store or fabric store are a great source for gift wrap supplies, think about using fabric for wrapping, silk or wired ribbons, flowers or feathers for decorations on the presents.  The sewing notion section is an unusual source for gift wrap embellishments such as buttons, tassels, zippers, etc.  The scrapbook section in your local craft store is also a great source for creating gift tags and other decorations for finishing off those holiday gifts.

SAFETY CAUTION: When using small items for gift wrap decorations please be aware if you have small children in the house that can get ahold of the presents.  Store these gifts in a safe place until it is the time to open gifts or keep them out of reach and store in a high place that children cannot get to.  

Listed below are suggestions for several styles of gift wrap choices –

ROMANTIC STYLE

When gift wrapping a present for a mother, wife or sister consider a romantic style.  I would describe a romantic style as classic and feminine.  Use soft jewel tones such as: tiffany blue, fuchsia, sage green and rose or metallic colors such as: silver, gold and bronze.  Think about patterned paper, such as: floral and toile prints or textured wrapping papers, such as: flocked or embossed velvet.  Look to the fashion runway ball gowns for inspiration for wrapping presents in a romantic style.

As an alternative for traditional wrapping paper, check out the local fabric store for elegant fabrics to use in wrapping the presents, such as silks or satins.  The ribbon aisle is a wonderful source for silk and wired ribbons in hundreds of colors and prints to tie up a present.  Silk flowers can add a beautiful finishing touch; just tuck a shortened stem into the knot of a bow.  Check out the costume jewelry department in a local retail store for beautiful sparkling broaches to pin onto a present.

HINT:  Fabrics can be tricky to work with at first when wrapping a gift.  Normal gift wrap tape will not adhere to the fabric so try double sided tape on the fabric surfaces to secure.  (Celebrity stylists use this old Hollywood Red Carpet trick for their client’s clothes and it can work for gift wrapping as well)  Practice folding the fabric in a traditional gift wrapping style or if this proves too tricky simply gather the fabric at the top of the present, secure and tie with a ribbon.

MASCULINE STYLE

For a masculine style be inspired by menswear when wrapping a present for a father, husband or brother. Use darker colors, such as: hunter green, burgundy and navy blue.  Look for wrapping paper in plaids, herringbone and pinstriped patterns.

Check out your local fabric store for masculine fabrics to use, such as: corduroy, flannel, suede or simulated leather.  Be inspired by fabric normally used in menswear, such as: tartan plaids, black and white herringbone and grey or navy pinstripe fabrics.  The ribbon aisle is a great source of different styles of ribbons, such as: suede, leather or menswear patterns.  Once again, check out the sewing notions department in the local craft store for unique buttons to attach to the present.

When gift wrapping presents such as formal tailored shirts use the accessories as gift wrap accents.  Think about using the coordinating tie purchased with the shirt tied with a traditional Windsor knot and secured to the outside of a present or if he uses a bow tie instead consider pinning it on the outside of the present.  One suggestion is use a one or two inch wide solid color ribbon or a leather or suede strip around the present vertically and glue several buttons down the front to simulate a shirt front.  The matching pocket square can also be attached to complete the look.

(Please refer to the hint above when working with fabric for wrapping gifts)

EDGY STYLE

An eddy style of gift wrapping is perfect for the teenager or young adult.  Black will be the obvious color used with accents of metal or leather for a bold look.  Neon colors of hot pink, tangerine orange and lime green could also be used as a trendy alternative. Also look for wrapping paper in bold and geometric patterns for a modern look.  Check the ribbon aisle in the local craft store for ribbons that are appropriate for an edgy style.

Black wrapping paper can be hard to find, so if you can’t find any in the stores use regular black scrapbook paper in a cool “torn” effect over colored or patterned wrapping paper.  Select a strip of black paper long enough to go around the entire present.  Use a straight-edge ruler on top of black paper and gently tear the paper for a rough edge look with tattered edges. Attach the torn black paper around the present.

Check the sewing notion aisle in the craft store for zippers to use as decoration.  Cut up a zipper at the bottom and this will give you two separate pieces to use.  Zippers come in all different lengths so you will be able to find for the present or tie two pieces together if you need a larger length. Coil the zipper and it can become a cool edgy flower!

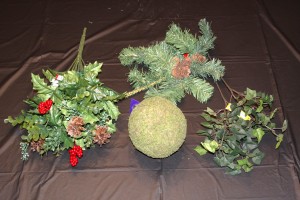
NATURE-INSPIRED STYLE

For those nature or outdoor loving family or friend’s presents, consider using supplies from nature.  Start by wrapping the present with simple brown craft paper or solid colored paper such as: green for the forest or blue for the sky and ocean.  Use grosgrain and silk ribbons to add texture and color to the presents.  You can gather materials from the forest or seashore but the local craft store is also a good source.  Items to look for as accessories would be – pinecones, artificial pine branches, holly branches or poinsettias for a traditional Christmas look or feathers and seashells for a non-traditional look.

HINT:  When gathering materials from the forest or seashore to use for gift wrapping, please be advised that they could contain bugs or other creatures.

TIPS AND SUGGESTIONS

TIP #1

Shop early for gift wrap supplies – that means shopping the Christmas sales the year before.  If you shop when these items first go on sale there is a better selection.  Find some space in a hall closet or a seldom used room to store these supplies until the next year.  When shopping for supplies look for wrapping paper, ribbon, gift tags and embellishments to create a fabulous wrapped gift.

TIP #2

Instead of purchasing yards of fabric, for smaller presents look in the home furnishing section of the local retail store for fabric dinner napkins.  Napkins are usually available in an assortment of colors, fabrics and even holiday prints.

Craft – Christmas Kissing Ball

The holly and the ivy have been used in English Christmas decorations for centuries.  The English people in olden days had no retail stores available to purchase holiday decorations so they decorated their houses with the evergreens available in their local woodland and forest areas – holly, ivy, mistletoe, pine and fir.  These plants stayed green all year and became symbols of life during the cold winter months.  They decorated with swags and garlands made of pine and fir boughs intertwined with holly and ivy.  Mistletoe was believed to have miraculous healing powers and was placed over doorways to ward off evil spirits and bring health, happiness and good luck.

An old midwinter custom in English villages dating back to medieval times was to hold a singing contest between the men and the women.  It was a chance for the villagers to gather for celebration, singing and dancing.  Using the holly and ivy as symbols, the men sang songs praising the masculine qualities of the rigid leafed holly while the women sang about the feminine qualities of the softer ivy.  The matter of who won the contest was frequently resolved under the mistletoe where young men of the village had the privilege and opportunity of kissing the girls.  As the couples kissed, they would pluck a berry from the mistletoe and when all the berries are gone the kissing privilege ceases.  (What a charming and romantic story!)

For your next Christmas party try adding some fun and excitement by making your own Kissing Ball.  Hang it in an area of the home where your guests are sure to walk under it – just don’t hang it too low so they hit their heads!

Christmas Kissing Ball – supplies

  • 3 or 4 inch Styrofoam ball (I found one already covered in moss at my local craft store)
  • Artificial pine, ivy, holly and mistletoe
  • Artificial red berries
  • Ribbon

Christmas Kissing Ball – instructions

  1. Cut the pine, ivy, holly and mistletoe into small workable pieces about 3 inches long.
    (Check the Christmas floral aisle in your local craft store early for the best selection – sometimes you can buy pre-cut pieces already shortened to the desired length)
  2. Insert and glue each piece of pine, ivy, holly and mistletoe separately.  Evenly space each type of greenery across the entire Styrofoam ball and fill all the empty spaces.
    (If desired, hot glue small amounts of Spanish moss to fill any empty spaces)
  3. Insert and glue red berries, scattered evenly across the Styrofoam ball.
  4. When the Styrofoam ball is completely covered, cut some festive ribbon to the desired length for hanging and attach to the top of the ball.


The Christmas Kissing Ball is finished and ready to hang – so, get ready to pucker up!!

Decor – Christmas Home Decorations

CHRISTMAS… the weather has turned a little frosty and there might even be snow on the ground. (if you are lucky!)  If you live in a warmer climate, don’t worry about it because as soon as you put on some Christmas music to set the mood and start to unpack those Christmas decoration boxes you will definitely get into the holiday spirit!

After Thanksgiving, I pack up all the fall decorations and the boxes are stored down in the basement. Then, my husband brings up the Christmas decorations and it can take awhile because I have several boxes!  The process of decorating our house for Christmas can take several days but I enjoy every minute of it!  The interior house Christmas decorations I have collected over the years are not specific to a certain room and I can be creative with the different accessories, so I’m not limited to the same decorations in the same place every year and this keeps things interesting and fun!  I have fewer exterior house decorations and generally they are the same every year.  For the last couple of years we have decided not to decorate the outside of the house with lights to save both time and money – please don’t call us Scrooge!!

Like most holidays when I start the decorating process for the holiday season, I begin with setting up the Christmas decorations outside on the front porch.  Living in the Midwest the weather conditions can get very harsh and I usually keep all my exterior decorations under the roof of the porch to keep everything safe from the elements.  I start with a couple of pre-lite artificial Christmas trees and for the last couple of years I have added a pre-lite snowman bought at a Target after holiday sale.  I liked the size of the snowman but embellished him a little by gluing on larger black buttons, topped it off with an old black winter hat and this year I’m going to change the wire nose and add a large artificial carrot instead!  To complete the front porch, I hang a Christmas wreath on the front door.  I have three different wreaths that I rotate from year to year. One is a large pine wreath decorated with pinecones and red berry sprays, another is a wreath covered completely in velvet holly leaves and the third one is a pine cone wreath accented with holly leaves and red berries.

With the outside of the house done I can now start decorating the inside of the house.  In the entry hall I set up a whimsical 24” Santa displayed with two elves hanging onto the branches of a small Christmas tree.  Nearby I have a pair of black ice skates hanging from an antique sled with a Boyd’s moose named Mortimer.  Whenever I am shopping in the antique stores, I always look for holiday items – on my wish list is a set of old skis and poles and hopefully I will be able to find it before next year.  This year I have added a Christmas Kissing Ball and I think it will be fun for our guests’ arrival and departures this holiday season!  (Please look for the December Craft post for instructions on how to make your own Christmas Kissing Ball)


The next room of the house is our library; this is the room where all our books and vacation memorabilia are in bookshelves that fill up an entire wall.  On the other side of the room, I keep my Boyd’s Bear collection year-round in a small lawyer’s bookcase.  I add my Boyd’s Christmas figurines and I decorate the two shelves with pine branches to give it a festive Christmas look.  The bottom shelf holds the Boyd’s Bear Village and I decorate the display with winter trees and tiny snowflakes.  I also add a Boyd’s Bear Santa to one of the ivory chairs in the library.  On another side of the room, I have displayed for the last a couple of years our Fontanini Nativity set on an antique table that my husband’s Grandmother kindly gave us.  This heirloom table is very special to us because it has been in the family for a very long time. (Please see a previous December Décor post for more detailed information on the Fontanini Nativity Display)

The next room to decorate is the family room.  One wall of the room has a fireplace and mantel flanked by two bookcases/cabinets.  For the past few years I have displayed our Department 56 North Pole Village in the bookshelf but this year I will be doing something new and it will be displayed across the fireplace mantel.  The fireplace mantel is also the place where we traditionally hang our Christmas stockings.  Next, to complete the family room, I will set-up a display on the fireplace hearth with a traditional 29” Santa, his two reindeers and a small Christmas tree. (Please check out my previous December Décor posts for more detailed information on the Department 56 North Pole Village display and the Christmas stockings and Fireplace Mantel decorations

In the dining room, the Memory Tree set out for Thanksgiving will be moved to the family room.  (Please refer to last month’s Craft post for ideas and tips on how to create your own family Memory Tree)  In November I had displayed in the china cabinet three Currier and Ives porcelain houses I purchased at a local craft store a few years ago.  Our china cabinet has a mirrored back so you are able to see both the back and the front of the display of the houses.  I add a few small pine trees and additional figurines and these are set-up on a beautiful elongated mirror and silver stand.    This display is an example of a decoration that works for both Thanksgiving and Christmas seasons – I love when that happens!  This year I have added two new Craft projects to our dining room decorations – a Victorian inspired fruit arrangement that I made last month for our Thanksgiving table and a Cranberry topiary inspired by one I had seen in a past HGTV White House Christmas shows.  I think they are great additions to our traditional dining room design.  (Please look for full instructions on making both projects – the Fall Victorian Centerpiece is a November Craft post and the Cranberry Topiary is a December Craft post)

The last room on the main floor of the house to decorate for the holidays is the kitchen.  Now, this can get a little tricky because the room needs to function as a full service kitchen, so the counters need to stay clear of decorations because food and meals are being prepared and eaten at the table on a daily basis.  We have a fairly large kitchen that is open to the family room and these two rooms of the house are where we spend most of our time.

Several years ago I found the perfect Christmas theme for the holiday decorations in the kitchen – gingerbread and candy canes!!  Since there are several areas in the kitchen that I decorate for Christmas, I start with an area that has a long chair height counter with upper and lower cabinets.  This is the area my daughter does her homework and the counter needs to stay free of clutter.  So, in the space above the upper cabinets I usually set-up a Department 56 gingerbread train that is displayed with pine boughs, red berry sprays and this year I have added “white icing” snowflakes to give it a different look.  I also hang two holly wreaths with red berries and gingerbread snowflakes on the cabinet doors.


The last area that needs some Christmas attention is the area by the stove and oven.  Please be careful with the holiday decorations in this area because with the extreme heat from cooking you don’t want anything that is flammable or a fire hazard.  I have a basket of artificial vegetables on the counter and I add a cute “North Pole Candy Canes” container that holds some wooden candy canes and pine sprays.  I also hang some Santa towels from the oven bar handle.

I hope you enjoyed the tour of our house decorated for the holiday season and I try to create decorations that are classic and traditional but fun and interesting.  Please let me know your comments or suggestions; I would love to hear what you think.

Travel – Bronner’s Christmas Store

Living in California, I had heard about the world famous Bronner’s Christmas store in Frankenmuth, Michigan.  After we moved to the Midwest, I knew it was my chance to visit and planned an easy weekend trip to Michigan in October 2009.  Their busiest weekend is after Thanksgiving with over 50.000 visitors.    So, we knew we wanted to visit before the Christmas season started to avoid the crowds of holiday shoppers.

During that weekend trip we stopped in Detroit to visit the Ford Company Manufacturing Plant and the wonderful Henry Ford Museum.  My husband and son loved visiting the assembly plant (OK, it’s a guy thing) The Ford Museum turned out to be a very interesting museum and had an extensive collection of historical memorabilia.  Since I want to concentrate on Bronner’s in this post, please look for a separate Travel post in January 2013 with detailed information on those two destinations.

Before the holiday season got too busy, I knew I wanted to visit the “World’s Largest Christmas Store”.  I had my wish list of the ornaments I wanted and I was ready to shop!!

Located in Michigan’s “Little Bavaria”, the store is in the charming town of Frankenmuth.  Founded in 1945, this large retail store has over 90,000 square feet of space and over two million visitors annually.  Walking into the store the sights, sounds and feelings of Christmas can be almost overwhelming.  It is a huge store and can take a couple of hours to walk and shop all the various departments.  The store inventory includes a large assortment of Christmas ornaments, Nativity sets, Christmas lights, Christmas decorations and collectible Christmas items such as Fontanini, Department 56 and Precious Moments.

My husband, son and daughter were not interest in shopping and after looking around the store for a short time, they decided to go into town.  I was left alone for a few hours and the shopping experience was wonderful and not rushed.  Of course, when I was picked up at the prearranged time, I still wasn’t ready to leave!!

For more information or store hours for Bronner’s Christmas Store see their website at www.bronners.com


After lunch in Frankenmuth, we found an amazing sausage store called Willi’s Sausage Company.  Since my husband has lived in Berlin, Germany for several years during grammar school and high school, he considers himself a sausage expert.  He always complains that he can’t find really good sausage here at home.  I remember when we visited Germany a few years ago, our first stop after landing in Berlin was to find a sausage cart and my husband was right – the sausage was delicious!  Well, my husband was very pleased with the selection of over 100 different kinds of sausages at Willi’s.   After taste testing several kinds of sausage, we made our selection and were ready to check out.  The store packaged everything very nicely in a cold pack for our trip back home the next day.  They also shipped their sausage to anywhere in the United Sates, so check out their website, www.willissausages.com

We would definitely like to go back to Frankenmuth because it was such a quick weekend trip and there was so much more to see and many more places to visit.  The atmosphere of Michigan’s “Little Bavaria” was very reminiscent of the charming little Danish town of Solvang, California.  Both places have great stores to shop and wonderful restaurants to eat.   Maybe on a future trip up to Mackinac Island, we can plan to spend an extra couple of days in Frankenmuth.

Craft – Cranberry Topiary

Depending on the current First Lady’s Christmas theme and decorative style for the White House, some variation of a cranberry covered decoration is always in the Red Room. Some years it can be a cranberry wreath or another variation but I have long admired the cranberry topiary.  I always thought that it was one of those perfect decorations for Christmas with the red color of the cranberries and the green color of the pine.

For years now I’ve always keep a silver bowl of artificial cranberries in our dining room during the holiday season.  This year I wanted to do something different and decided that I was finally going to use those cranberries to make a topiary for our dining room.

Listed below are the materials and instructions to make a cranberry topiary.

Cranberry Topiary – supplies

  • 1     Styrofoam come
  • 1     Styrofoam circle, a couple of inches wider than the base of the Styrofoam cone
  • 1     Container, as wide as the bottom of the Styrofoam cone
  • Cranberries, artificial
  • Pine boughs or other type of greenery for base
  • Small Pinecones, several
  • Hot glue gun/ glue sticks
  • Sheet moss, to cover the Styrofoam cone (optional)
  • Foam adhesive spray, to attach the sheet moss to the Styrofoam cone (optional)
  • Hot glue gun /glue sticks

Cranberry Topiary – instructions

Center the Styrofoam cone on the Styrofoam circle; attach the cone securely to the circle with hot glue. This will create one piece that you can set a silver bowl or I used a silver pedestal base.

Option #1 – Use spray adhesive to attach sheet moss onto the Styrofoam, this covers any empty spaces left between the cranberries and gives a finished look.

Option #2 – Paint the Styrofoam cone a burgundy shade to match the cranberries so the empty spaces between are not noticeable.  (Even though it is not pictured, this is the option I used for my cranberry topiary)

  1. Insert the pine boughs or greenery into the Styrofoam circle at the base of the Styrofoam cone.
  2. Hot glue small pinecones at the base of the Styrofoam circle.  Be sure to save one for the top of the Styrofoam cone
  3. Using a small amount of hot glue, attach each individual cranberry to the cone.  Starting at the bottom, work in rows until the cone is completely filled to the top.  Try to leave as little space as possible between cranberries.
  4. Hot glue a small pinecone to the top of the Styrofoam cone to complete the topiary.


As you can see from the photo at the top of the post, the cranberry topiary looks wonderful on the tea cart in our dining room.  Additional ideas for places for a topiary: on a side table in the family room, placed into the corner of the kitchen counter or two topiaries on a buffet table for a Christmas luncheon.