Decor – Fall Mantel Decoration

For this Décor post I would like to highlight a 2004 Fall Mantel Decoration from our old house in California.  In the family room three animal prints were hung above the fireplace, a large duck print and two vintage prints of a peasant and quail that I had purchased at an antique store.  Using the artwork as inspiration, I went shopping at my local Craft store for themed accessories to use for the mantel decoration.  I start assembling the decoration by using a pine garland placed across the mantel.  Next, I intertwined a string of amber pine cone lights and laced brown autumn 2” wide ribbon throughout the garland.  Then, I added several bunches of berries, red apples and yellow pears.  The final touch was a family of stuffed quails which were the perfect way to tie in the mantel decoration with the animal prints.

OLYMPUS DIGITAL CAMERAOLYMPUS DIGITAL CAMERA    OLYMPUS DIGITAL CAMERA

This 2004 Fall Mantel Decoration is a wonderful example of using existing home accessories as inspiration for seasonal decoration.  So, take a look around your house and maybe you will find ideas for some holiday decorations to create for your own home!

Decor – Seasonal Front Door Decorations

Festive decorations on the front porch are a wonderful way to welcome guests during the holiday seasons.  In this post I will showcase the seasonal front door decorations that I have used for our home throughout the year.

Shown below are three photos from past Christmas front door decorations I have used.  The first photo was taken in 2003 and shows the Christmas wreath and front door garland I used for our home in California.  Both decorations feature pine boughs, poinsettias and red berries.  The second photo was taken in 2008 and shows the Christmas wreath I used for our new home in the Midwest.  The grapevine wreath is covered entirely with pine cones and I added red berries and holly leaves.  The third photo was taken in 2012 and shows the pine wreath and I added several pine cones and red berries.  (For more information about my home’s Christmas decorations, please click on the following links: Christmas Home Decorations, Christmas Wreaths Décor post, Christmas Wreaths Craft post, and More Christmas Wreaths and Christmas Decorations from Past Years)

OLYMPUS DIGITAL CAMERA    2008 Christmas front door wreath

2012 Christmas  Front door wreath

The next photo shows the Valentine’s Day wreath that I used for the front door of our home in 2012.  It is the same pine wreath that I used for Christmas the previous year and I just added some large red glitter hearts.  I used the wreath as a front door decoration for the Queen of Hearts Party that I had for Valentine’s Day.  (For more information about the Queen of Hearts Party, please click on the link)

2012 Queen of Hearts party wreath

Below are two photos that show two of the different front door decorations that I have used during the Spring and Summer months at our home in the Midwest.  The first shows a very special and sentimental wreath that was originally used at my Mother’s funeral.  The floral wreath that I made features white roses that were my Mother’s favorite flowers – six white full roses to represent my parents and their four daughters, nine white rose buds represent their nine grandchildren and finished with green hydrangeas and berries in a lovely pastel shade of rose pink.  The second photo shows my most recent Spring/Summer front door decoration.  I had purchased a metal cone-shaped container which I filled with white and purple tulips.  (For instructions and supply list for this Spring Door Decoration, please click on the link.  Also, for more information about my home’s Easter decorations, please clink on the link)

2013 Easter wreath 1a    2014 Spring Front door wreath

Finally, below are two photos that show two different shaped front door decorations that I have used for the Fall season.  The first photo shows an unusually triangular shaped pine wreath that features several sunflowers, orange berries and a festive autumn bow.  The second photo shows another unique door decoration, it is an oval grapevine wreath that features a pumpkin wall hanging, orange mums and autumn leaves.  (For more information about my home’s Fall Decorations, please click on the following links:  Fall Home Decorations, Halloween Decorations and Nightmare Before Christmas Wreath inspired by the classic Disney animated movie)

OLYMPUS DIGITAL CAMERA    2013 Front door autumn wreath

Decor – Setting up a Boyds Bear Village display

In two previous posts I discussed the many wonderful pieces of my Boyds Bear collection that I started in the 1980s.  Throughout the years I have collected Boyds stuffed animals, whimsical figurines and picture frames.  The main portion of my Boyds Bear collection is displayed in the library of our home in a lovely oak glass-front lawyer cabinet.  These items are displayed year-round in the cabinet and I also add additional seasonal holiday themed figurines.  (If you would like to see more of this collection, please click on the following links:  Displaying a Boyds Bear Collection Part One and Two)

The focus of this post will be the setting up a Boyds Bear Village Display and will included step-by-step instructions of how I set up the display.  In addition, I will show how I change or add special seasonal items to the display for the various holidays.  The Boyds Bear Village display is set-up on the bottom shelf of my Boyds Bear cabinet with several of the charming Boyds Bear Village houses that remain in place throughout the entire year.  The Boyds Bear Village house are: “Edmund’s Hideaway”, “Grenville and Beatrice’s Homestead”, “Emily’s Carrot Cottage”, and “Bailey’s Cozy Cottage”.

Below are the step-by-step instructions and photos of how I set up the display:

First, I lined the bottom shelf with newspaper and then placed two large bricks to add height to the display.  The newspapers were used to prevent the bricks from scratching the oak bookcase.  Next, I placed two smaller bricks to create more height in the center of the top section of the display.  I also used two large rocks on either side of the display to create more texture and visual interest.

Boyds Bear Village set-up 1Then, I placed the four Boyds houses, leaving space in the middle for additional accessories.  On the lower section of the display, I placed a piece of artificial grass.  To hide some of the brick, I used four sections of stone walls and added small rocks.  On the top section of the display, I used a three piece section of fencing between the two houses.

Boyds Bear Village set-up 2Next, I placed several trees around the display.  Special Note:  I have several sets of seasonal trees for the different holidays.  Such as full green trees for summer/spring, bare-branch and golden brown trees for fall and pine trees for winter.

Boyds Bear Village set-up 3To hide the base of the trees, the spaces behind the wall on the lower section and behind the fence on the top section and also to fill the other empty areas of the display I used Spanish moss.

Boyds Bear Village set-up 4Finally, I place some of the Boyds Bear Village bear/hare figurines around the display.  Special Note: I have several different sets of small seasonal figurines that I add or remove during the different seasons and holidays.

Boyds Bear Village set-up 5

Below are several photos taken of the Boyds Bear Village display throughout the year for the various seasons with a description of the items that I add or remove depending on the holidays.  Some of these additional items are from the Boyds Bears product line, I also use some Department 56 items and other items were purchased at local craft stores.  Every year I try to change or add to the seasonal displays!  Craft Tip: Keep an eye out during the various holidays throughout the year for miniature decorative accents; also check the dollhouse section in the craft stores for more miniature items to add to a display.

Valentine’s Day

Sometime near the end of January, I will remove some of the winter accessories, such as the Christmas figurines and pine trees leaving only the bare-branch trees.  Then, in my local craft store I found miniature pink and red hearts that I sprinkle on the grass area of the display for Valentine’s Day.  (Next year, I’m thinking of adding more small hearts to the bare-branch trees for an extra special touch)

2012 Valentine's Day Boyd's Bear Village2012 Valentine's Day Boyd's Bear Village closeup

Spring/Summer

Usually in March, I will remove the bare-branch trees and will replace them with a set of full green trees.  Next, in the railroad model section of my local craft store I found miniature white, pink and yellow tulips which I added to the top and bottom sections of the display inserting them into the Spanish moss so they would remain upright.  To complete the Spring/Summer display I placed several of the Boyds Bear Village small figurines.

2013 Spring Boyd's Town2013 Spring Boyd's Town closeup 1

Fall – Halloween & Thanksgiving

In mid-October, I will remove all the Spring/Summer accessories.  Then, I will replace the Spring/Summer trees with several bare-branch and golden brown trees for a more seasonal autumn look.  Next, for Halloween I will add several “trick or treaters” figurines, a pumpkin patch figurine and several miniature pumpkins to display.  As a final touch, I will add a “harvest moon” in the right corner of the display.  For Thanksgiving, I will remove the Halloween figurines and on the left side I will add a figurine of two small turkeys.  Last year, I could find the right accessories to add to the Fall display so I made sunflowers from small buttons that I found in my local craft store.  I added small twigs, which I attached through the button hooks on the back and glued small leaves onto the twigs and placed them near the rock wall on the lower section.  I also added small corn stalks near the fence on the top section.

2012 Halloween Boyd's Bear Village

2012 Fall  Boyd's Bear Village closeup 1    2012 Fall  Boyd's Bear Village closeup 2
2013 Fall Boyd's Town closeup 1    2013 Fall Boyd's Town closeup 2

Winter – Christmas

At the beginning of December, I remove all of the Fall figurines and replace the Fall Trees with snow covered pine trees for a winter look.  Next, I add a small Santa bear and several snowmen figurines.  I also add several tiny lamp posts accented with Christmas wreaths and place them near each of the Boyds Bear Village house.  To finish the display I sprinkle several miniature snowflakes which I found in my local craft store.

2012 Christmas Boyd's Bear Village 1

So, I hope you enjoyed seeing how I set up my Boyds Bear Village and also how I accessorize the display throughout the year!


Decor – Memorabilia Displays

Shadowboxes are a great way to display memorabilia such as travel souvenirs, vintage items, or personal heirlooms.  By having these items protected under glass you and your family, along with the visitors to your home, can enjoy looking at them while keeping these items protected from any damage.   Over the years I have made several shadowboxes that are displayed throughout our home and in this post I will show these examples.

Travel souvenirs

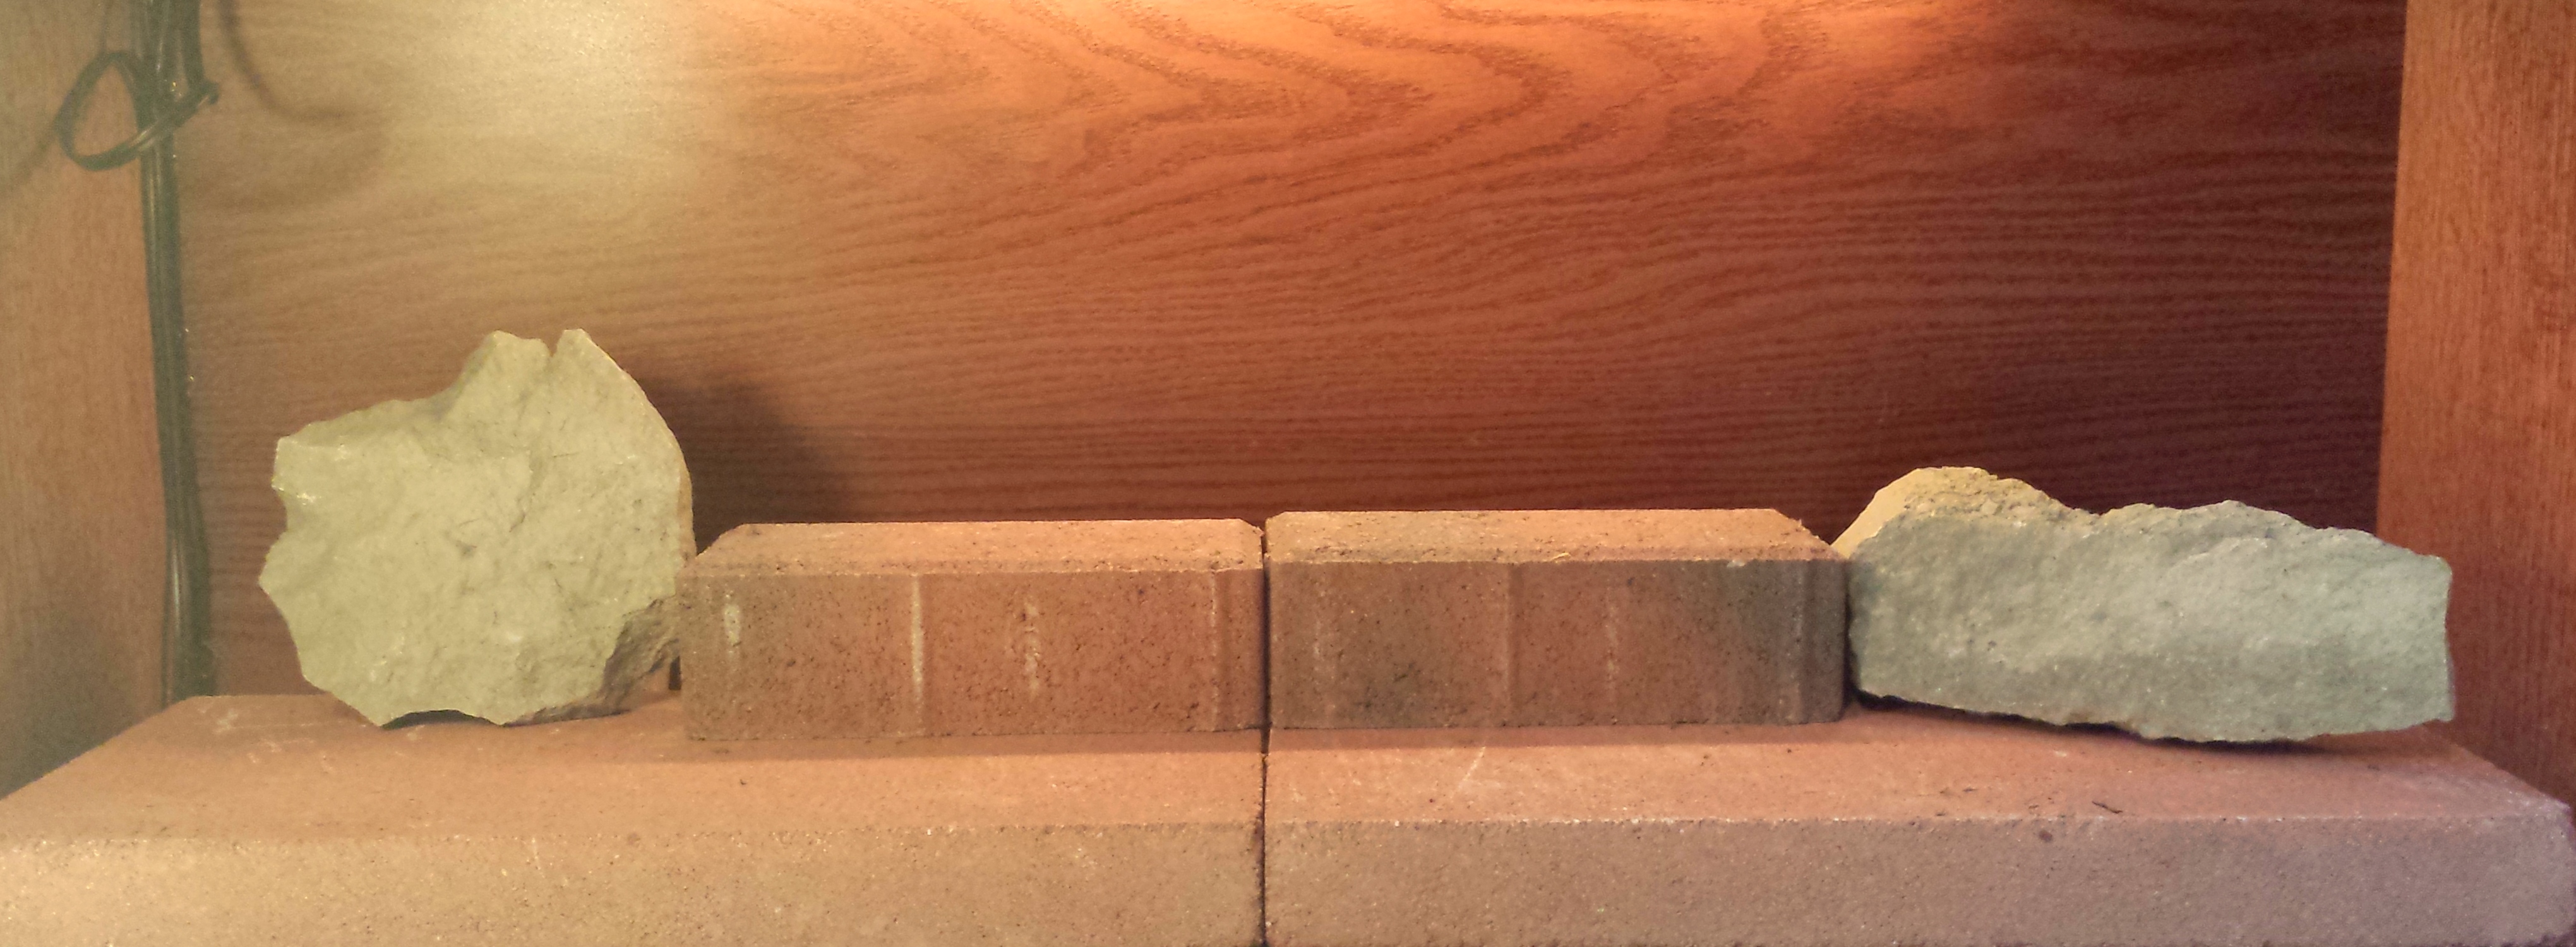
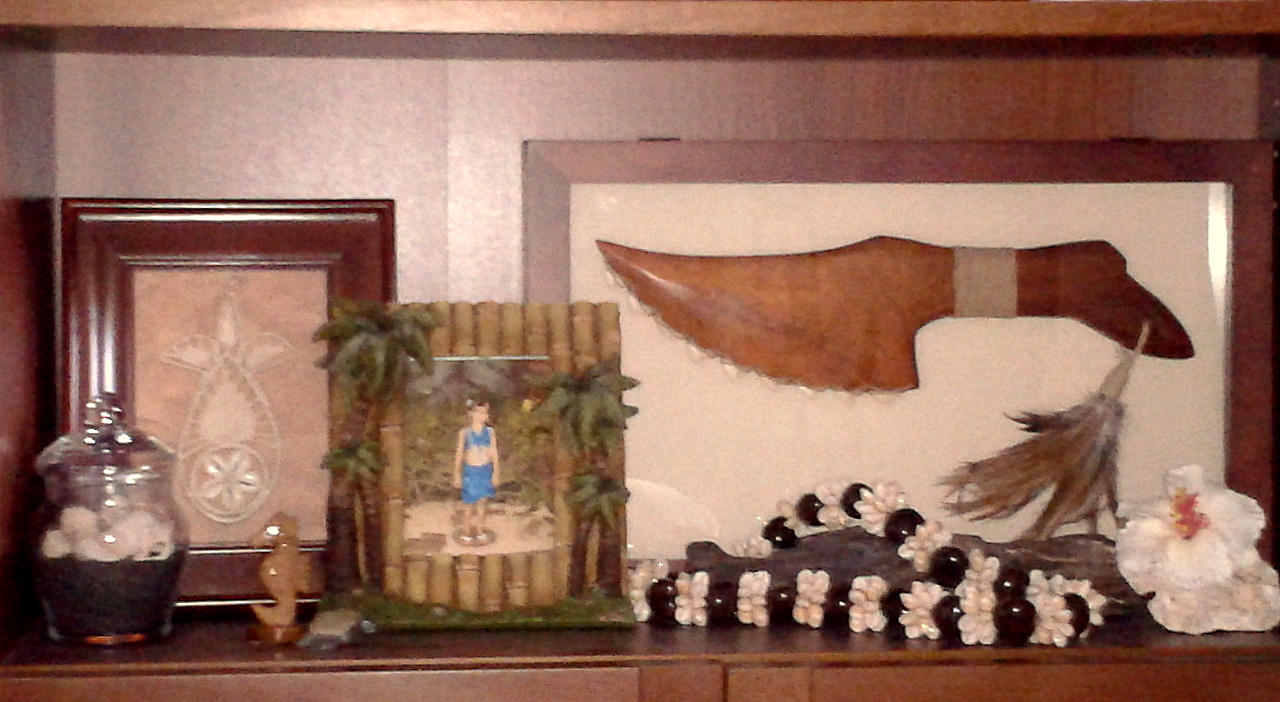
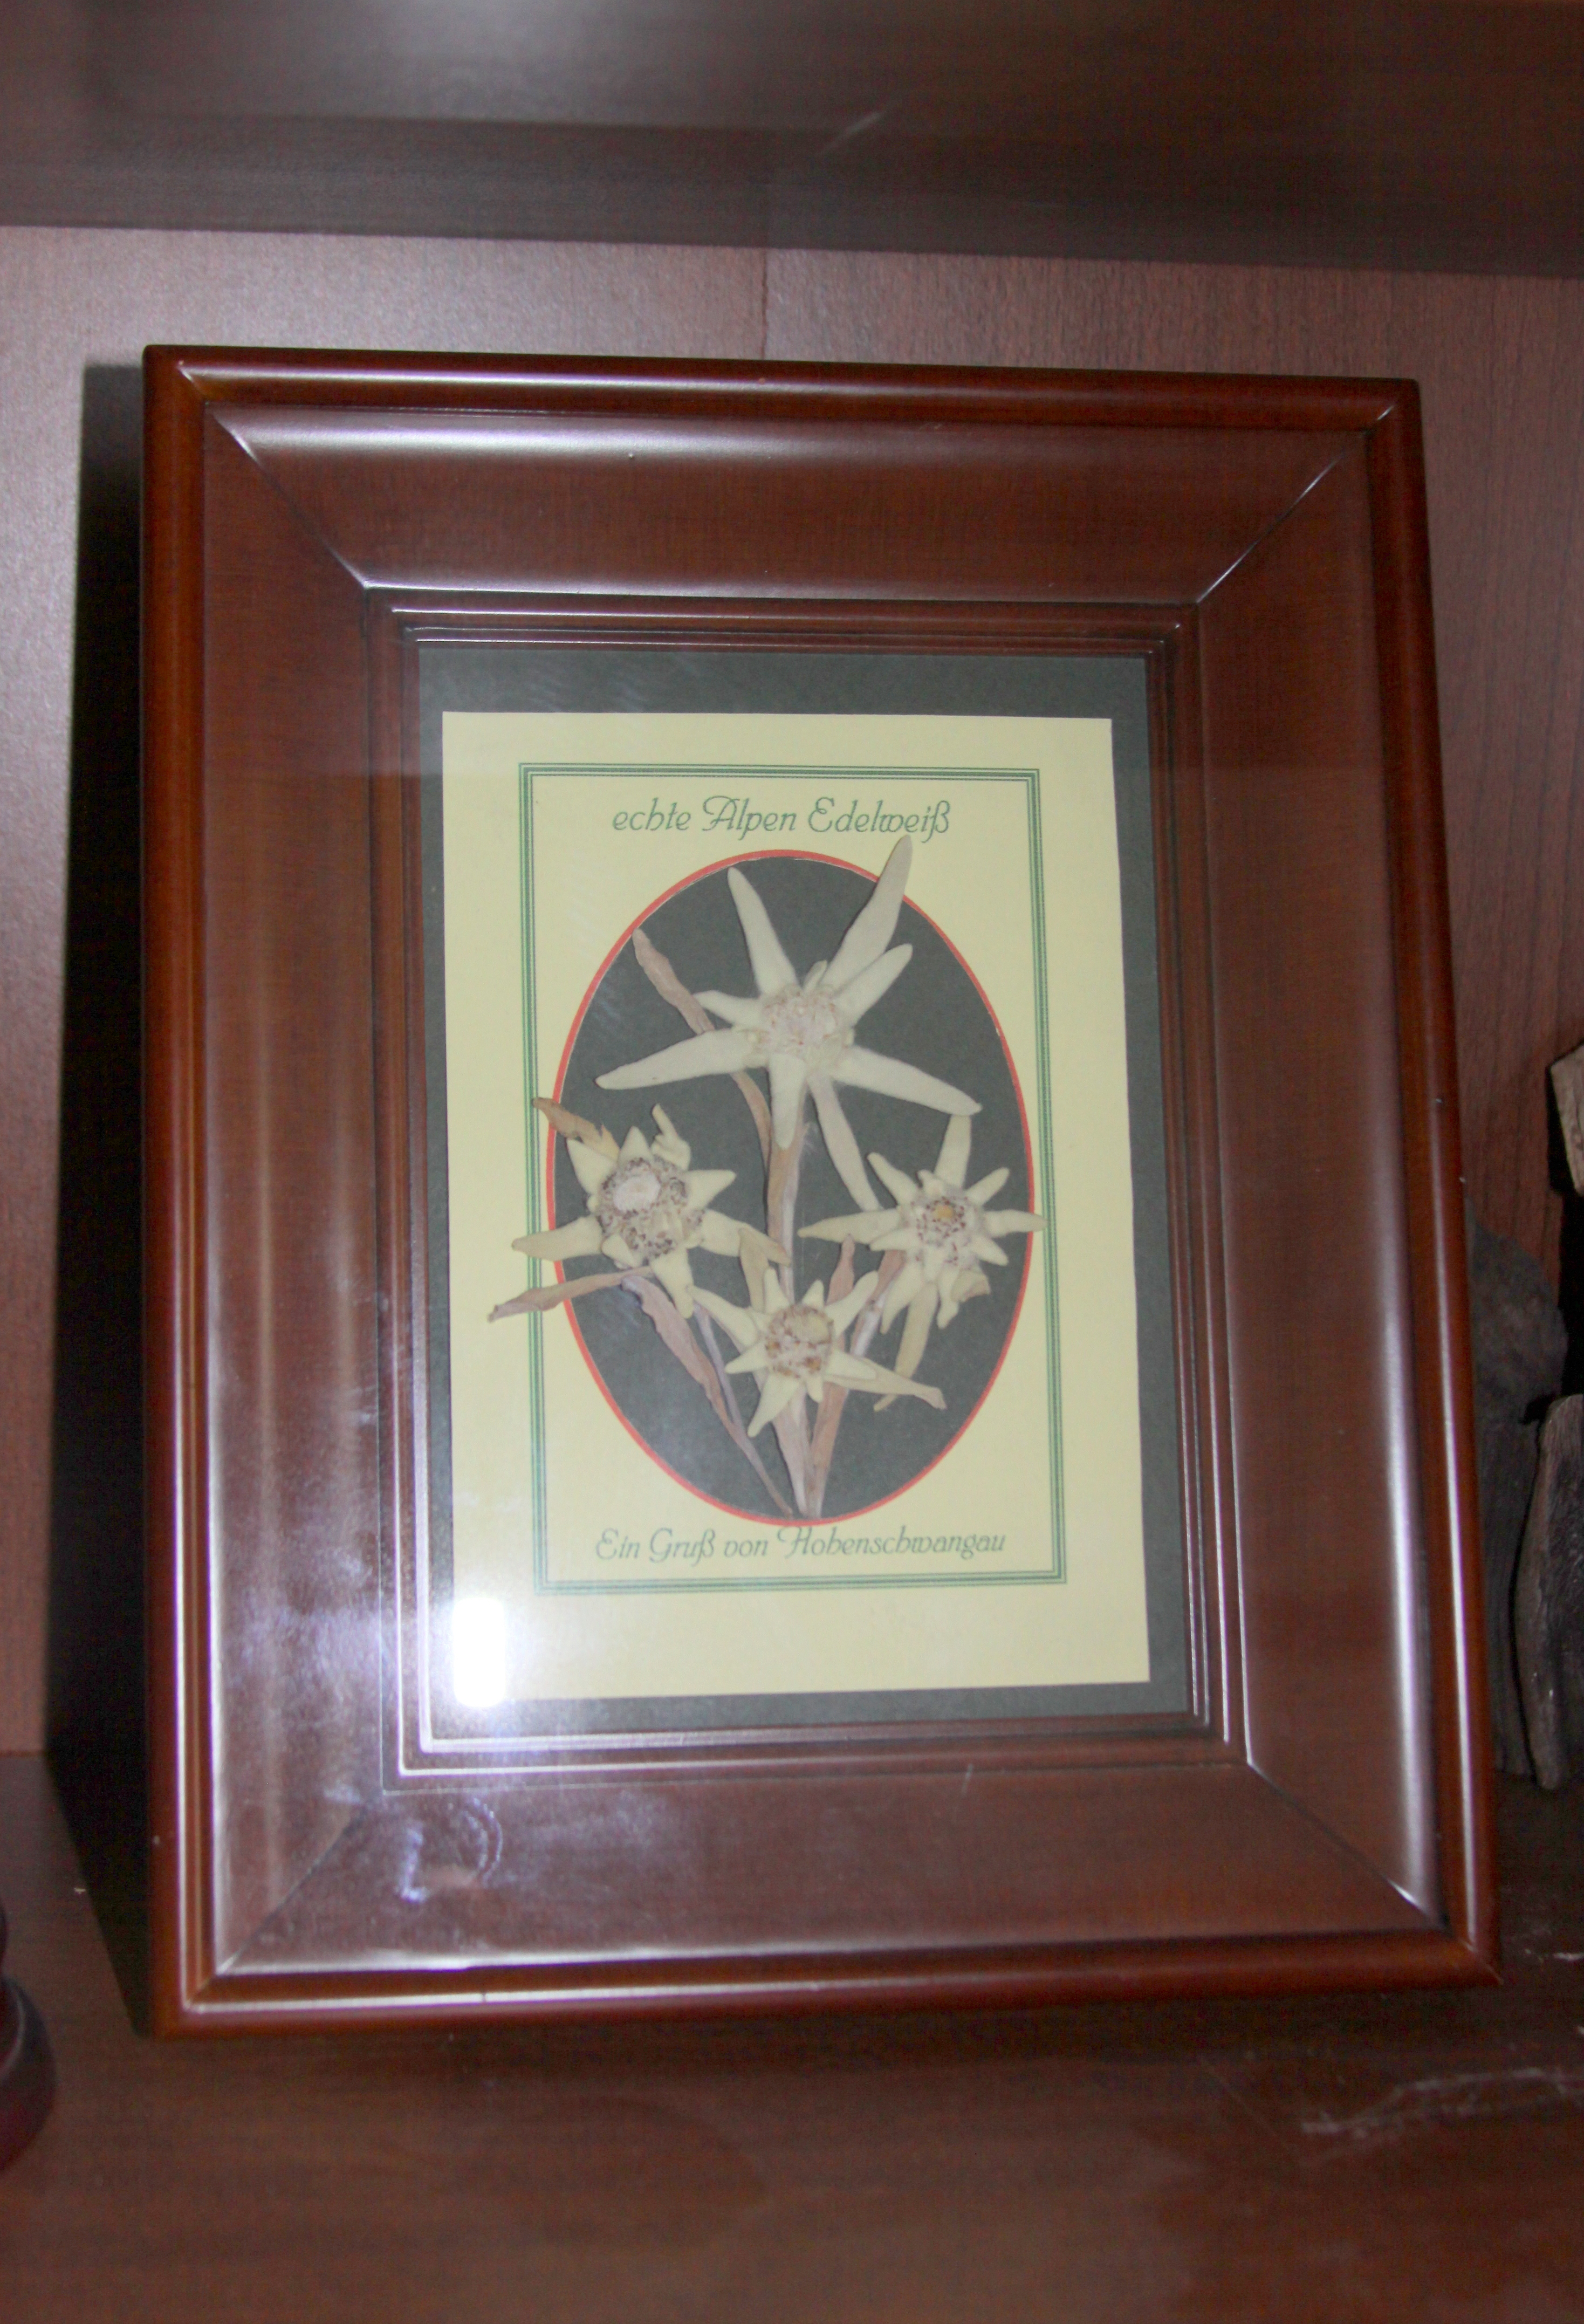
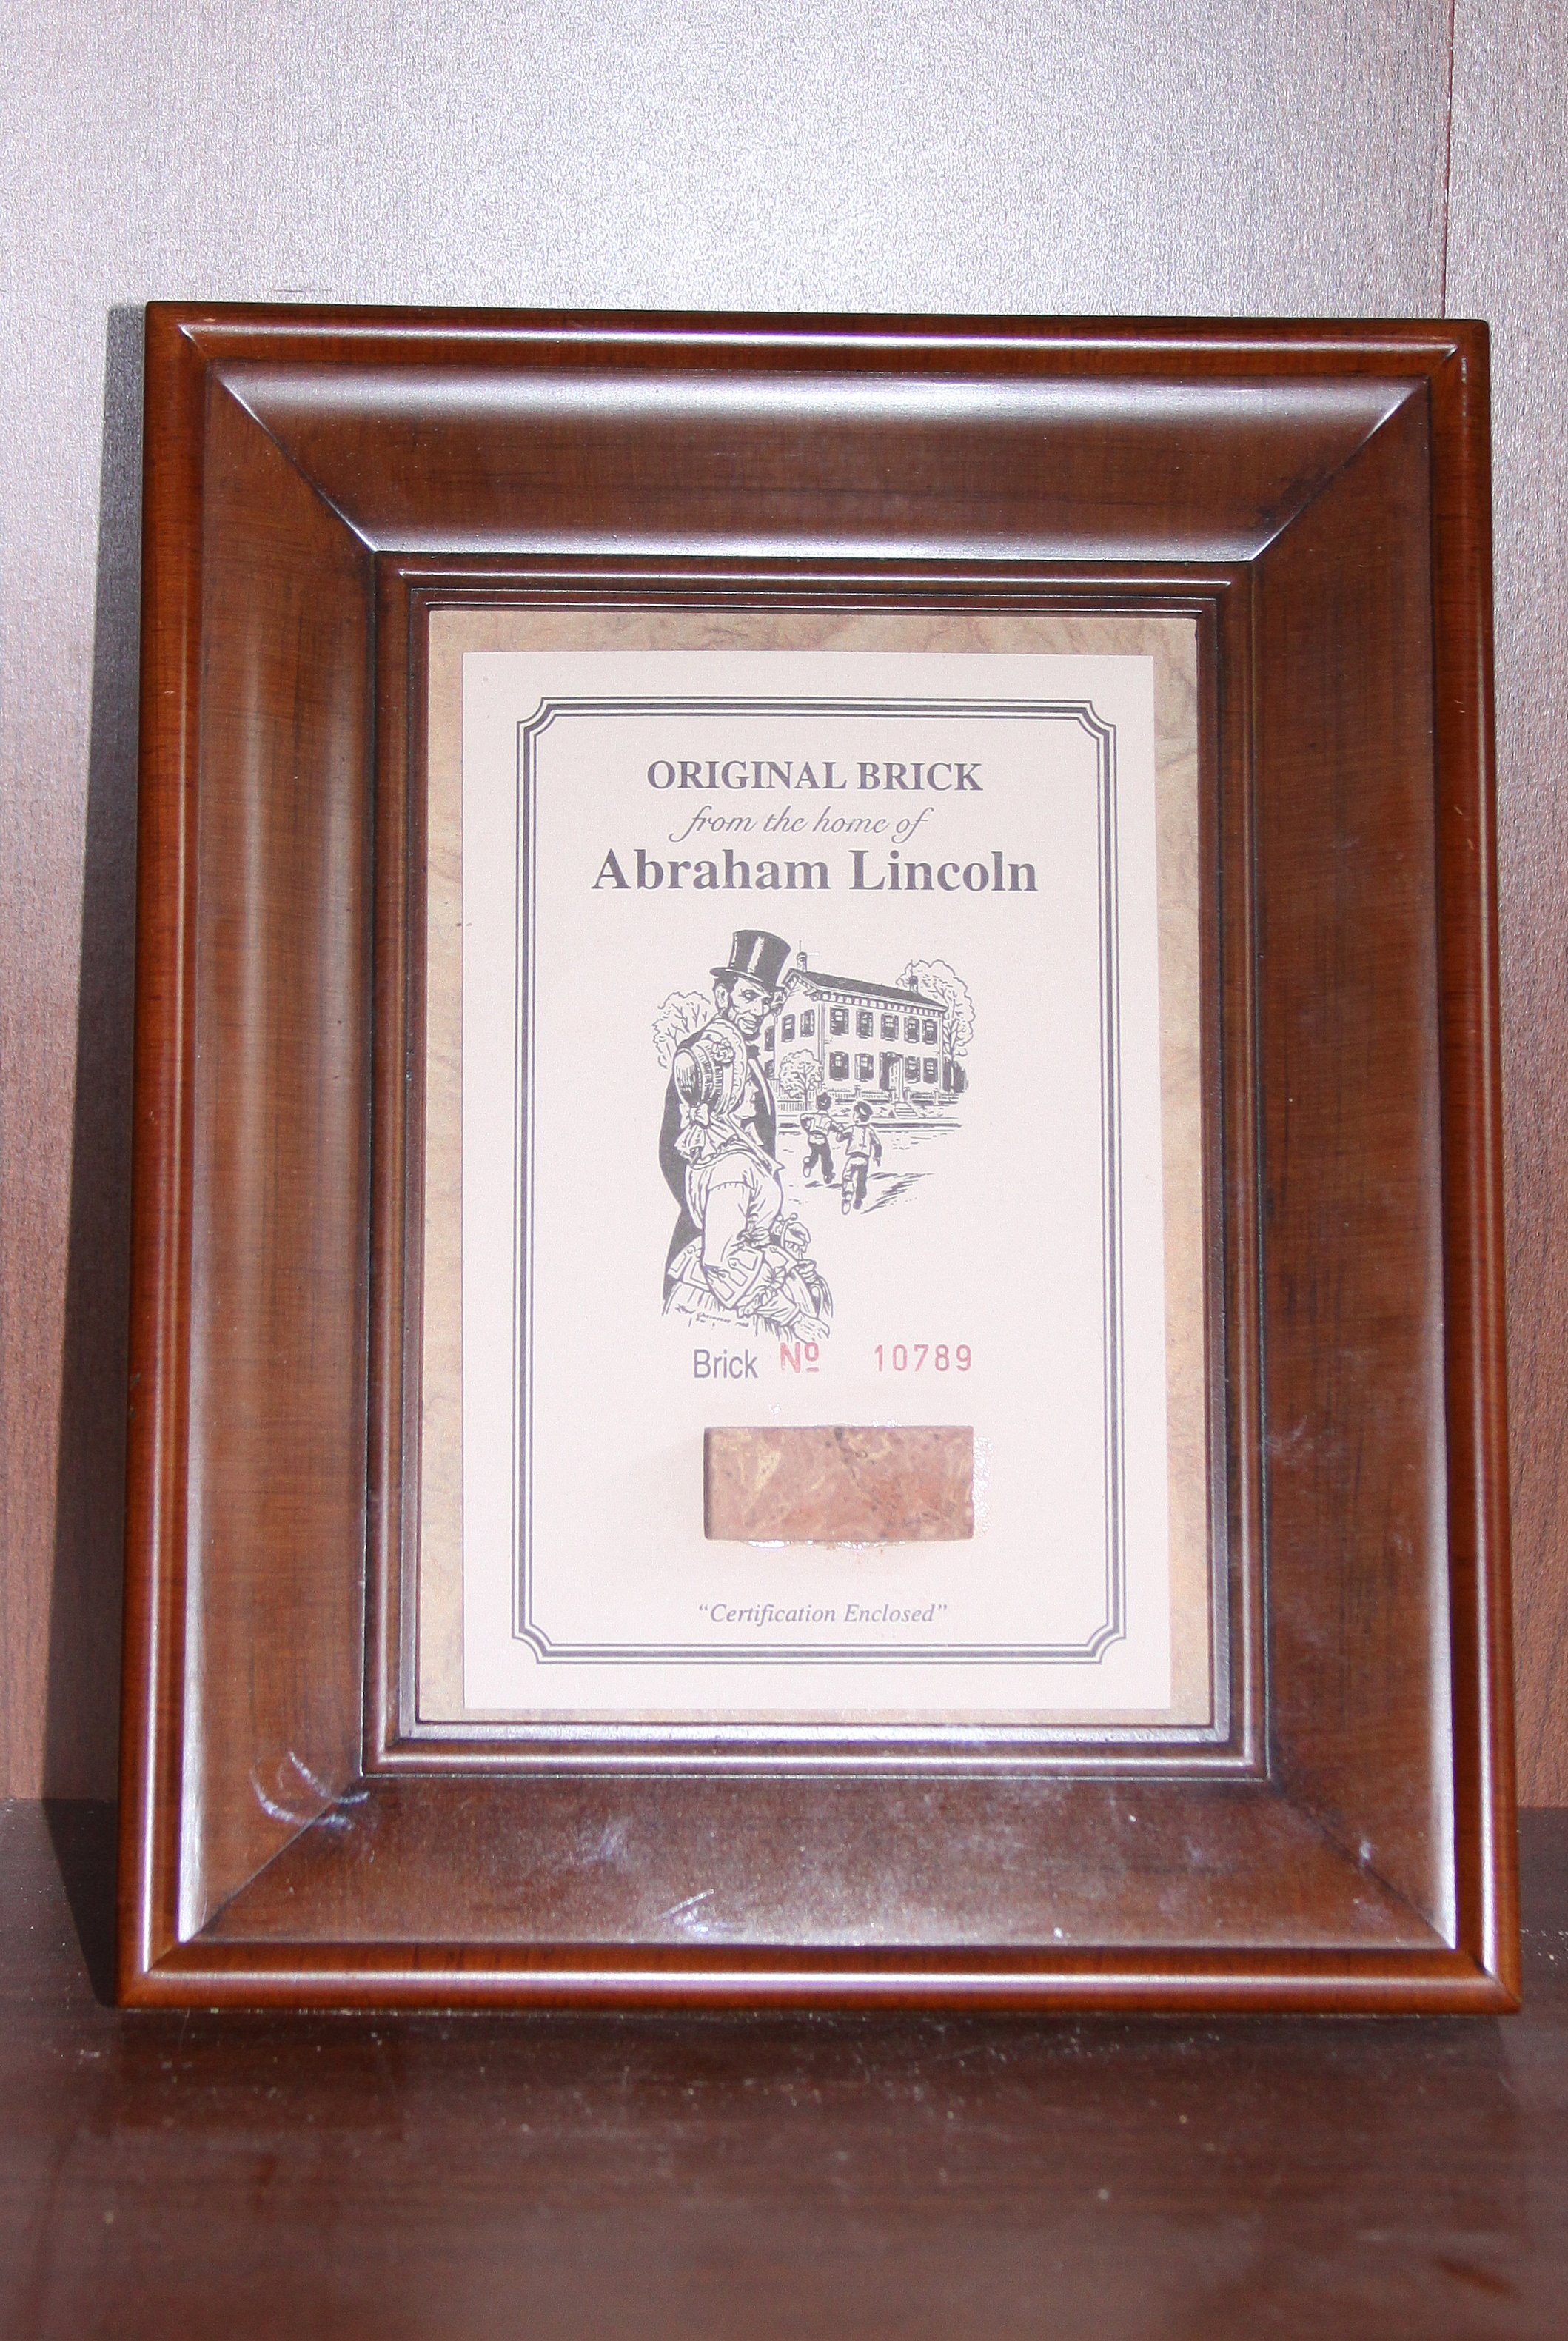
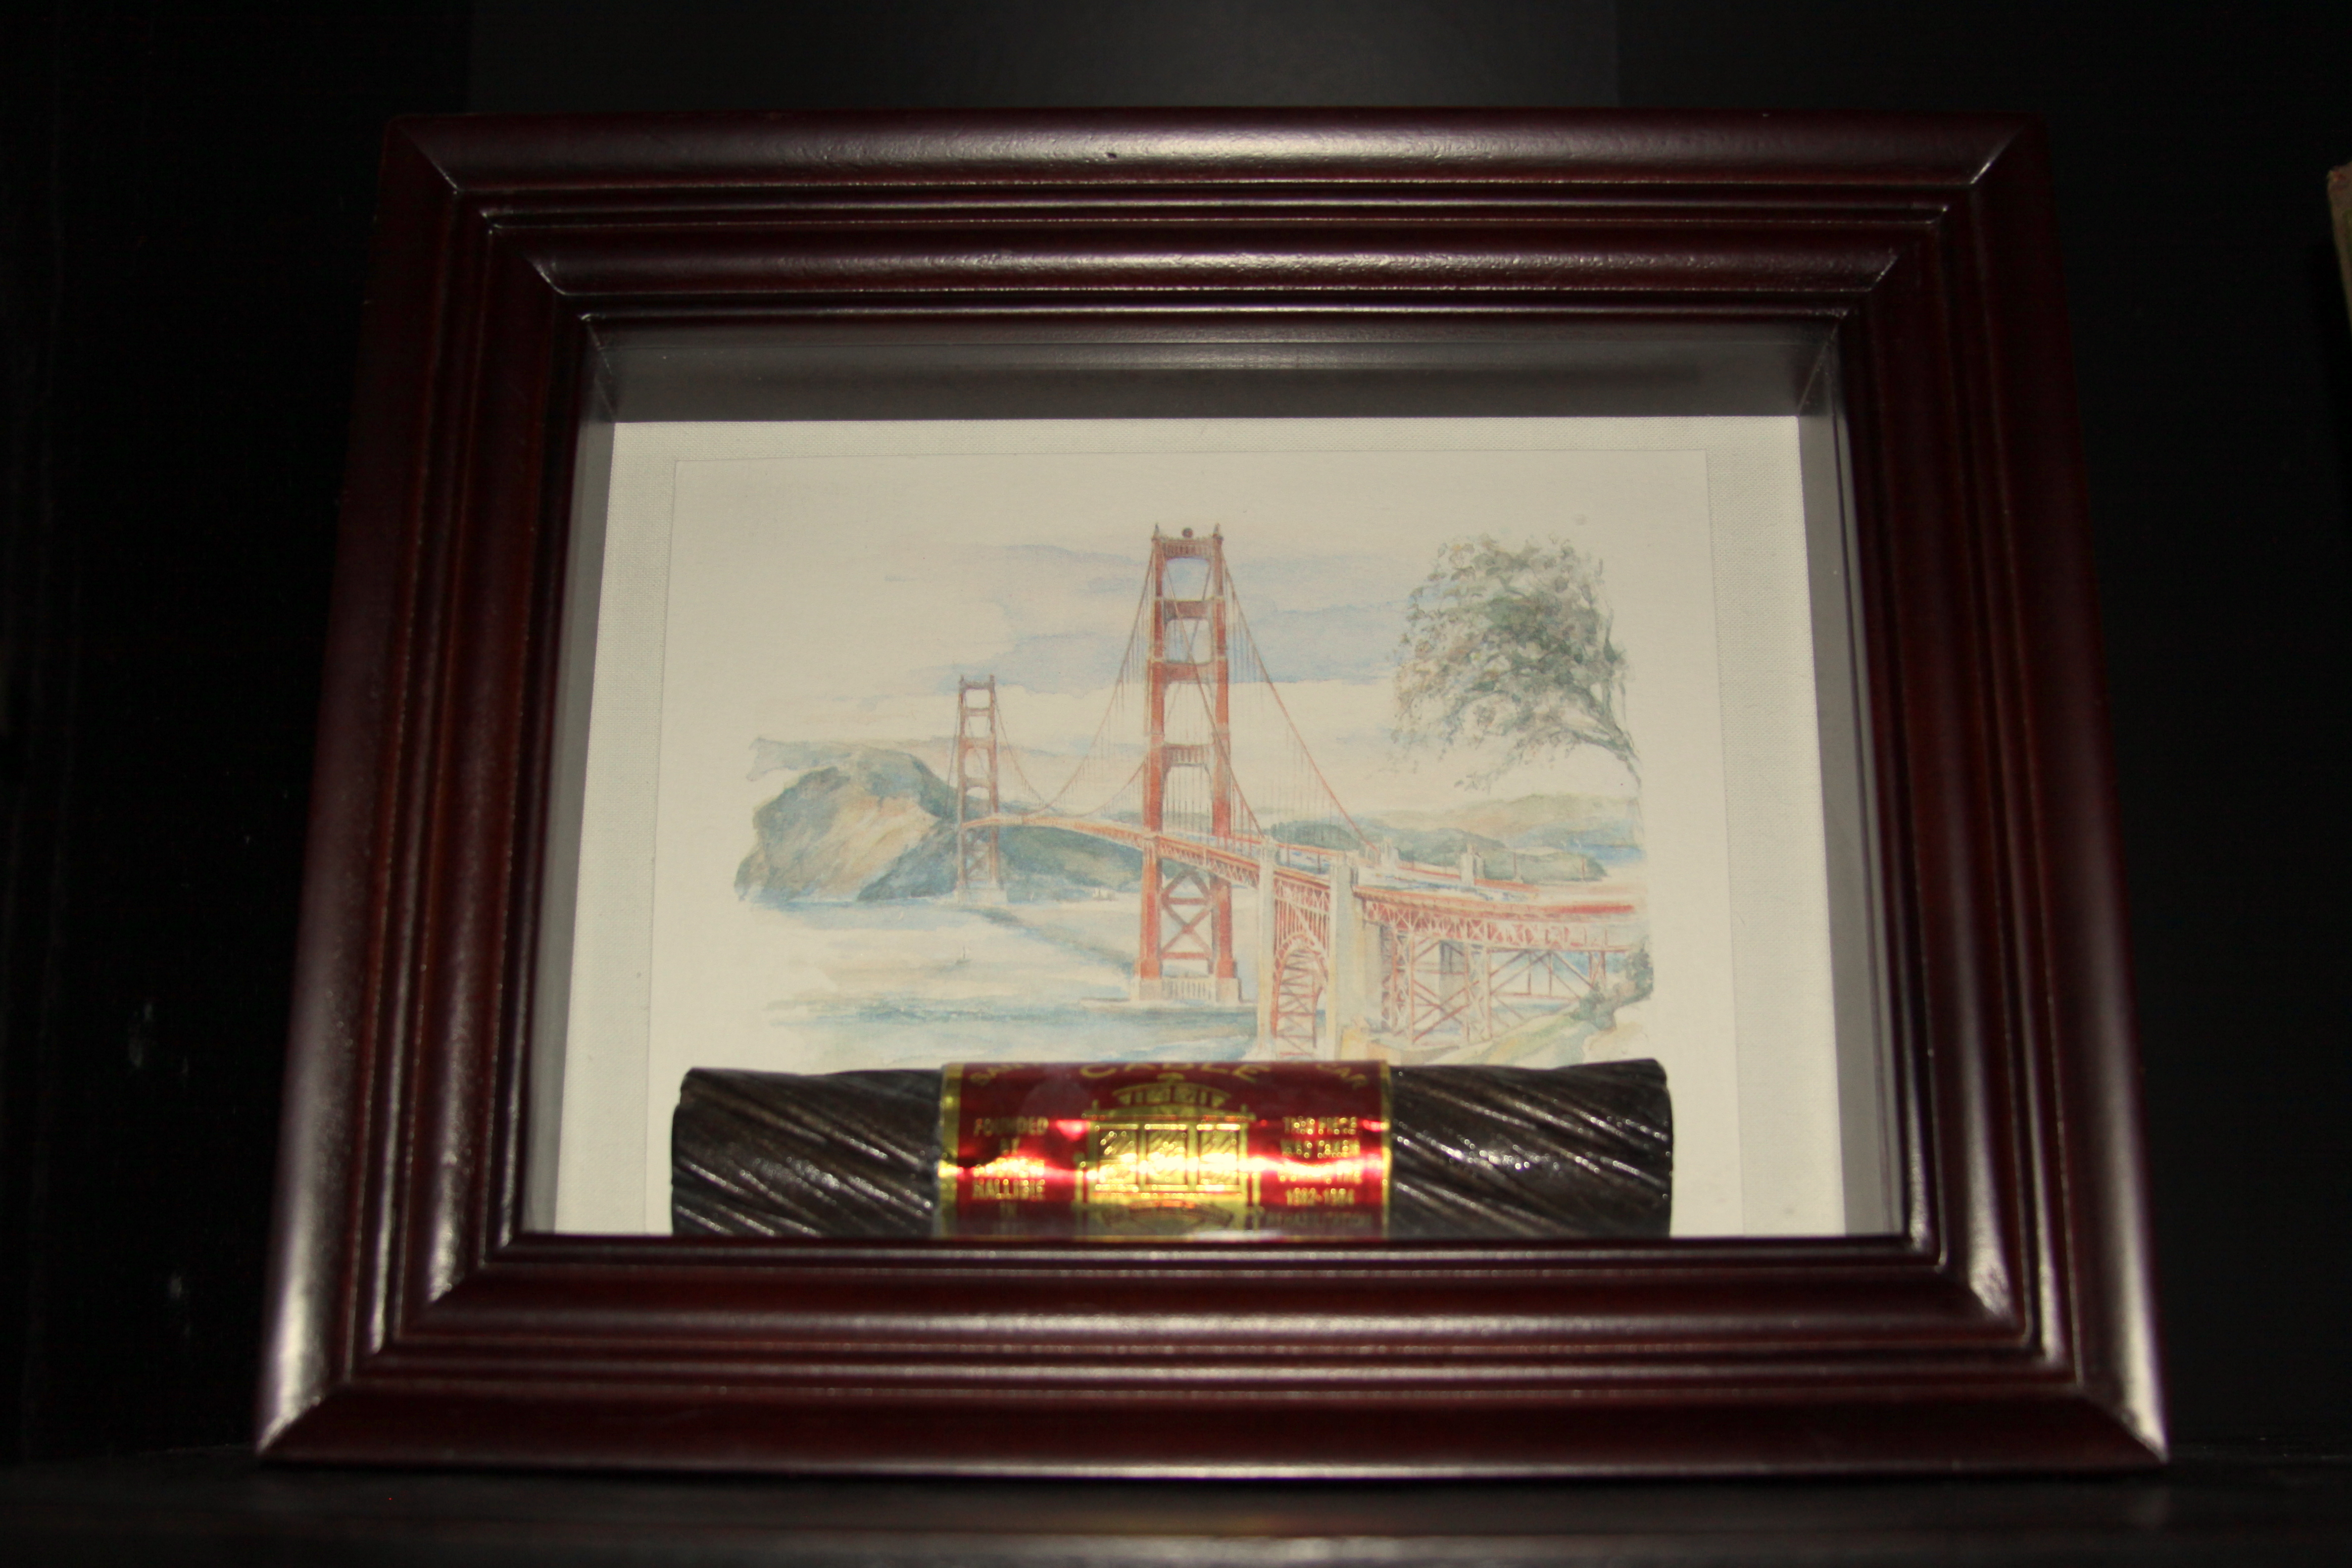
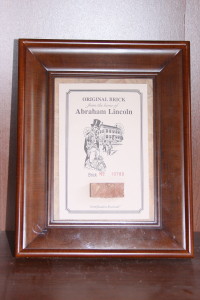
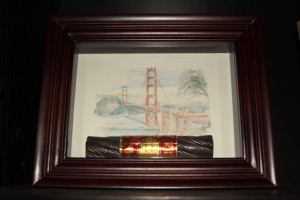
As I mentioned previously in a July 2013 Décor Post, Displaying Travel Souvenirs, in the library of our home nestled among the books are several items that we have collected over the years during our travels across the United States and other distant places such as Europe and Asia.  I have found that shadowboxes are an excellent way to display these travel souvenirs.  One example, shown below, is the shark weapon that we purchased on a visit to the Polynesian Culture Center in Hawaii.  This beautifully crafted piece is displayed in a shadowbox to be admired but the real purpose for having it behind glass is that the sharp edges of the shark teeth are enclosed to prevent anyone from handling this dangerous weapon.  Several other smaller shadowboxes are also displayed on the bookshelves and the examples are shown below and they are: a framed piece of Edelweiss purchased in a small shop near Neuschwanstein Castle in Germany, a small piece of brick from the home of Abraham Lincoln located in Springfield, IL and a piece of cable that we purchased at the San Francisco Cable Car Museum.

Hawaiian travel souvenirs
Germany travel souvenir    Springfield travel souvenir

San Fransico travel souvenir

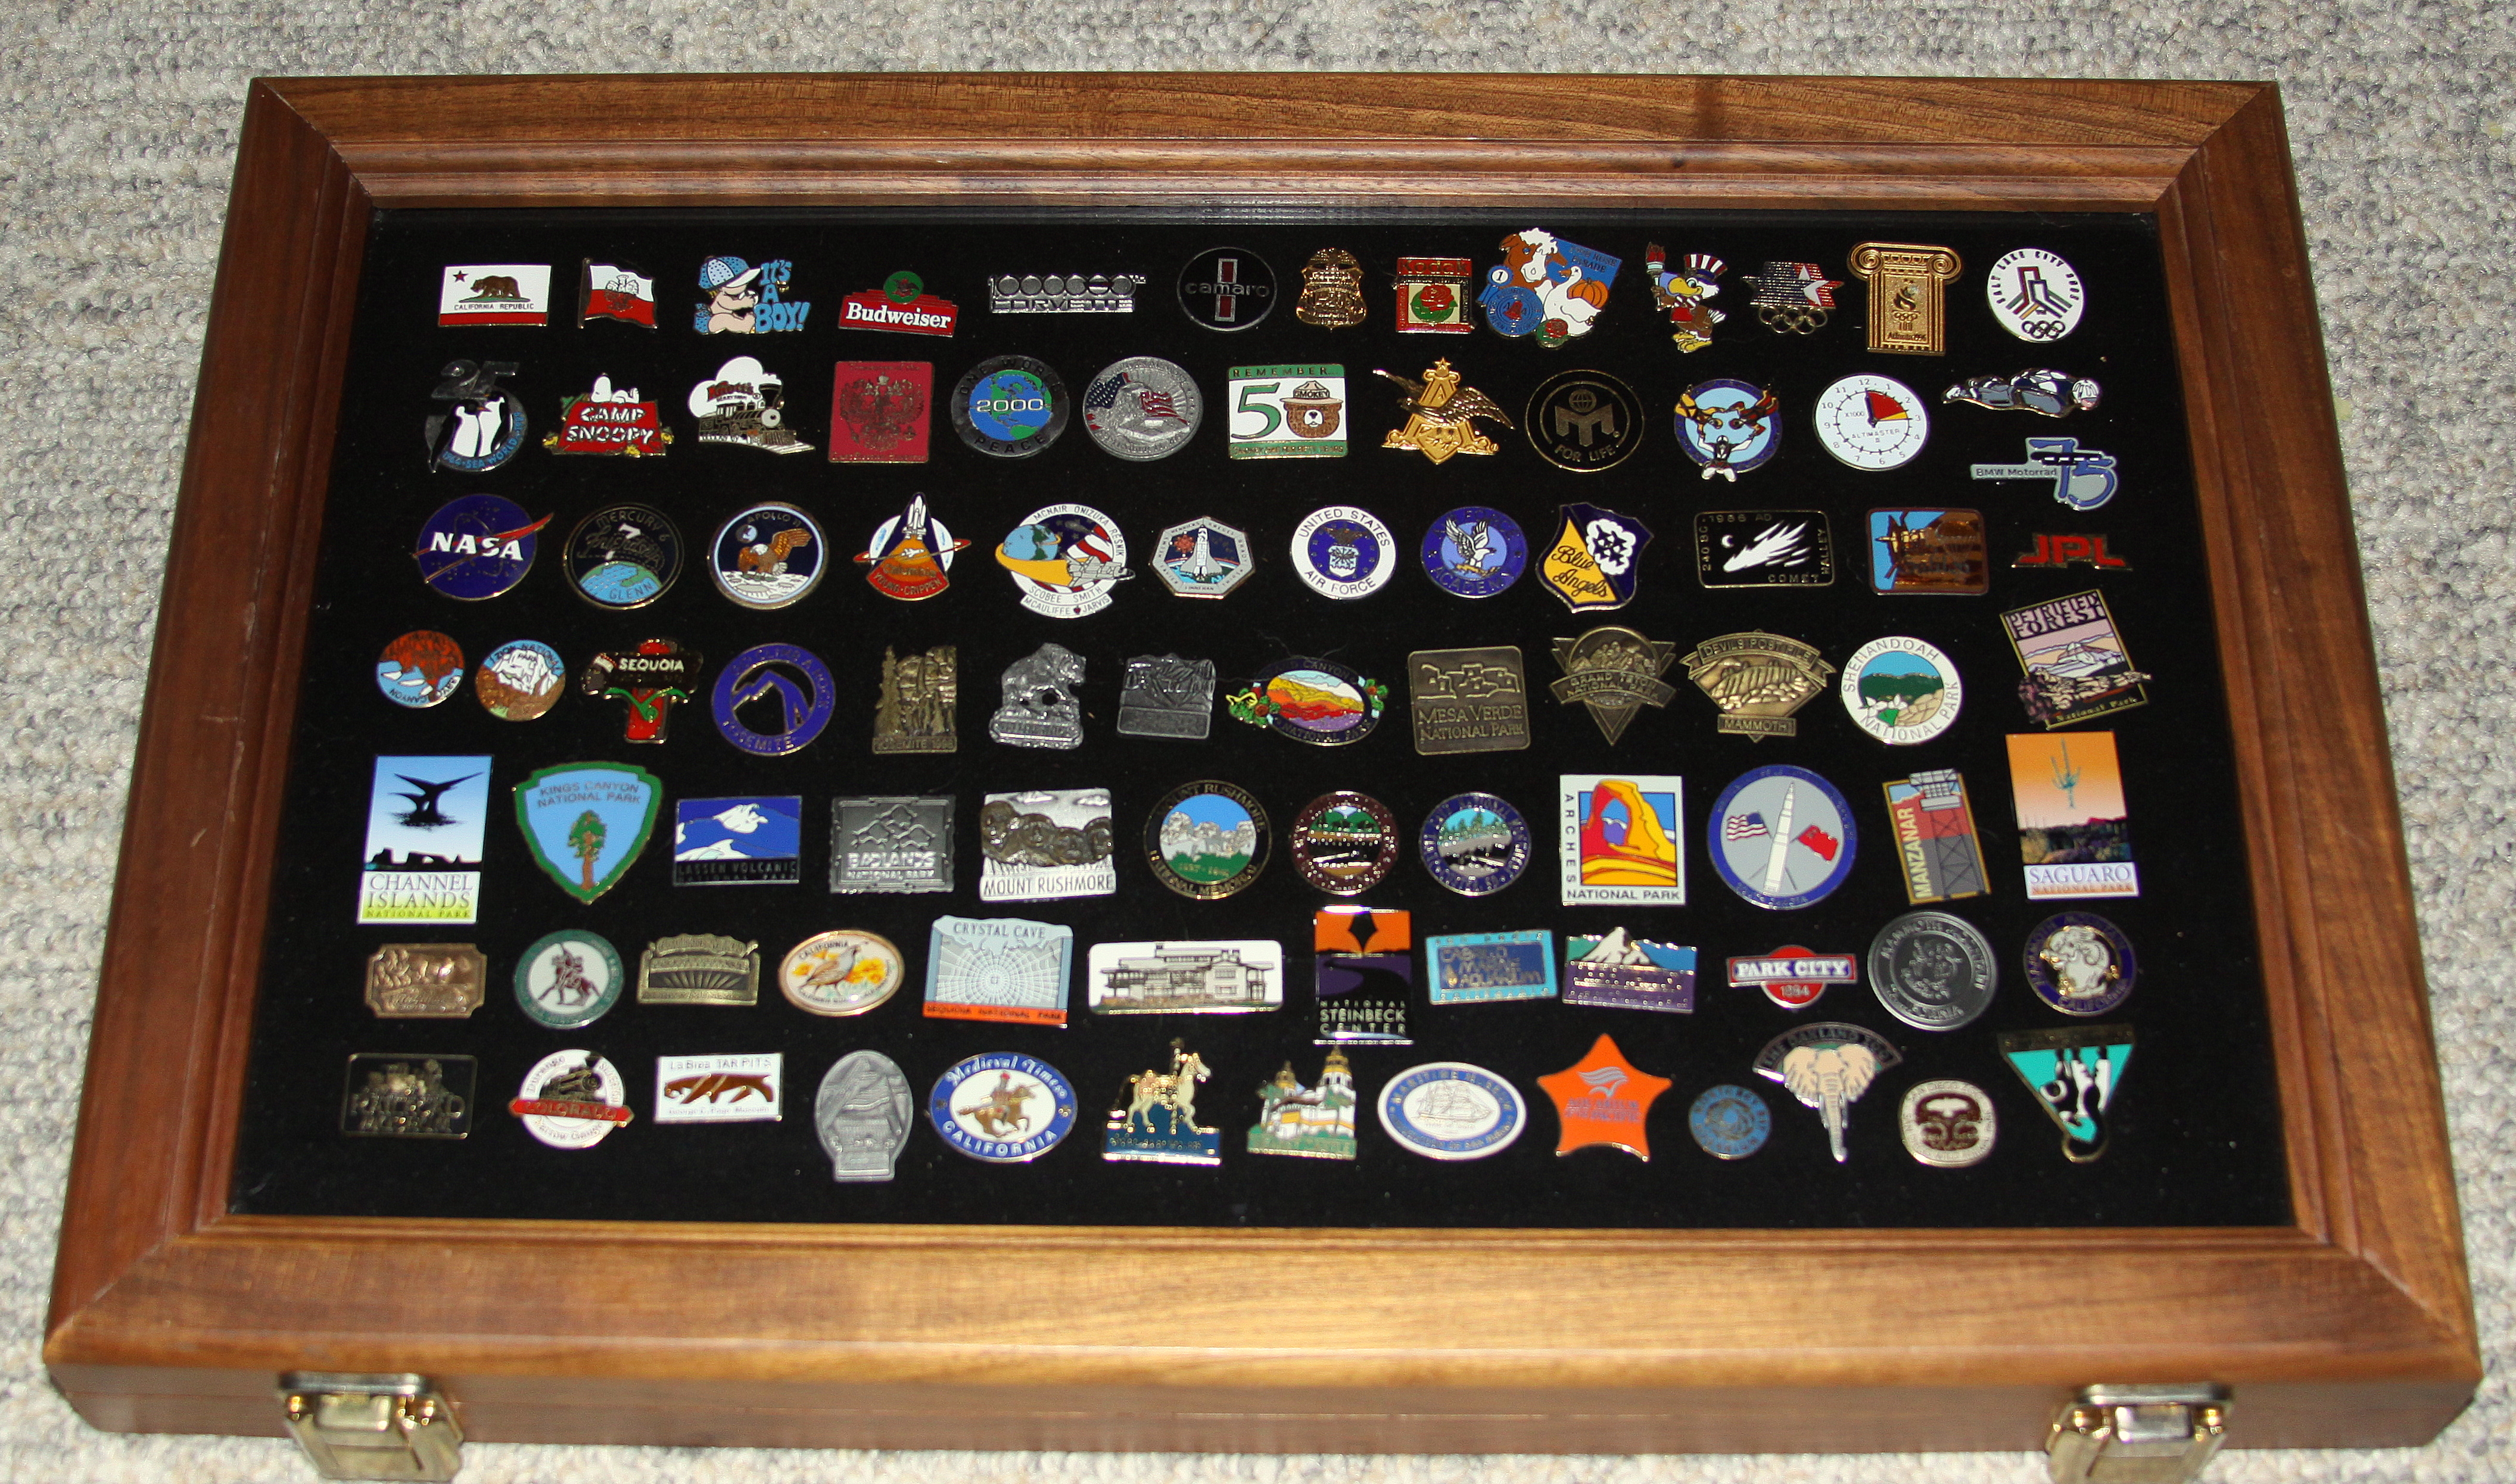
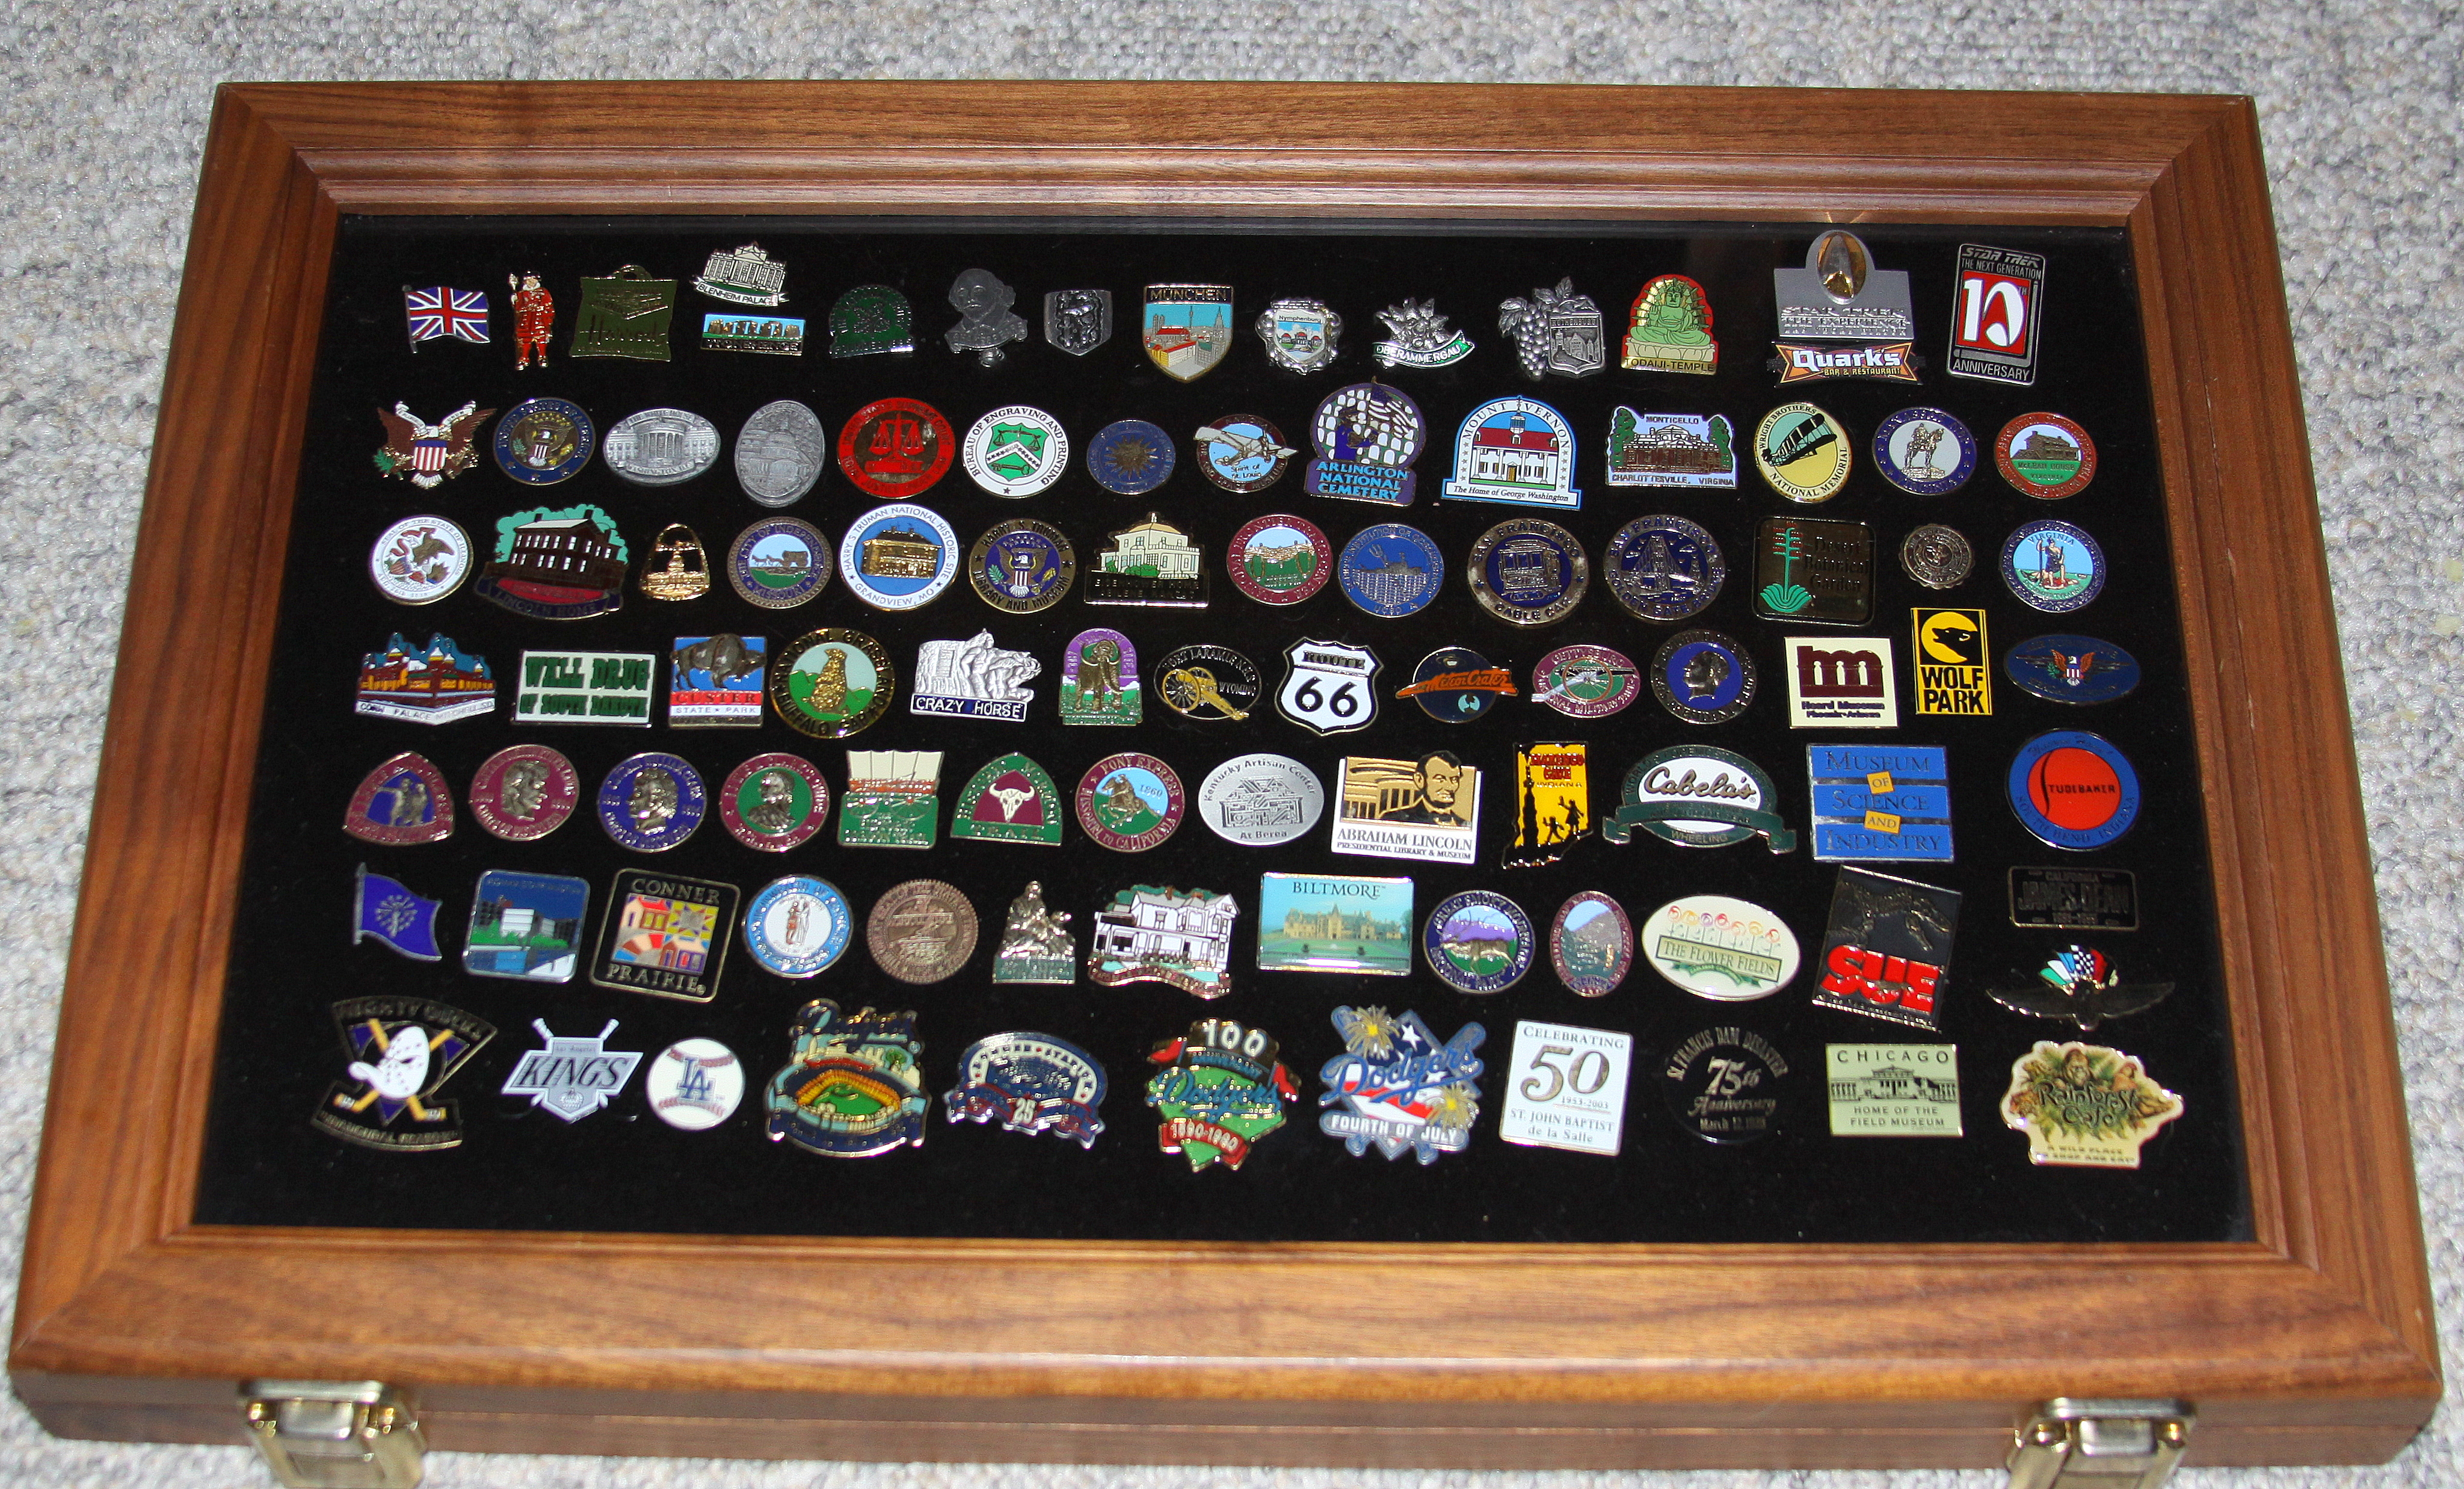
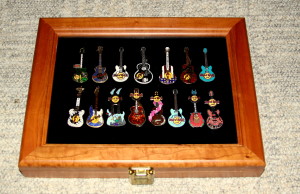
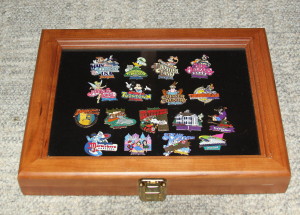
Discussed in the May 2013 Décor Post, Framing Small Items, during our family road trips, I always purchase pins as inexpensive souvenirs and over the years I have collected hundreds.  These pins, shown below, are displayed in special walnut cases with black liners.  Also shown below are additional cases, one case displays my collection of Hard Rock Café guitar pins purchased during over visits to the restaurants throughout our travels and in another case is a very small part of my collection of over two hundred Disney pins.

Pin collection 2  Pin collection 1
Pin collection 4    Pin collection 3

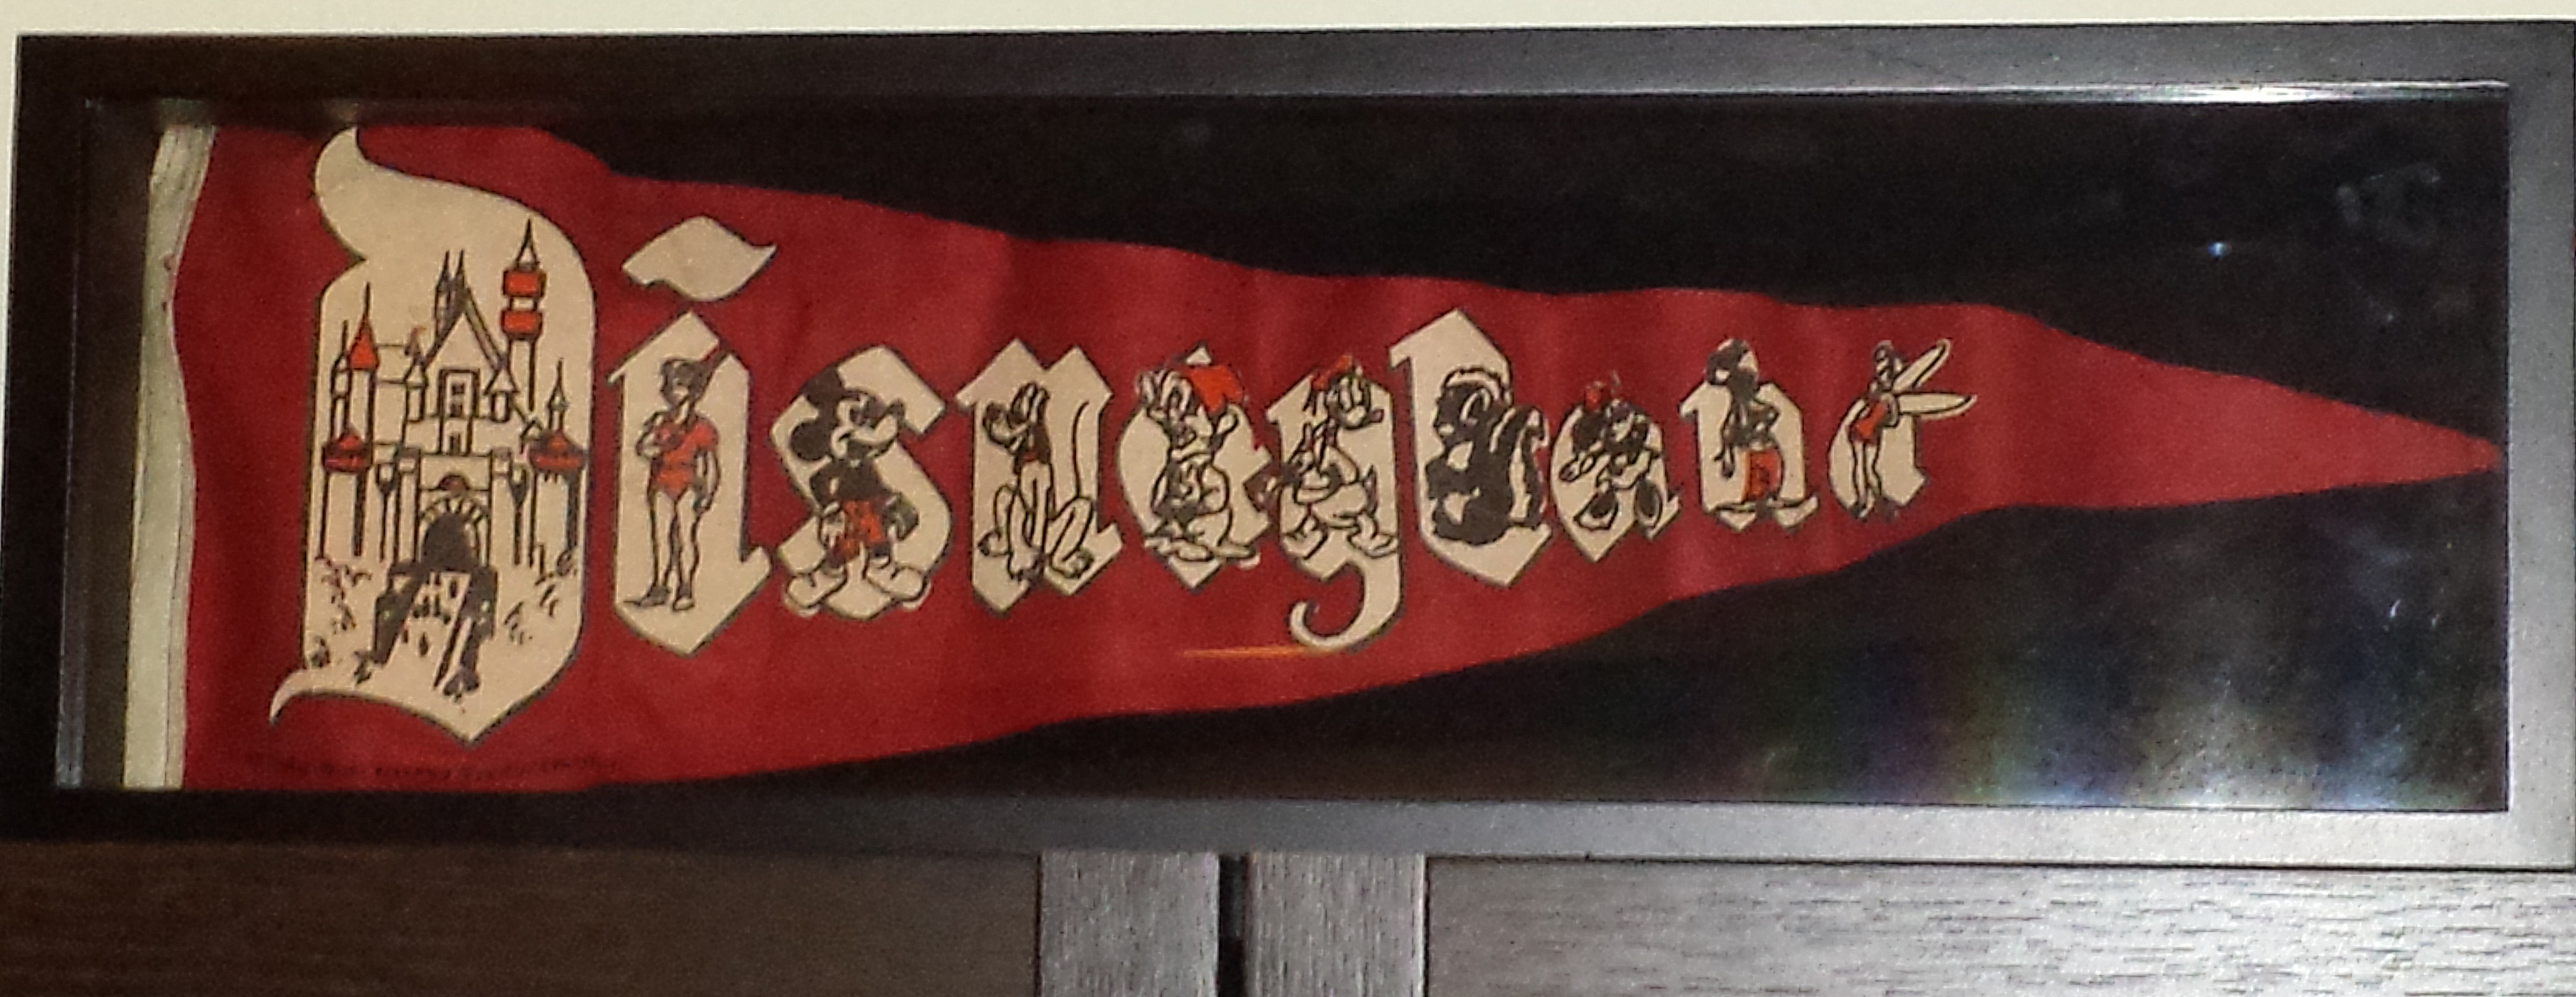
Another memorabilia display featuring travel souvenirs can be found in our basement displayed above my Disney bookshelves.  It is a vintage Disneyland pendant in a black shadowbox and is shown in the photo below.    As I mentioned previously in the April 2013 Decor Post, Disney Memorabilia Collection, I go into details about my Disney obsession and the items that I have collected over the years.

Disneyland pendant shadowbox

So, instead of storing your travel souvenirs in boxes which are hidden away from view, try displaying them in shadowboxes or special display cases which allow you to look at these items while the items are protected from dust or damage and you will be able enjoy the memories of your travels!

Vintage items

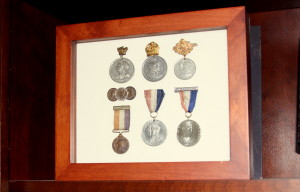
As many of you know from reading previous posts, I enjoy browsing and shopping in antique stores and on EBay.  Over the years I have purchased many vintage items and scattered around our home are several small and unusual framed items which add personality and interest to our home decorations.  In the May 2013 Décor Post, Framing Small Items, I featured a shadowbox that is on display in my home office that contains commemorative medals of the British Kings and Queens that I had purchased inexpensively on EBay.  The pins, shown below, range from Queen Victoria to the present Queen Elizabeth II and it is a wonderful way to have a little piece of interesting history.

Framed collectible 3

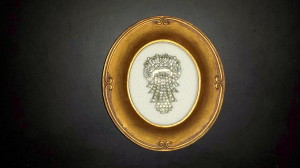
In another Décor Post, Framed Jewelry, posted previously in February 2014 features several vintage jewelry items that I also purchased while shopping in antique stores and on EBay.  These vintage jewelry pieces look wonderful displayed in small frames and add an elegant touch to our home décor.  Shown below is a beautiful crystal fur clip which is attached to a piece of white velvet and displayed in a small gold frame.

Framed Fur clip

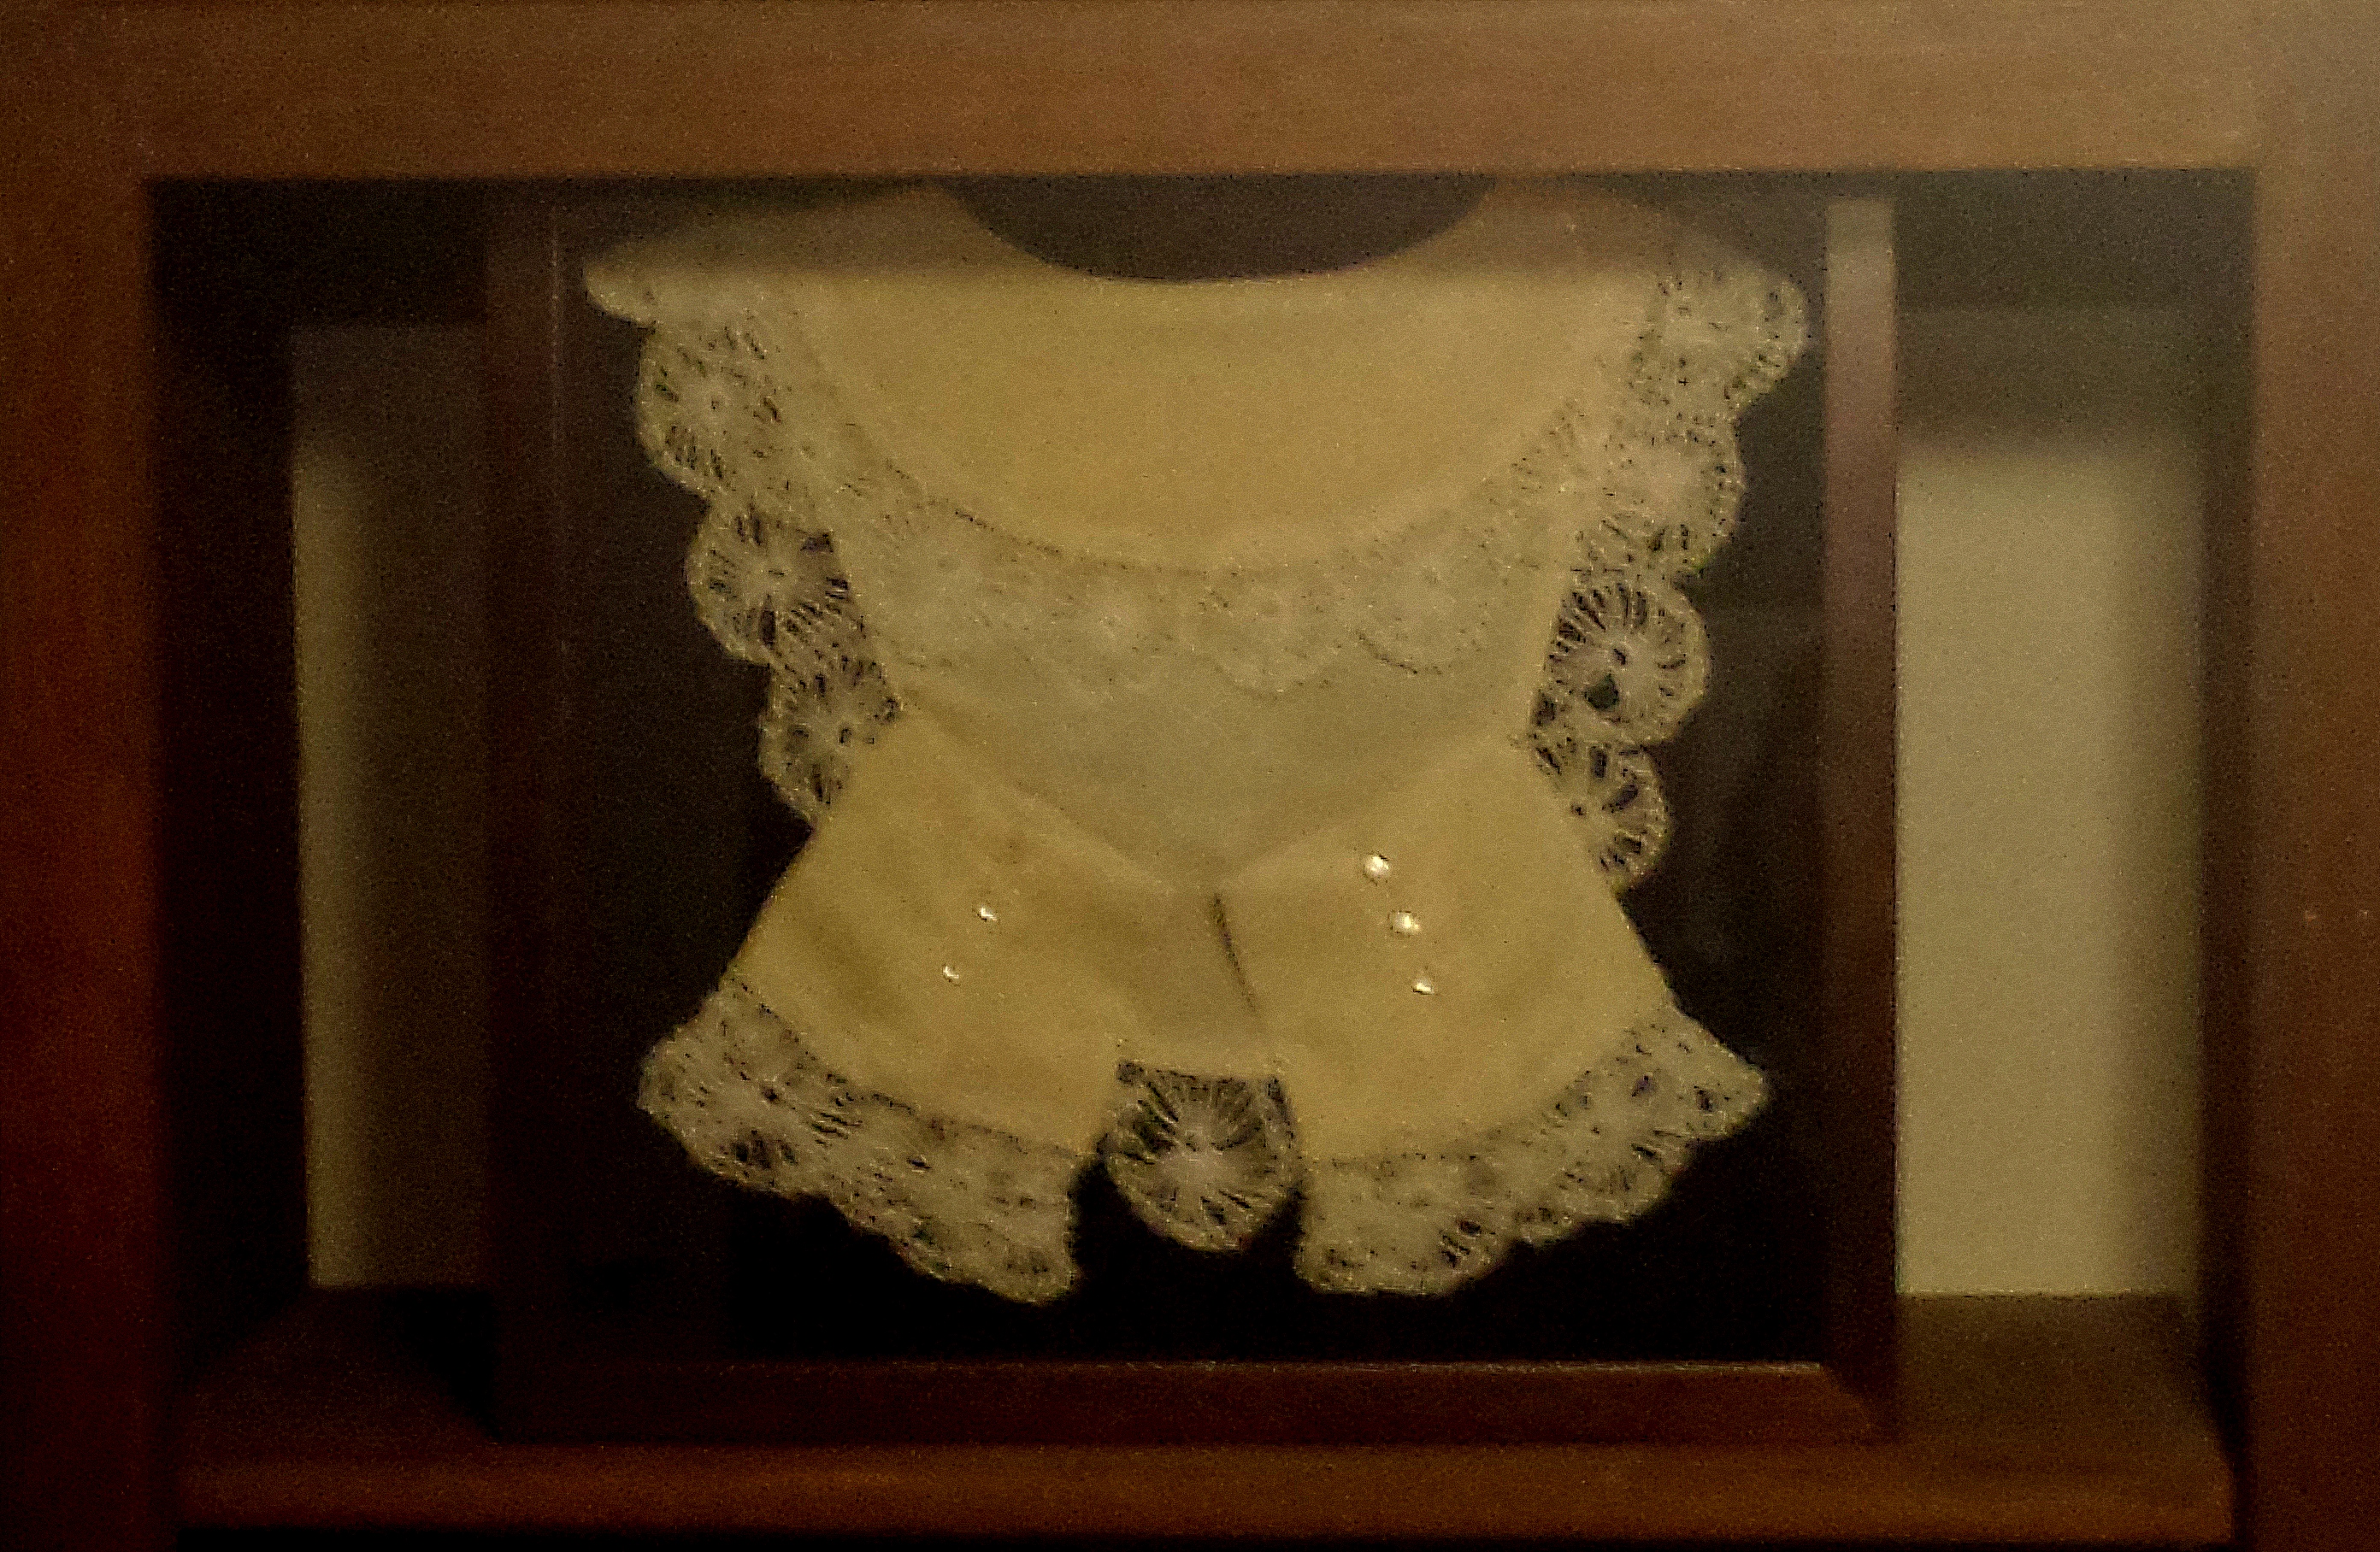
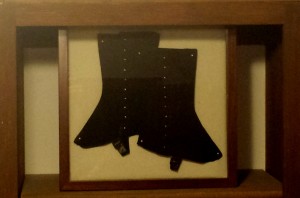
Recently, one of my Spring cleaning projects was organizing the closet in our master bedroom.  The room is a rather large walk-in closet with a counter positioned in the center and has a wonderful and convenient chute to the laundry room downstairs.  The room also has useful built-in shelving where I have displayed two shadowboxes, which are shown below.  One shadowbox has a set of antique lace collars and cuffs while the other one has a pair of antique men’s spats.  Using these antique items displayed in the closet seemed perfect and I think they look great!

Vintage women's lace collar and cuffs    Vintage men's spats

So, next time you are shopping in antique stores or on EBay think about how you can decorate with vintage items displayed in shadowboxes in your home.

Personal heirlooms

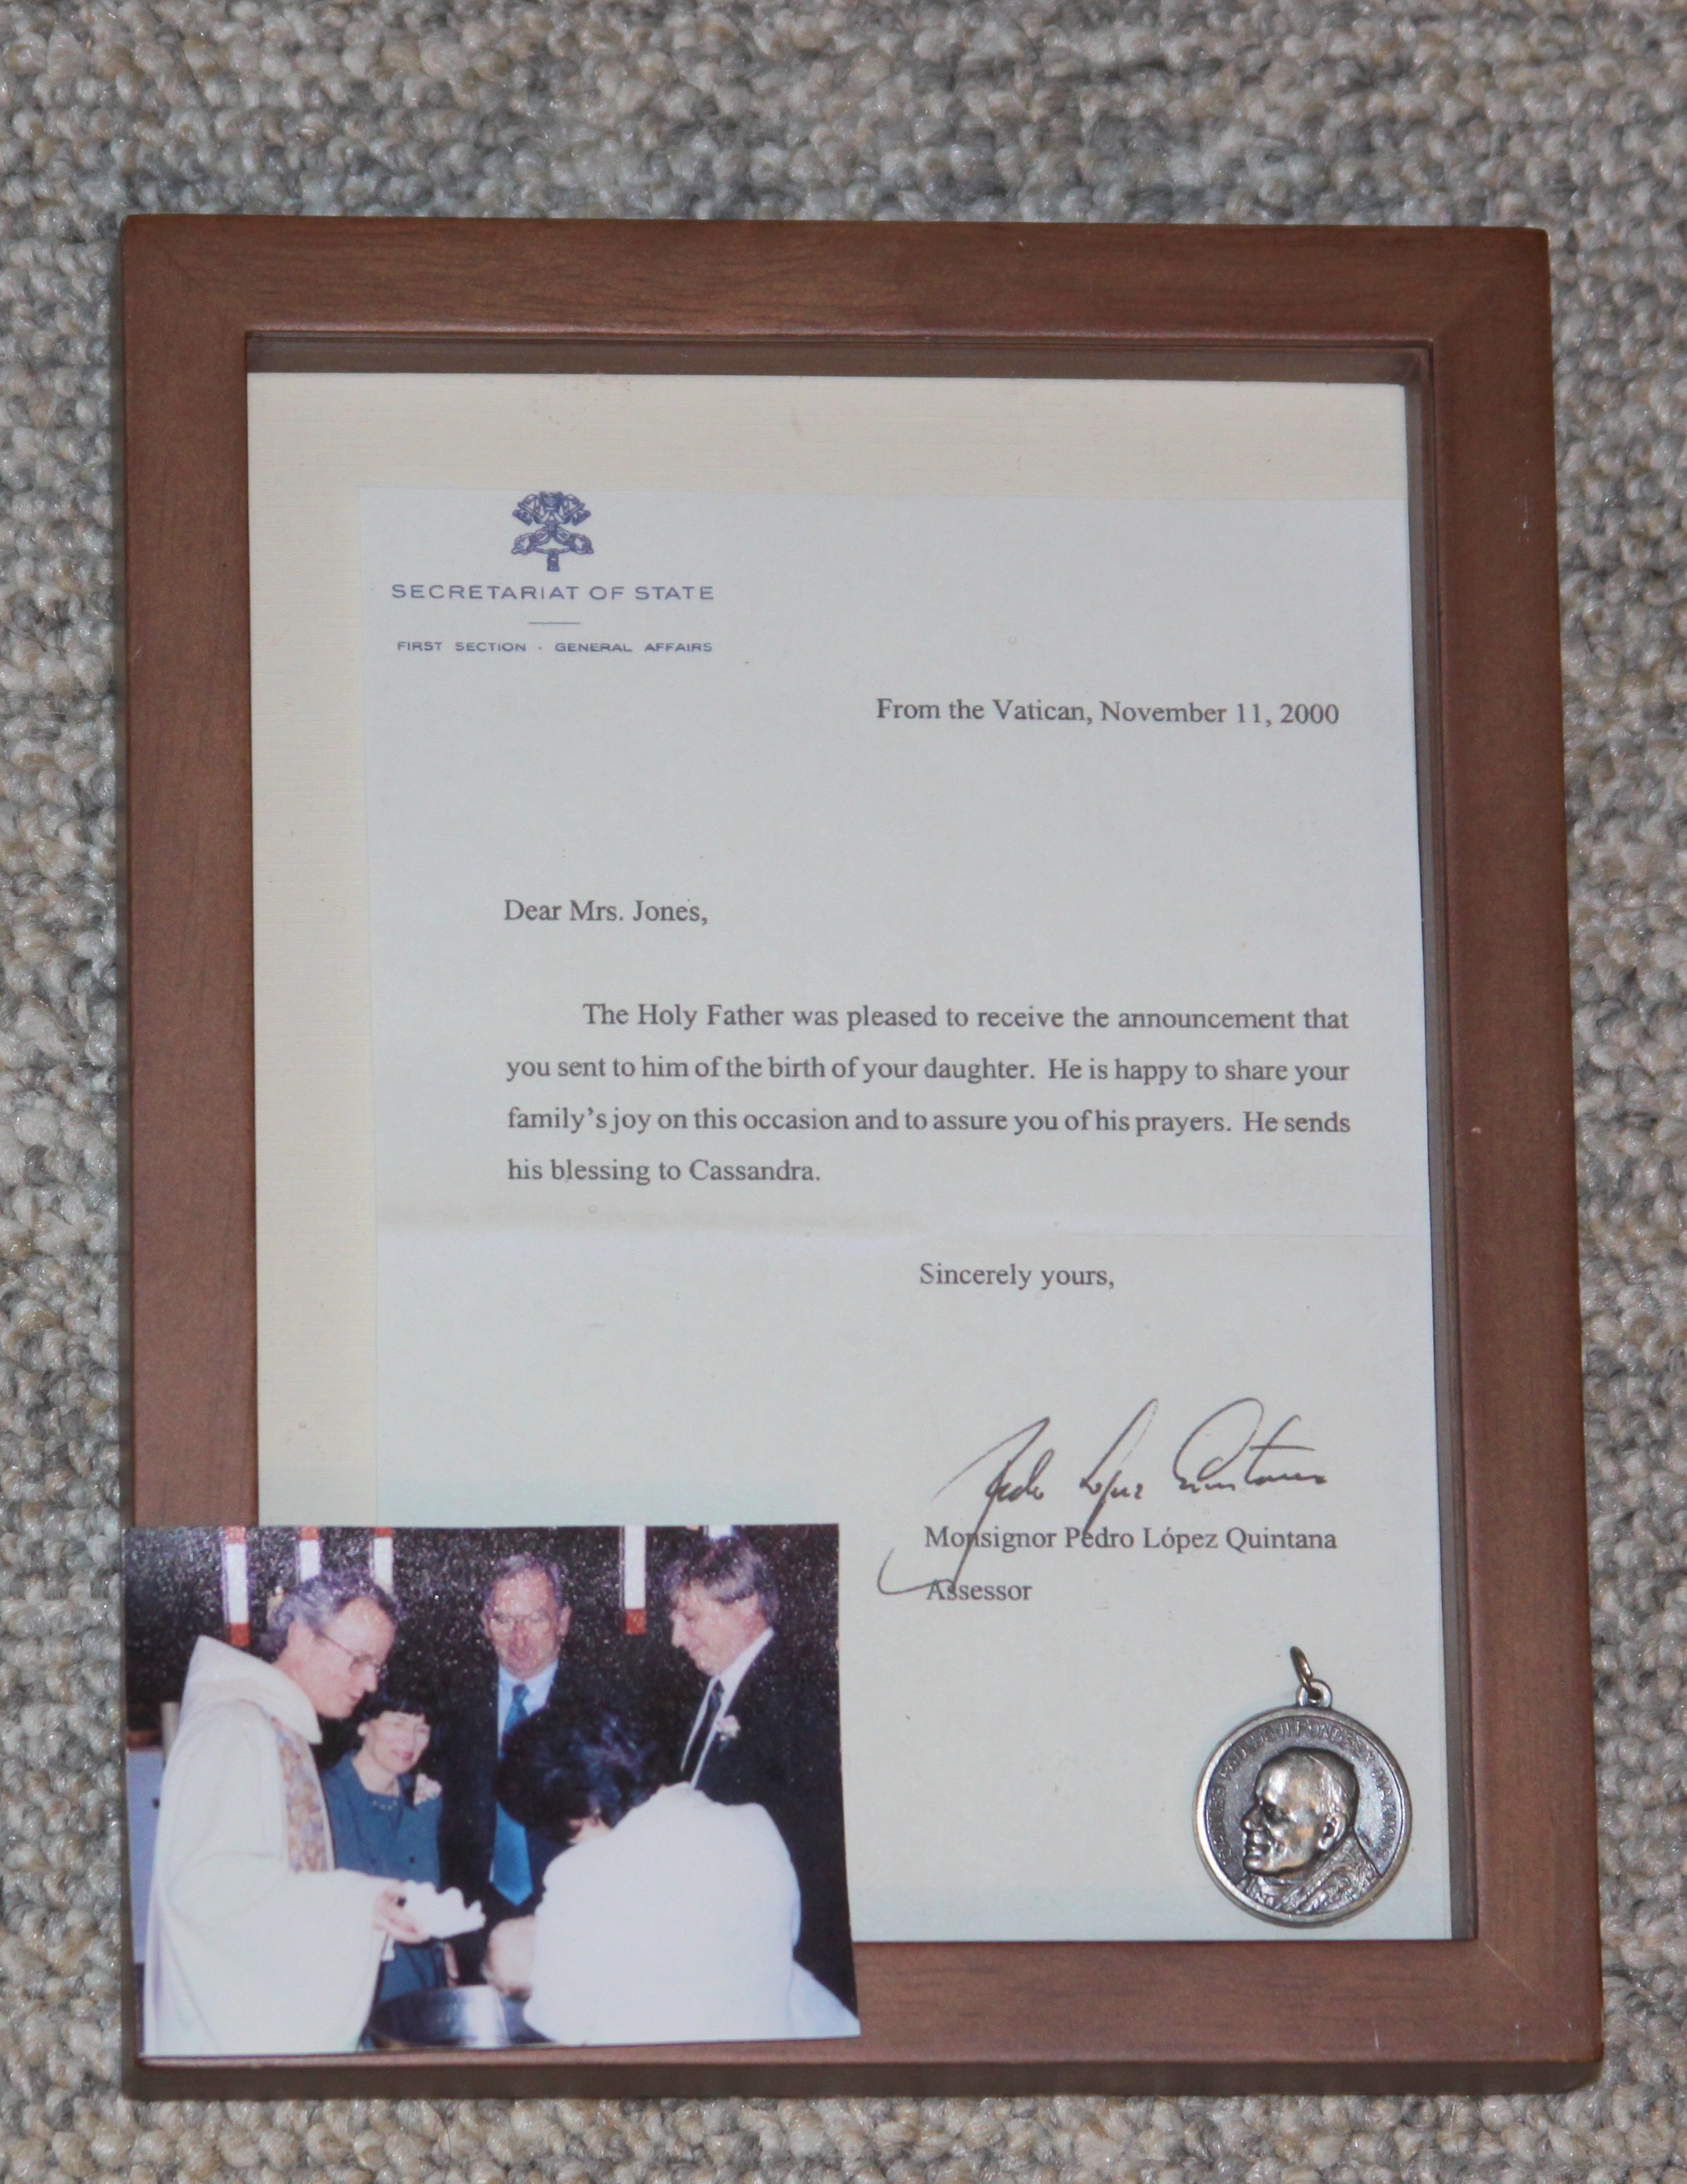
Showcasing family memorabilia or heirlooms is a wonderful way to add a personal touch to any home.  In a May 2013 Décor Post, Framing Small Items, I featured quite a unique item displayed in a shadowbox.  The items, shown in the photo below, are a personal letter and a religious medal from Pope John Paul II and included in the shadowbox is a photo taken on the day of our daughter’s baptism. This is an example of how these very personal items can be displayed to commemorate a blessed event.  For more information about this shadowbox and to read the story of how we came to receive these special items, please click on the link above. 

Framed collectible 1a    Childhood beach shovel

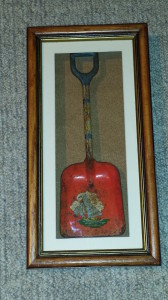
The next item of family memorabilia is an old rusty beach shovel shadowbox display, shown in the photo above.  When I was a child living in California, our family used to enjoy the occasional day at the beach.  This old metal beach shovel, found in my parent’s garage.  The trick to making this type of shadowbox is finding one that has enough depth to accommodate the shovel and then using a piece of sandpaper for the background of the shadowbox because it would look like the sand on the beach, finally the shovel was attached to the paper with hot glue.  Seeing the beach shovel shadowbox hanging in our downstairs bathroom brings back wonderful memories of Paradise Cove.

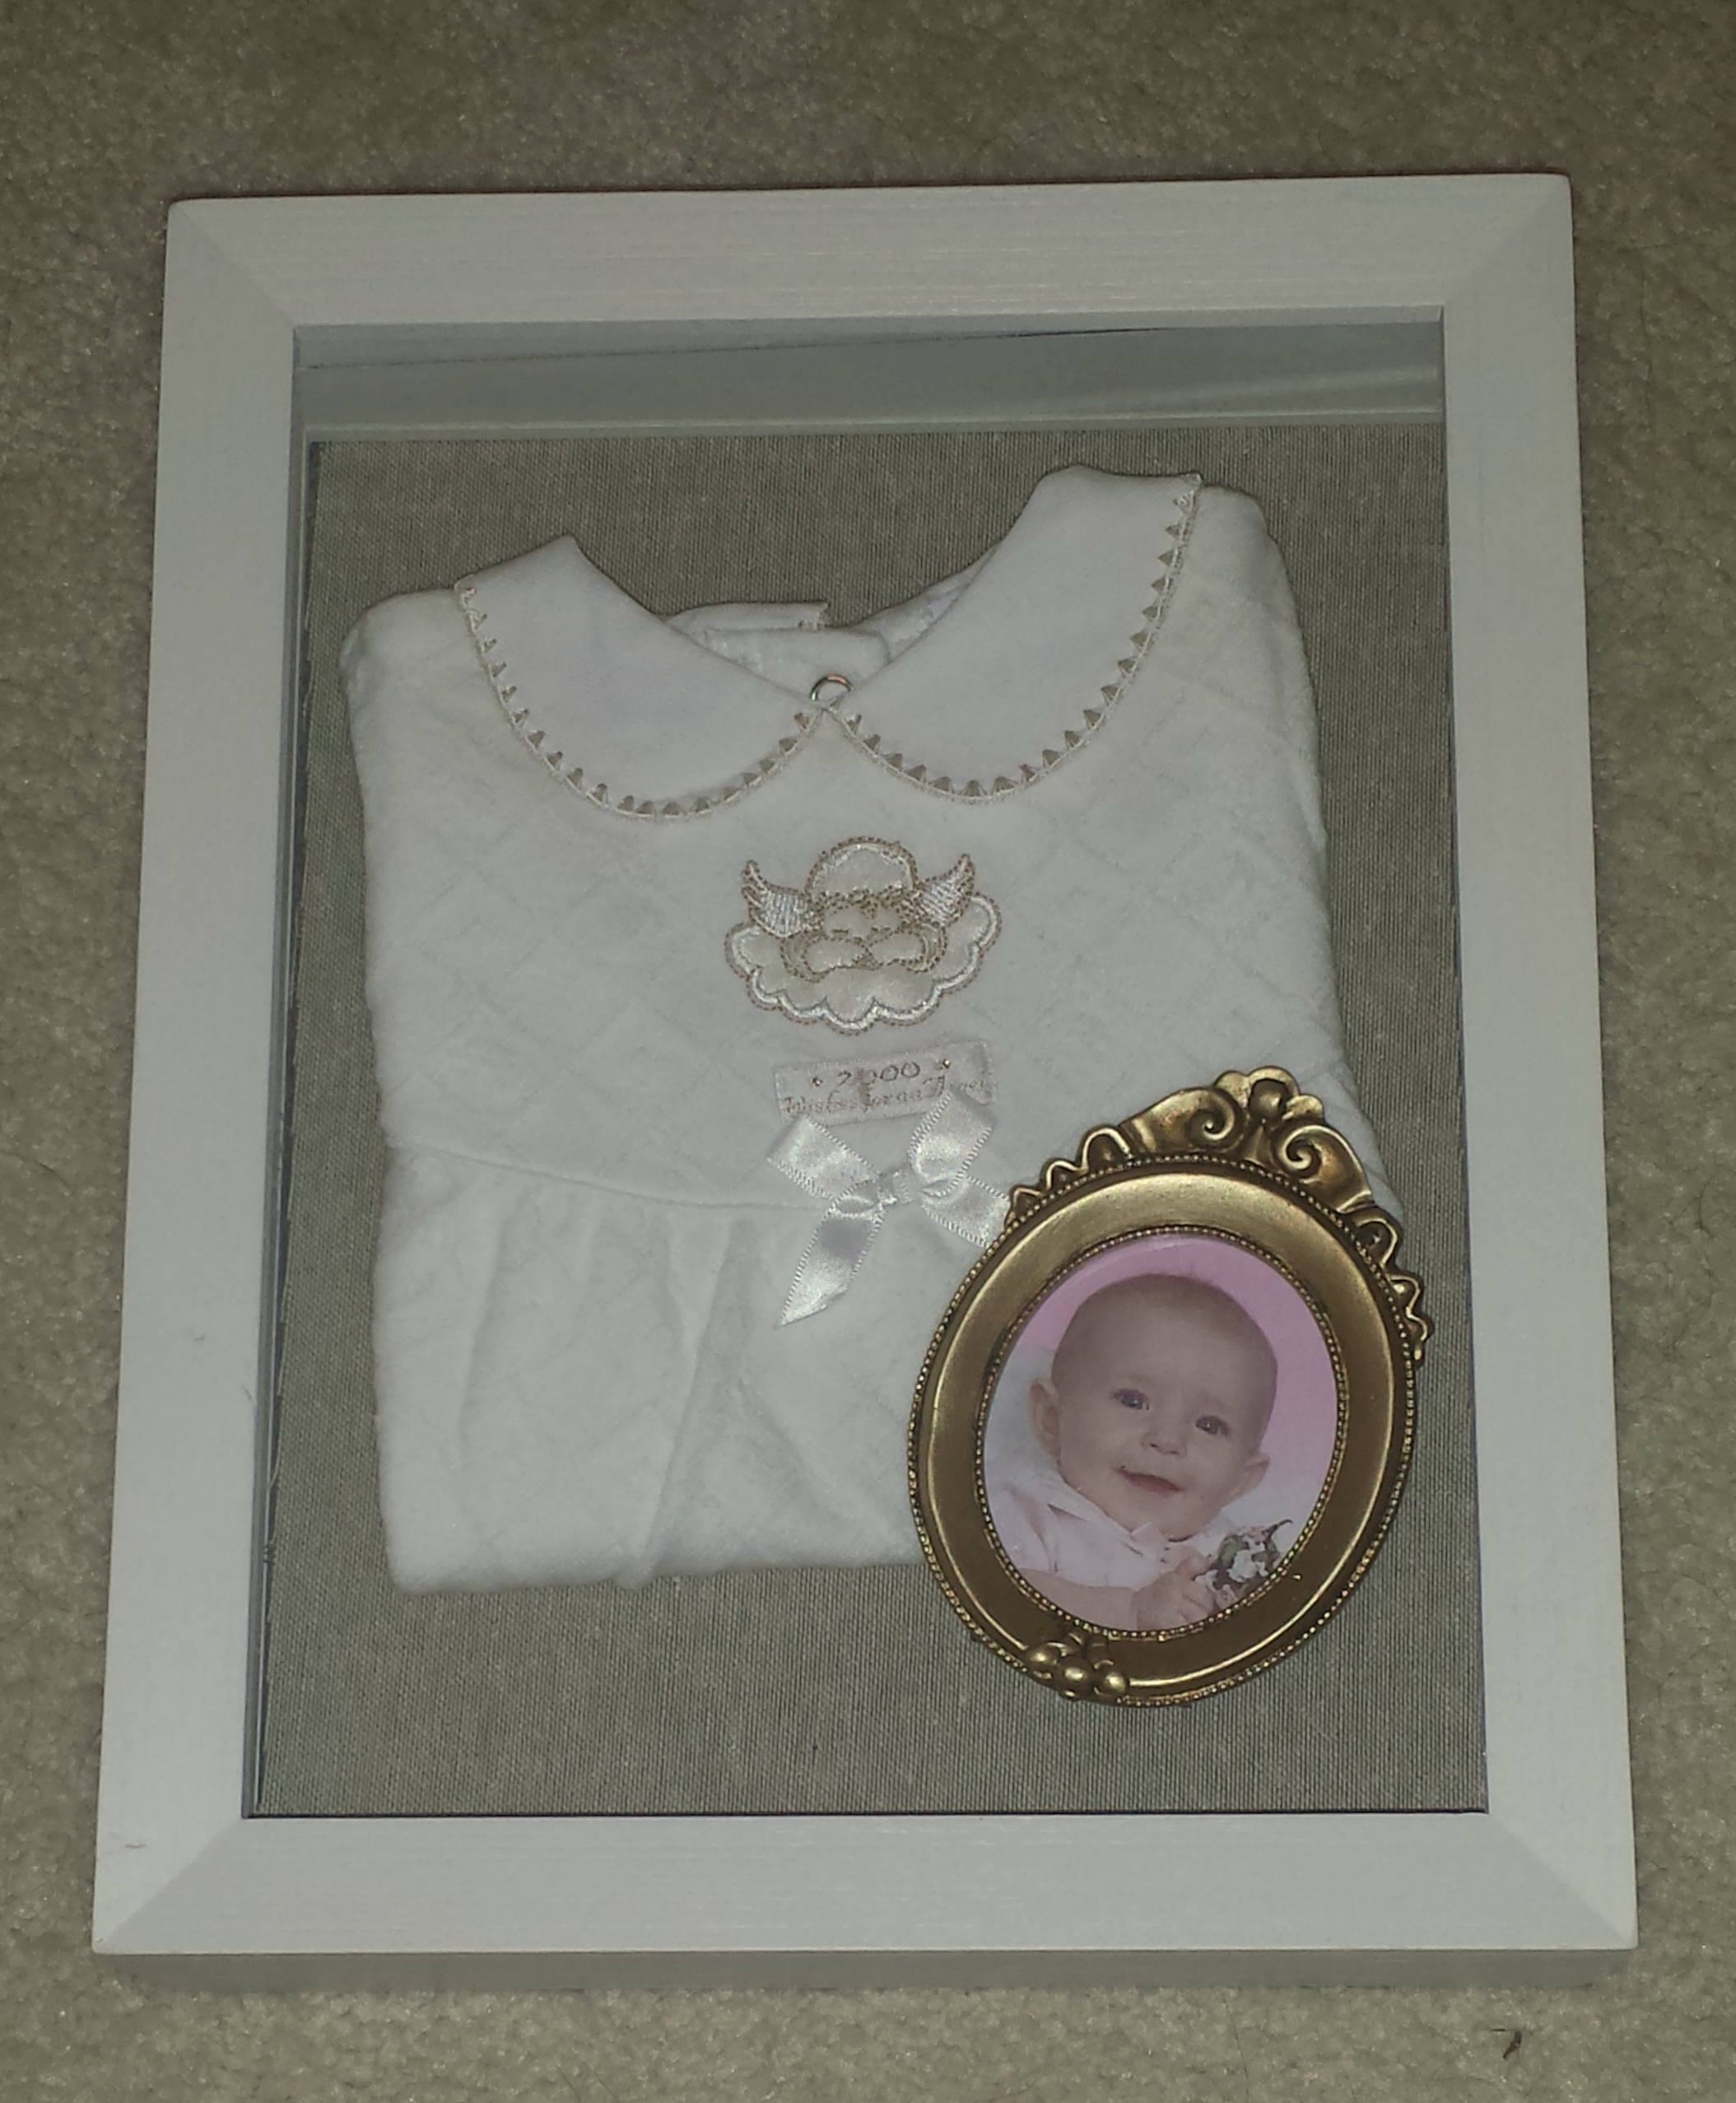
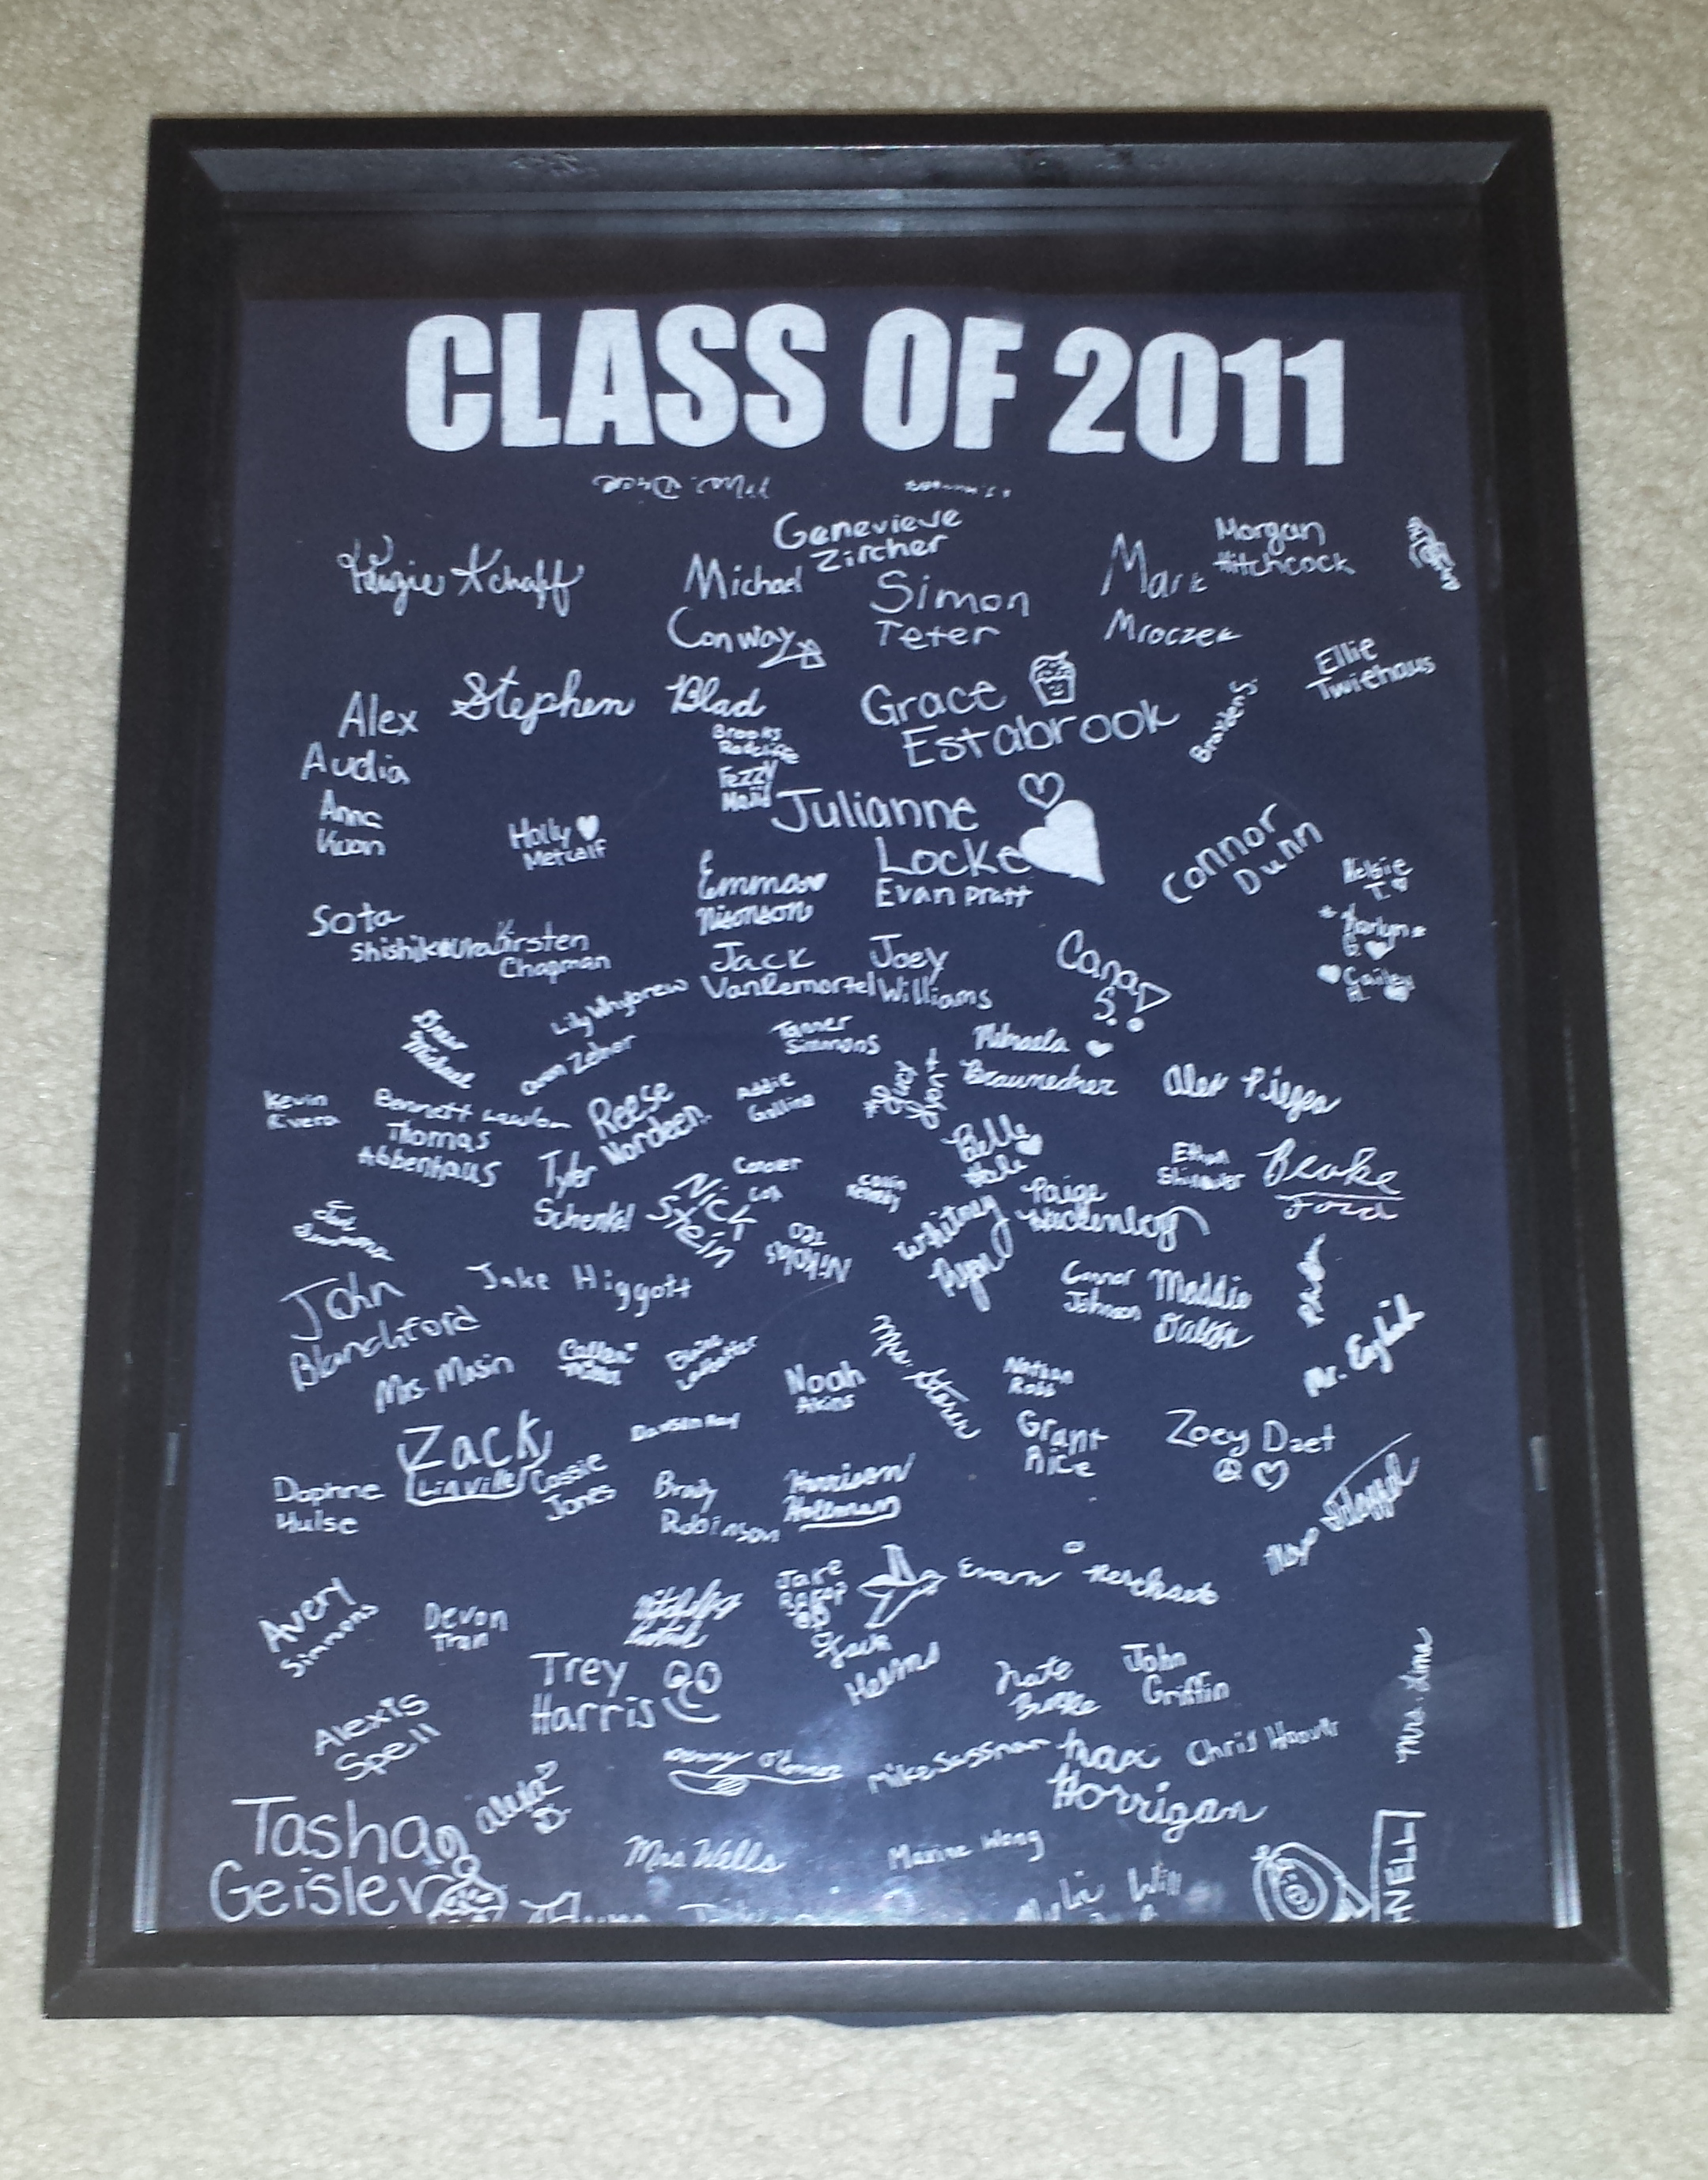
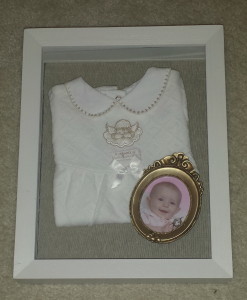
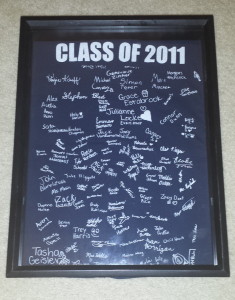
The next two examples of family memorabilia are framed items of clothing which are shown below.  The first is one of our daughter’s baby outfits and I also included a baby photo of her in a small gold frame, these items are simply displayed in a white shadowbox.  The second shadowbox which contains our daughter’s 5th grade graduation t-shirt and it is hung in her bedroom, she likes looking at the names and remembering her classmates.

Cassie shadowbox 2    Cassie shadowbox 1

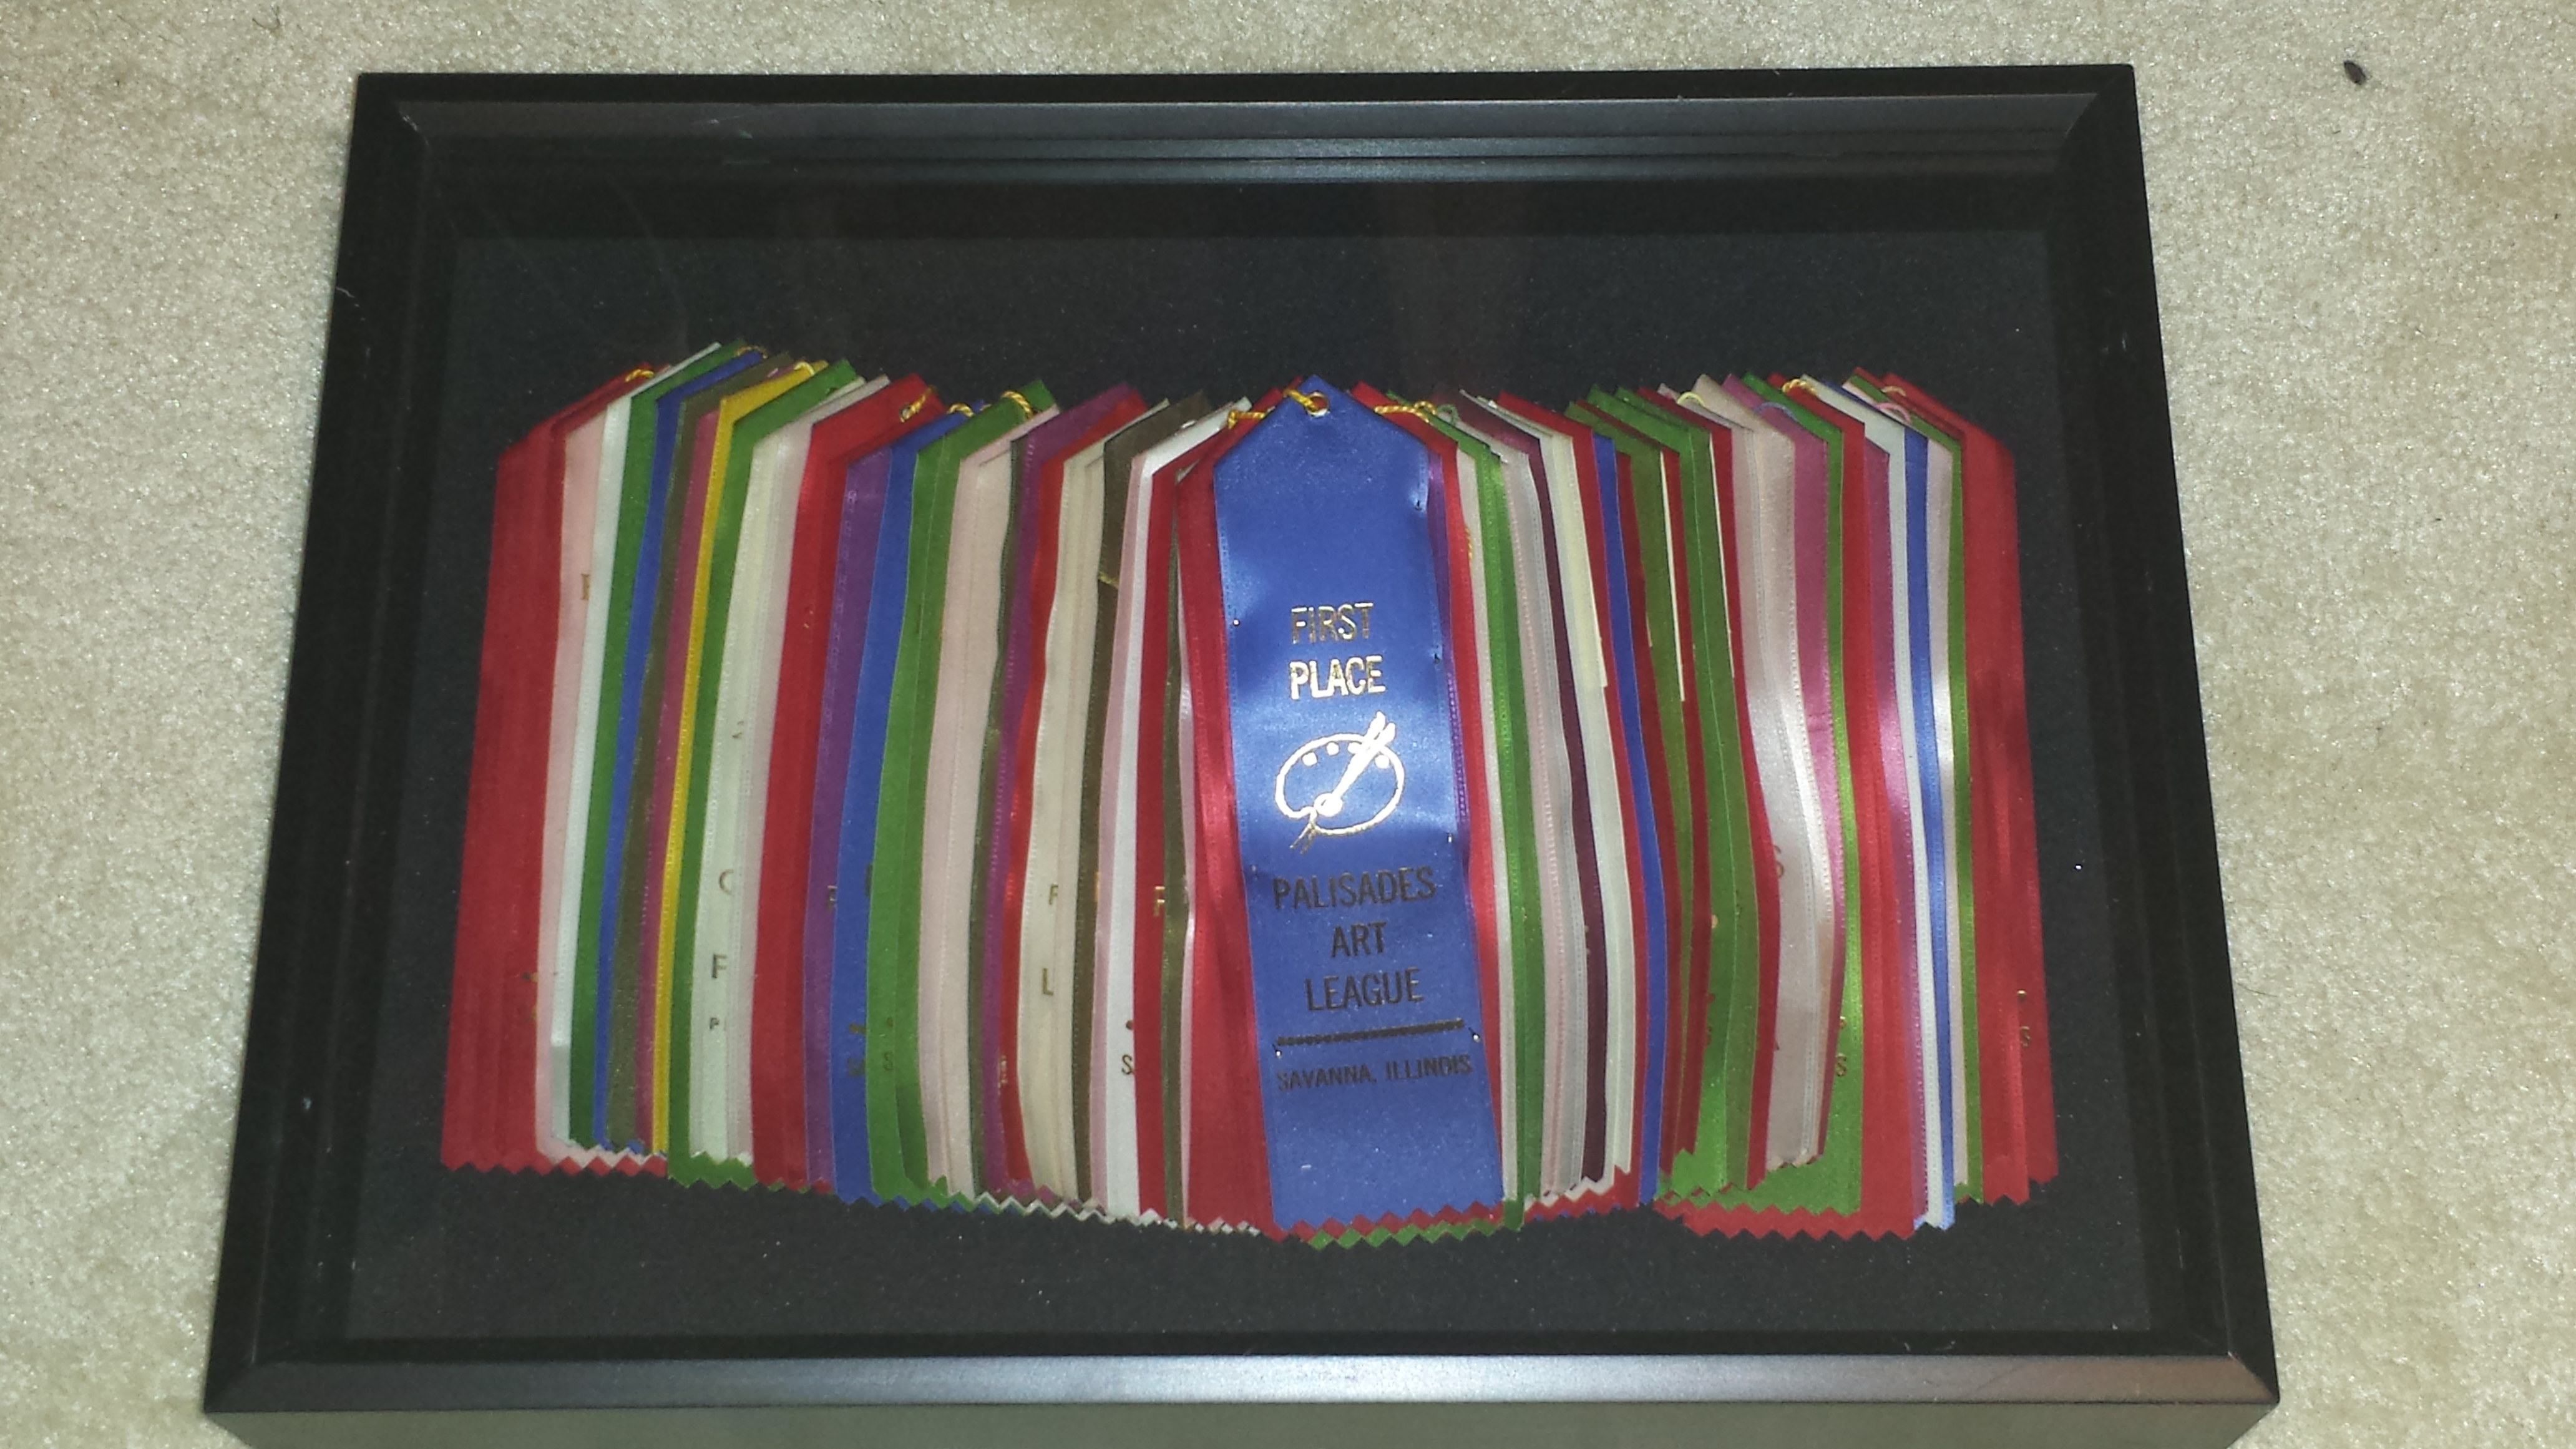
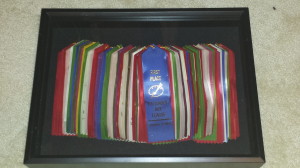
The final example of a family memorabilia shadowbox was used a few years ago when my husband’s Grandmother passed away.  She was an artist and for her funeral/memorial services and we displayed several of her paintings and other pieces of artwork and her art ribbons won at local fairs and competitions was arranged in the shadowbox and also put on display at the funeral home.  Sadly, if you are ever put in the position of making funeral arrangements or planning a funeral service, it is always a thoughtful idea to add some items that were of personal interest to the deceased.  When these items are displayed among photos of the deceased, along with the floral arrangements, it helps to “tell the story” of the person’s life.

Grandma Hodge's art ribbons

So, memorabilia shadowboxes can be used to decorate and add personality to the home.  These items can be travel souvenirs, vintage pieces and family heirlooms. For another idea using shadowboxes, please be sure to check out next week’s Craft Post, Childhood Shadowboxes, for an easy and simple craft project to use as a display in your home.

Decor – Elegant Easter Eggs

20140418_191001

Inspired by this month’s craft project, Elegant Easter Eggs, I decide to make several larger eggs to add to my annual Spring decorations for this year.  These larger Elegant Easter Eggs look wonderful displayed in the family room bookshelves of our home.  I made three different ones using oversized paper-mâché eggs tied with beautiful ribbons and then I attached lovely pieces of jewelry to add some elegant sparkle.  The jewelry items that I used were purchased inexpensively on Ebay, but maybe you have a wonderful heirloom broach or pin from your mother, grandmother or other special relative that could be used for a special sentimental touch.  The jewelry that is selected, paint and ribbon can be customized to incorporate the colors and design style of any home.  The Easter Eggs can also be made to give as a wonderful gift for family and friends or maybe a hostess gift when visiting during the Easter season and another suggestion would be to possibly give one as a teacher’s present before Spring Break.

The first Elegant Easter Egg I made was painted with a beautiful gold metallic color. (Décor Art paint called Glorious Gold)  I found 2” wide ribbon at my local craft store in an ivory color and then I wrapped the ribbon around the egg and tied a bow.  Next, I attached a gold and pearl pin that I purchased on Ebay as part of a vintage 1950s parure set that included a necklace, a bracelet and earrings.

The second one that I made was painted with a pretty green metallic color. (Folk Art paint called Metallic Peridot)  I wrapped a 2” wide green ribbon which matched the color of the paint and then I laced the ribbon through a beautiful crystal pin that I also purchased on Ebay to finish the egg with an elegant touch.

The third one was painted with a lovely blue pearl color. (Martha Stewart paint called Glazing Ball)  I found ribbon at my local craft store that matched the color of the paint and then I wrapped the ribbon around the egg and tied a bow.  Next, I attached a crystal and blue round pin that I also purchased on Ebay to complete the craft project.

For more Easter egg decoration ideas, please check out two previous craft posts.  In the first post I discussed how our way of decorating Easter eggs has changed over the years into a more elegant style since our children are now older.  Instead of the mess of coloring eggs, we now decorate our eggs with crystal and pearl stickers.  For more information on this easy craft project from last year, please click on the link to Jeweled Easter Eggs.

Another craft project posted this month, shows three different styles of smaller Elegant Easter Eggs, click on the link to view the photos.  In the post I have included supply lists and easy instructions.  These smaller eggs can be used for display, Easter luncheon or dinner table accessories or party favors and would also make wonderful gifts for family or friends.