Craft – More Fabergé-inspired Eggs

Silver Egg  - display

This month I posted a craft project on a Fabergé-inspired Egg.  Peter Carl Fabergé was the famous designer of these beautiful jeweled Russian Imperial Eggs which were specially created for the Russian Tsar Alexander III and later his son Tsar Nicholas II between 1885 and 1917. (For readers interested in more detailed information about the House of Fabergé or the Fabergé Eggs, please click on the link to the previous blog posts)

The previous Fabergé-inspired Egg craft post featured a lovely golden eagle pendant with a large blue gem which seemed to copy the style of the Russian Imperial crest.  Then, recently when in the jewelry/accessory store Charming Charlie looking through the clearance section, I found two inexpensive necklaces, a bracelet and earrings that I decided would be perfect for two more Fabergé-inspired egg craft projects.       

Fabergé-inspired Egg supply list

  • Large wooden egg
  • “Inspiration pieces” of jewelry (necklace and bracelet)
  • Self-stick pearls (select a color to coordinate)
  • Metallic paint – for one egg I used gold and for the other I used silver
  • Paint, paint brush
  • Sally Hansen Miracle Gel – Top Coat nail polish
  • Sandpaper
  • Hot glue and glue sticks
  • Wire cutter

Fabergé-inspired Egg  instructions

  1. Use sandpaper to smooth any rough surfaces to prepare the wooden egg for painting.
  2. Begin painting the bottom portion of the wooden egg, let dry completely.  Then paint the upper portion and let it dry completely.  (I selected a metallic paint color to coordinate with the metal of the “inspiration pieces”)
  3. After the paints dries, to give the egg a beautiful finish to resemble the enamel technique that was often used in the creation of the original Fabergé Eggs I used the Sally Hansen Miracle Gel – Top Coat nail polish to achieved this effect.  Apply the nail polish covering the entire egg; let it dry completely before proceeding to the next step.  (I think that the nail polish worked much better than a gloss paint to create an enamel look)
    Gold Egg - supplies
  4. Prepare the necklace and bracelet by clipping the links to create separate pieces, use sandpaper to smooth any rough or sharp edges.  
  5. Hot glue the individual pieces to the painted egg, work out the placement before gluing by marking with a small dot to indicate the position.
    Gold Egg - jewlery poistion
  6. Attach the self-stick pearls to the egg.   (If desired, the pearls can be additionally made secure with the use of glue)

Gold Egg - finished    Silver Egg - finished

Please check out the two previous craft posts also inspired by the Fabergé Eggs.  The first craft project is an elegant Fabergé-inspired oval box that is painted and decorated with crystal and pearl stickers.  This box is still displayed in our family room bookshelf during the Easter season.  The second craft project, as previously mentioned, is a Fabergé-inspired Egg which features a lovely golden eagle pendant with a large blue gem which resembles the style of the Russian Imperial crest.  (For more information regarding the supply list and instructions for these two craft projects, please click on the links)

Craft – Faberge-inspired Egg

Faberge egg - final

Last year I published a post on the House of Fabergé which gave a brief history of the company.  Peter Carl Fabergé was famous for designing the beautiful jeweled Russian Imperial Eggs which were specially created between 1885 to 1917 for the Russian Tsar Alexander III and later his son Tsar Nicholas II.  In 2013 I published a separate post regarding the 54 Imperial Eggs that Fabergé had created during that time.  (For readers interested in more detailed information about the House of Fabergé or on the Fabergé Eggs, please click on the link to the previous blog posts)

Inspired by the Fabergé Eggs, I decided to create a Fabergé Egg craft project.  This idea started when I found the double eagle pendant in my local craft store.  The golden eagle pendant has a large blue gem set in the center and accented with diamond-like crystals.  I thought this pendant was a perfect inspiration for an Imperial Fabergé-style Egg.

Faberege Egg - inspiration piece

Fabergé-inspired Egg supply list

  • Large wooden egg
  • Large “inspiration piece” of jewelry (possibly a pendant or brooch)
  • Self-stick crystals (select a color to coordinate)
  • Paint – I used a deep blue to match the gemstone in the inspiration piece
  • Paint, paint brush
  • Sally Hansen Miracle Gel – Top Coat nail polish
  • Hot glue gun, hot glue sticks (option white glue stick to attach crystals)
  • Sandpaper

Fabergé-inspired Egg instructions

  1. Start by using sandpaper to smooth any rough edges to prepare the wooden egg for painting.
  2. Begin painting the bottom portion of the wooden egg, let dry completely.  Then paint the upper portion and let it dry completely.  (I selected a Royal Navy Blue paint color to coordinate with the blue gem of the “inspiration piece”Faberege Egg - paint
  3. To give the egg a beautiful finish to resemble the enamel technique that was often used in the creation of the original Fabergé Eggs I used the Sally Hansen Miracle Gel – Top Coat nail polish to achieved this effect.  Apply the nail polish directly to the entire egg; let it dry completely before proceeding to the next step.  (I think that the nail polish worked much better than a gloss paint to create an enamel look)Faberege Egg - top coat nail polish
  4. Prior to attaching the self-sticking crystals, work out the placement of the “inspiration piece” and then the final pattern and position of the crystals.  Once this is determined, attach the crystals to the egg leaving a space for the “inspiration piece”.  (If desired, the crystals can be additionally made secured with the use of glue)
  5. To complete the craft project, hot glue the “inspiration piece” to the egg.    

Faberge inspired egg - final


Elizabeth Taylor’s Personal Jewelry Collection

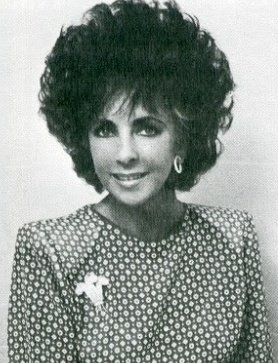
In honor of Elizabeth Taylor’ birthday (born: February 27, 1932 died: March 23, 2011), in this post I will feature ten pieces from her personal jewelry collection which were sold after her death at an auction that raised approximately $115 million to benefit her AIDS foundation, ETAF.  Some of the pieces sold at the Christie’s auction in 2011 have some interesting stories, such as the Cartier Ruby and Diamond Necklace that was presented to Elizabeth by her third husband Mike Todd while she was swimming in the pool on vacation in the French Rivera.  Other pieces have historical significance, such as the La Peregrina Pearl which was once owned by Queen Mary I of England or the “Prince of Wales” brooch which was originally owned by Wallis Simpson the wife of the Duke of Windsor.  Perhaps one of the most stunning pieces was the Krupp Diamond Ring which sold at the auction for over $8 million and subsequently renamed the “Elizabeth Taylor Diamond”.  Special Note: The diamond necklace with the “Taylor/Burton” diamond mentioned in the list had previously sold in 1978 after she divorced Richard Burton)

Ten pieces of jewelry from the personal collection of Elizabeth Taylor:

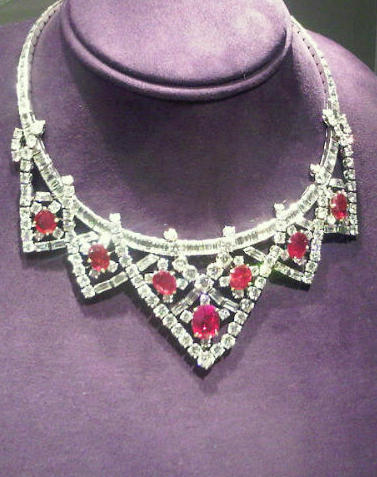
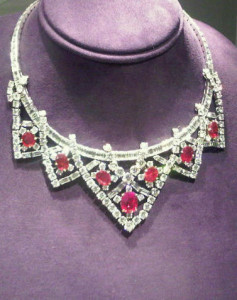
1.  Cartier Ruby and Diamond Necklace

The Cartier Ruby and Diamond Necklace was a gift from Mike Todd, Elizabeth’s third husband.  The necklace featured seven oval rubies with round and baguette diamonds forming a lattice framework and finished with a ruby and diamond clasp.  In August 1957, while Mike Todd and Elizabeth were on vacation near Monte Carlo, they were swimming in the pool and relaxing and he suddenly surprised her with the stunning necklace.  Being Elizabeth, she quickly put on the necklace, along with the matching bracelet and earrings, and then returned to swimming wearing all the jewels!

Cartier Ruby necklace  Cartier ruby necklace 2

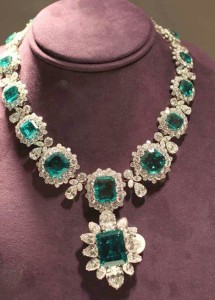
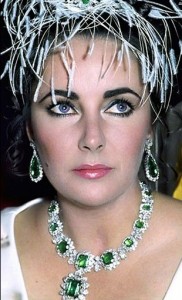
2.  Bulgari Emerald and Diamond Pendant Brooch and Necklace

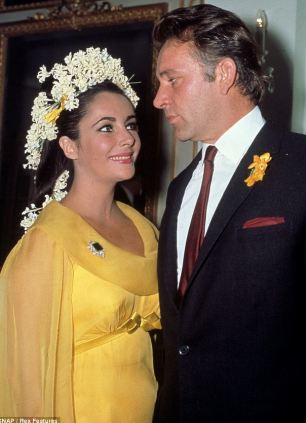
On the occasion of their engagement, Richard Burton gifted Elizabeth with the Bulgari Brooch.  The brooch features an 18 carat rectangular-cut emerald surrounded by pear-shaped diamonds set in platinum.  Elizabeth wore the emerald brooch on March 15, 1964 when she and Burton were married the first time.  

The emerald and diamond necklace features sixteen graduated rectangular-cut emeralds surrounded by round diamond clusters and in between are pear-shaped and round diamonds forming a quatrefoil shape and the entire necklace is set in platinum.  Later, Elizabeth would frequently attach the brooch to the necklace as a pendant.

Bulgari Emerald Necklace
Bulgari Emerald brooch worn at wedding to RIchard Burton  Bulgari Emerald Necklace 1

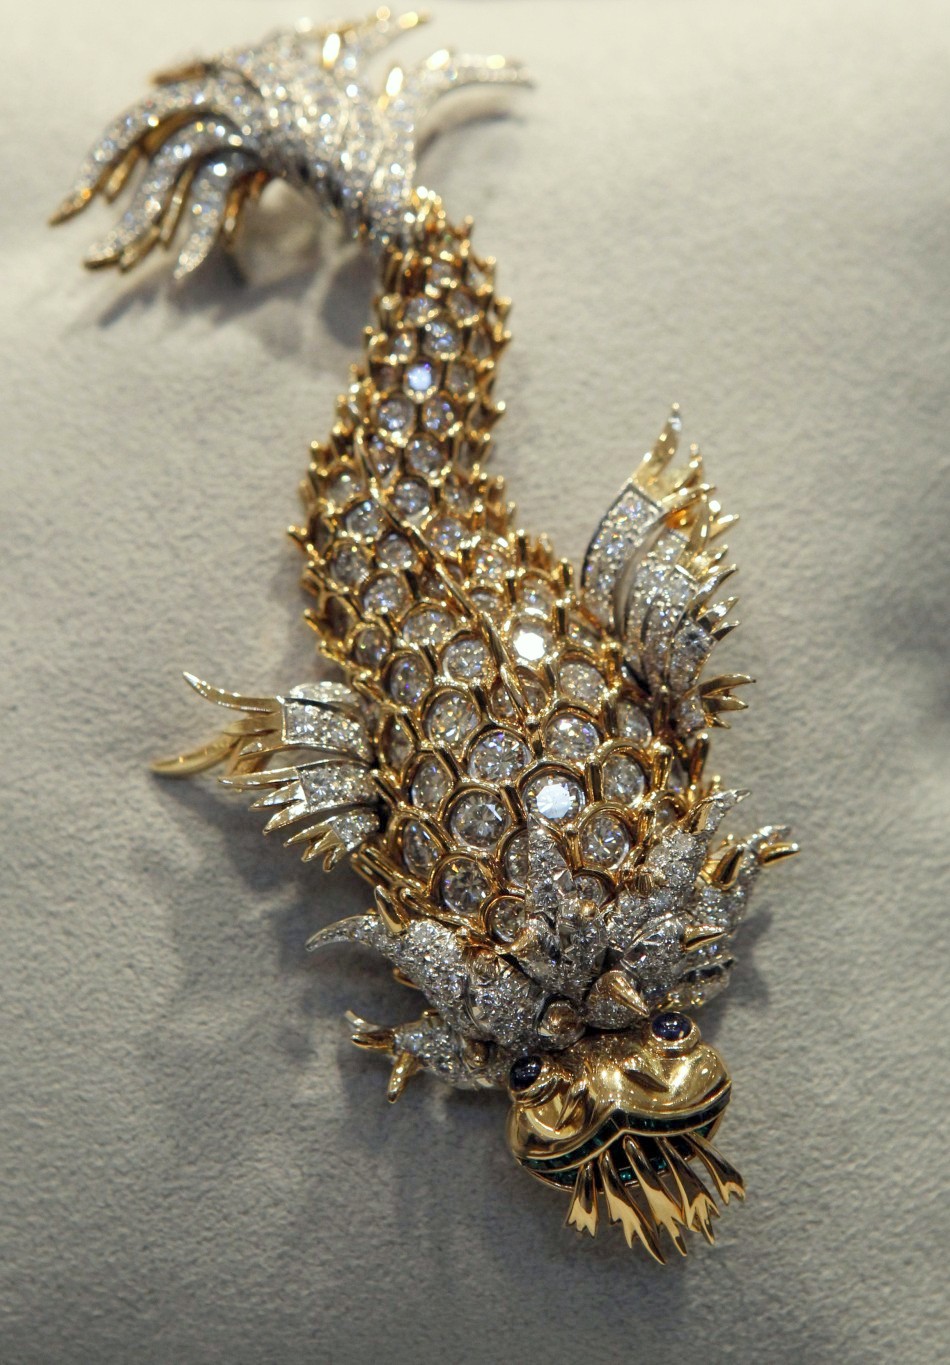
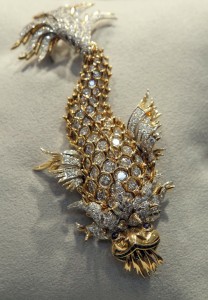
3.  “Night of the Iguana” Brooch

The “Night of the Iguana” Brooch by Jean Schulumberger of Tiffany & Co. was purchased in 1964 by Richard Burton.  The reason for the name is that Elizabeth accompanied Burton to Puerto Vallarta, Mexico while he was filming the John Huston movie, “Night of the Iguana”.  The couple had such a fabulous time that to commemorate the film’s premiere Burton gave her the brooch as a special gift (hence the name!)  The design of the brooch is actually a dolphin with diamond and gold scales, the head features cabochon sapphire eye and an emerald mouth all set in platinum and gold.      
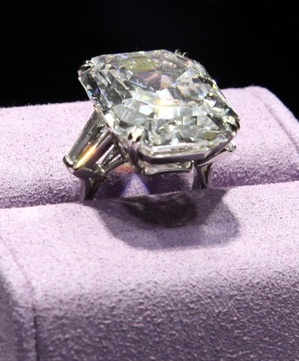
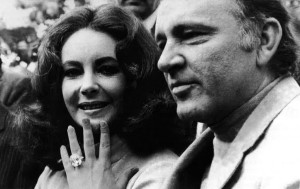
Night of the Iguana brooch  Night of the Iguana brooch 1

4.  Krupp Diamond

The large 33.19 carat diamond was previously owned by Vera Krupp, her family were German industrialists.  The type IIa-rated diamond (the most pure and flawless grade of diamonds) is cut in a deep emerald-style, sometimes referred to as an Asscher-cut indicating a style frequently cut prior to the 1920s.  When the diamond came up for auction by the Krupp estate in 1968 Burton paid a reported $305,000.  Elizabeth wore the Krupp Diamond ring frequently referring to it as her favorite piece of jewelry.  After Elizabeth’s death, the Krupp diamond was sold at auction for over $8 million and it has since been renamed the “Elizabeth Taylor Diamond”.

Krupp Diamond Krupp Diamond 1

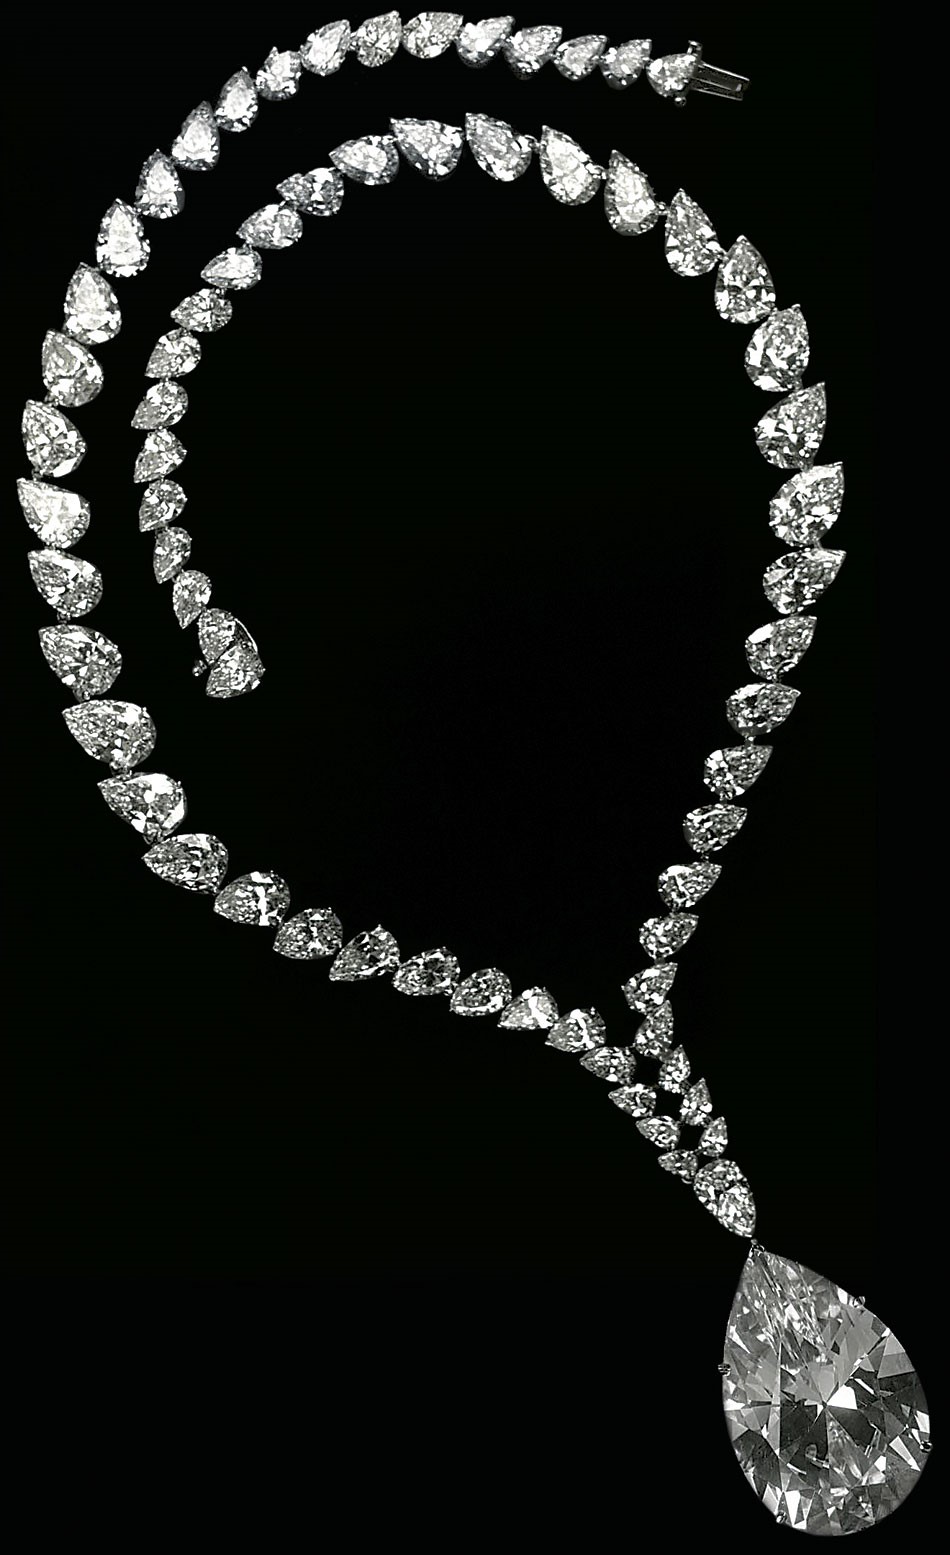
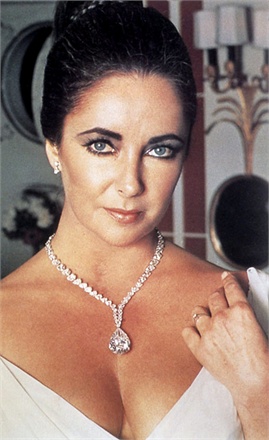
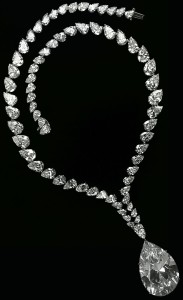
5.  “Taylor / Burton” Diamond Necklace

The original rough 241 carat diamond was found in a South African mine in 1966.  Harry Winston bought the rough diamond and had it cut into a 69.42 carat pear shape and set into a platinum ring with two smaller diamonds on either side for Mrs. Harriet Ames, the sister of Walter Annenberg.  She sold the diamond ring in 1969 to Cartier Jewelers and the diamond was remained the “Cartier Diamond”.  Subsequently Cartier put it up for auction and it was bought for over $1 million by Richard Burton in 1969.  Elizabeth felt the ring was too heavy and had it redesigned into a necklace, she commissioned Cartier to create an $80,000 diamond necklace made of several graduated pear-shaped diamonds as a setting for the larger diamond now hung as a pendant.  Elizabeth wore the newly designed necklace for the first time at Princess Grace of Monaco’s fortieth birthday party held in Monte Carlo and then later to the Academy Awards in 1970.

After her second divorce from Burton in 1978 (yes, Elizabeth married him twice!) she sold the diamond to Henry Lambert, a New York jewelry and it was subsequently sold in December 1979 to Robert Mouawad of Mouawad jewelers and it is now known as the “Taylor-Burton” necklace.

Taylor Burton Diamond necklace  Taylor Burton diamond necklace 1

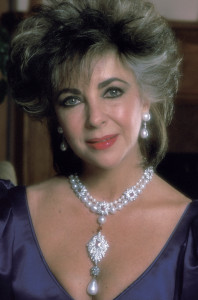
6.  La Peregrina Pearl / Cartier Diamond, Pearl and Ruby Necklace

The La Peregrina Pearl has a long history.  It was first discovered in the Gulf of Mexico and presented to the King Phillip II of Spain who in turn offered it as a wedding present when Mary Queen of Scots married.  After her death, the pearl was returned to Spain, many of the Queens of Spain can be seen wearing the La Peregrina Pearl in their official portraits.  Later, the pearl became the procession of the Bonaparte family of France but by the end of the 19th century there is no documentation to show what happened to the La Peregrina Pearl.

A century later, the La Peregrina Pearl was purchased from the Parke-Bernet Gallery in New York City by Richard Burton in 1969 for $37,000.  The pearl was on a gold chain but this was too simple for the taste of Elizabeth.  She commissioned Cartier to create a more elaborate necklace inspired by a portrait she had seen of Mary Queen of Scots wearing the La Peregrina Pearl.  Elizabeth collaborated with Al Durante of Cartier and they designed a necklace featuring two rows of pearls, twenty-three larger pearls and thirty-four larger pearls, intersected with eight separate clusters of diamonds centered by a cushion-cut ruby style to resemble flames all set in platinum and gold.  In the center of the necklace is the La Peregrina Pearl hangs from a diamond and silver bail which is attached to a large cluster of diamonds centered by a pear-shaped ruby which is attached to a large pearl and then another pear-shaped ruby and then finally attached to the necklace.  The La Pergrina Pearl Pendant can also be detached and worn as a brooch. 

After Elizabeth’s death, the La Peregrina Pearl Necklace sold for over $11 million at the Christie’s auction.            

La Peregina pearl necklace 2  La Peregina pearl necklace 1

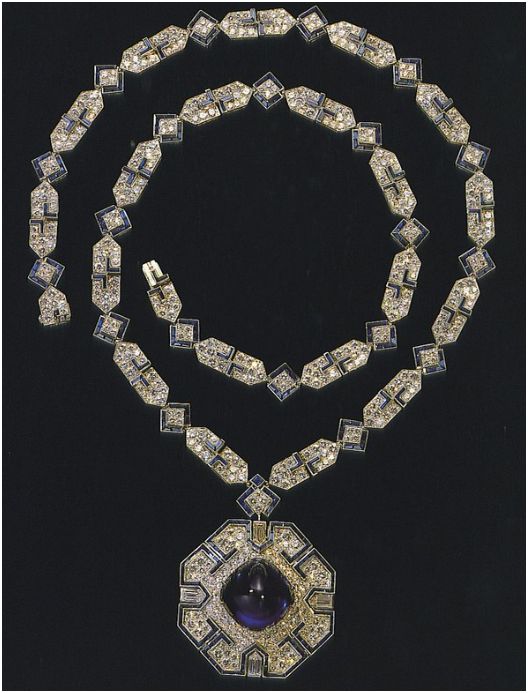
7.  Bulgari Sapphire and Diamond Sautoir

Throughout their marriage Burton bought several Bulgari pieces of jewelry and in 1969 he gave Elizabeth a diamond and sapphire sautoir.  (a sautoir is a long necklace set with precious stones usually with a hanging pendant that can be worn either shortened or full length)  The necklace is a chain of pave-set diamonds and calibre-cut sapphire geometric-shaped links all set in platinum with a large pave-set diamond octagonal-shaped pendant with more caliber-cut sapphires and pave-set diamonds with a 50 carat cabochon sapphire in the center also set in platinum.  The pendant with the large sapphire can be detached from the necklace and worn separately as a brooch.     

Bulgari Sapphire Sautoir 2  Bulgari Sapphire Sautoir 1

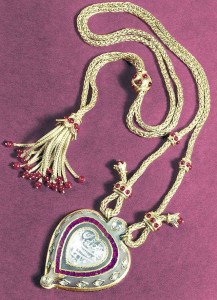
8.   Taj Mahal Diamond Pendant and Cartier Gold and Ruby Chain

Richard gave her the Taj Mahal Diamond with a Cartier Gold and Ruby Chain to Elizabeth in 1972 on the occasion of her 40th birthday.  The large engraved heart shaped diamond is surrounded by a red stone and jade mount which is hung from a woven gold chain embellished with cabochon rubies. 

This unique piece of jewelry has a very interesting past and dates back to the 1600s.  The engraving on the diamond reads: Nur Jahan Baygume Padshah, 23 and 1037.  It means that Nur Jahan was the favored wife of Padshah and 23 refers to the year of the Shah Jahangir reign and 1037 which translates to the date 1627 A.D.  Later the pendant was given to the Shah’s son, Prince Khurram, who later became Mughal Emperor Shah Jahan after the death of his father.  He in turn presented the pendant as a gift to his most beloved wife, Mumtaz-I-Mahal but she unfortunately died in 1631.  The Shah was so overcome with grief that he commissioned a large ornate mausoleum in her honor and it became known as the famous Taj Mahal located in India.

In 2011, at the auction of Elizabeth Taylor’s jewelry collection, the Taj Mahal Diamond Pendant and Cartier Gold and Ruby Chain sold for $8,818,500.    

  Taj Mahal necklace  Taj Mahal necklace 1

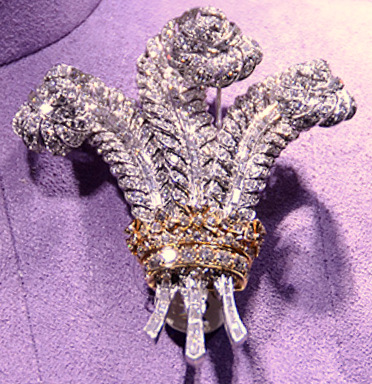
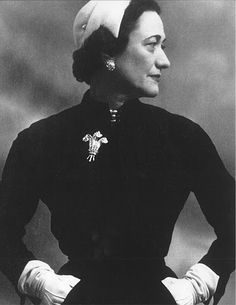
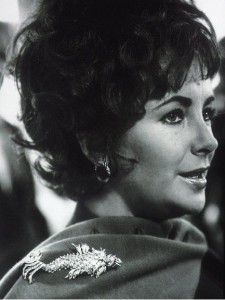
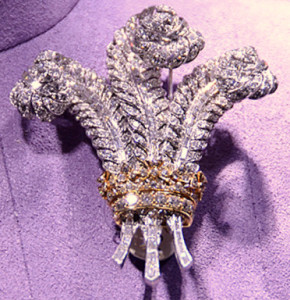
9.  “Prince of Wales” Brooch

Elizabeth and Richard Burton were friends of the Duke and Duchess of Windsor and often visited them when they were in France.  The Duke had formerly been the Prince of Wales before he briefly became King Edward VIII but then abdicated the throne in 1936 for the “women that he loved, Wallis Simpson.  The “Prince of Wales” Brooch was commissioned by Edward especially for Wallis.  The brooch design depicts the symbol of the Prince of Wales with three pave-set diamond feathers accented with baguette-cut diamonds which are gathered together by a crown, the piece is set in platinum and 18k gold.

Although Elizabeth was born in a suburb of London, England, Richard Burton was born in Wales.  Maybe given this fact or perhaps because she felt that their love story was so  similar to that of the Duke and Duchess of Windsor, every time she would visit them she would always tell the Duchess how much she like her Prince of Wales Brooch.  Then, in 1987 after the death of the Duchess her jewelry collection was auctioned by Sotheby with the proceeds going to the Pasteur Institute which was a leader in AIDS research.  Elizabeth knew she had to bid on the brooch and money was no object.  Ultimately, Elizabeth’s final bid was the highest (over $623,000) and she got the brooch, the first piece of jewelry she had ever bought for herself!

After Elizabeth’s death, the Prince of Wales Brooch sold for $1,314,500 at the Christie’s auction.        

Prince of Wales feather broochPrince of Wales feather brooch - Wallis  Prince of Wales feather brooch - Elizabeth

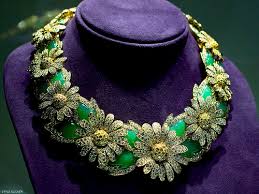
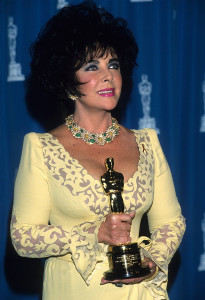
10.  Van Cleef & Arpels Daisy Necklace and Earrings set

In preparation for receiving the Jean Hersholt Humanitarian at the Academy Awards in 1993, Elizabeth borrowed a stunning Van Cleef & Arpels daisy necklace and earrings to wear with her beautiful yellow Valentino dress.  She loved the necklace and earring set so much that she later purchased it as her good luck charm.

The necklace was a series of graduated pave-set diamond daises each accented with a round yellow in the center, the daises were joined together by caliber-cut chrysoprase leaves accented with more diamonds which were all set in 18k gold.  The daisy earrings complimented the necklace perfectly and Elizabeth also purchased the matching brooch.      

Daisy necklace 2 Daisy necklace 1

Craft – Penny Crafts

A few years ago my mother gave me a bag of old pennies that my father had saved.  Now that both my parents have passed away I wanted to do something special with them.  So, I searched the internet and came up with a few ideas and in this post I will show the four different craft projects that I made using the pennies.

Serving tray embellished with pennies 

The first project uses a tray that I had previously made which was detailed in another post on this blog a few years ago.  Making the tray was a very simple craft project using a picture frame, decorative drawer pulls and knobs.  Now, I decided to embellish the tray with the pennies from my dad.  

Penny Tray - original version

Serving tray embellished with pennies supply list –

  • Picture frame tray (Please click on the link for a supply list and directions on how to make the picture frame tray)
  • Pennies, the amount will be determined by the size of the tray used
  • Hot glue gun and glue sticks

Serving tray embellished with pennies instructions –

  1. Remove the cardboard backing and material from the picture frame tray, leave the glass in place.
  2. Glue the material to another piece of cardboard, this will provide additional support to carry the weight of the pennies.
  3. Glue the pennies directly on to the material.  Line the pennies with all of them facing the same direction for a more uniformed look.
  4. After the pennies are arranged, carefully flip the material/cardboard piece with the attached pennies and place into the picture frame tray.
  5. Replace the cardboard backing and secure.

Penny tray - final 1

The next three craft projects involve items that, when they are completed, can be used as decorations for a home.

Framed Penny heart with special poem

For this next craft project I found a special poem on the internet.  I printed it out using my home computer, notice the poem is positioned in the upper portion of the paper to allow space.  In the lower portion the paper I arranged the pennies into a heart shape.  This piece would look wonderful hung on the wall of a home or set in a bookcase or on a table.

Framed penny heart/special poem instructions –

  1. Print a special poem on the computer (I suggest a short poem printed in the upper portion of the paper)  For additional support to hold the weight of the pennies glue the paper with the poem onto a piece of heavy cardboard.
  2. In the lower portion of the paper glue the pennies to form the outline of a heart shape.  Then, continue to fill the space within the heart outline and overlay several layers of pennies. I placed the pennies with all of them facing the same direction for a more uniformed look.
  3. Remove the cardboard backing from the frame; insert the special poem/penny heart and center within the photo mat.  Craft Tip: In order to avoid flipping over the paper weighed down with the heavy pennies instead lay the paper flat on a hard surface and then place the frame over it.  Then flip the entire frame over, by doing this it will allow the heavy paper some much needed support.
  4. Replace the cardboard backing to complete the craft project.

Penny heart and poem

Framed penny initial

This craft project was created with the remaining pennies that my dad had saved.  In my local craft I found a fabric covered board which I used for this project, this board would prove to be an excellent item to support the heavy pennies.

Framed penny initial supply list –

  • Frame
  • Photo mat
  • Fabric covered board (this ready-made board was purchased at a local craft store but if unavailable one can easily be made)
  • Pennies, the amount will be determined by the size of the frame used
  • Hot glue gun, glue sticks

Framed penny initial instructions –

  1. On the fabric covered board glue the pennies to form an initial.  Then, continue to overlay several layers of pennies. I placed the pennies with all of them facing the same direction for a more uniformed look.
  2. Remove the cardboard backing from the frame; insert the fabric board/penny initial and center within the photo mat.
  3. Replace the cardboard backing to complete the craft project.

Penny initial

Picture frame embellished with pennies

For the final craft project I wanted to incorporate a photo into the design to create a unique decorative item to remember my dad.  I decided to use a simple picture frame which I embellished with the pennies that my dad had saved.   

Picture frame embellished with pennies supply list –

  • A simple picture frame (I used one with a frame that was an inch wide which gave adequate space to arrange the pennies)
  • Photo mat
  • Special photo
  • Pennies, the amount will be determined by the size of the frame used
  • Hot glue gun, glue sticks

Picture frame embellished with pennies instructions –

  1. Remove the cardboard backing, insert the selected photo and position into the photo mat, then reassemble the frame.
  2. Start by gluing the pennies around the edge of the frame (I placed two layers on the frame overlapping the layers)  I placed the pennies with all of them facing the same direction for a more uniformed look.
  3. Next, glue the pennies directly to the glass starting at the edge of the frame and working toward the edge of the photo mat covering the entire area while overlapping the different layers.

Penny Frame

Craft – Mushrooms Under Glass

Mushrooms under glass - finished

In previous crafts posts I have used domes or cloches to create decorative displays under glass. These craft projects make wonderful displays for any home and can be used on tables or bookshelves as decorative Spring or Summer seasonal items.  In this post I will create another simple display using mushrooms, floral stems and moss.  Additional items, such as an artificial snail or a couple of ladybugs or a butterfly perched on one of the mushrooms or maybe a tiny sign that says “snail crossing” or “welcome to the garden” and decorative rocks can also be added to create interest.

Mushrooms under glass - supplies

Mushrooms Under Glass supply list

  • Glass dome or cloche with base – size is determined by the height and the width of the items used (the glass dome I used had a wooden base)
  • Mushrooms – 2 or 3 (I used a set that features two mushrooms)
  • Floral stems
  • Moss
  • Hot glue gun and glue sticks
  • Optional items – an artificial snail, ladybug, butterfly, small signs or decorative rocks

Mushrooms Under Glass instructions

  1. Center the mushrooms and hot glue them to the base (before gluing, be sure that there is a least a few inches of space between the mushrooms and the glass dome)
  2. Arrange the floral stems around the mushrooms and hot glue them to the base
  3. Arrange the moss around the mushrooms and floral stems
  4. Optional items can be added to the display to create more interest, such as an artificial insect or a small sign.

Mushrooms under glass - finished 1

For more information about the previous crafts posts, Butterflies in a Jar and Fairy Under Glass, also using domes or cloches to create decorative displays under glass, please click on the links for supply lists and full instructions.