Craft – Flower Pot Wreath

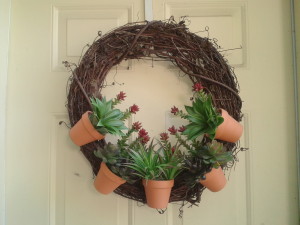
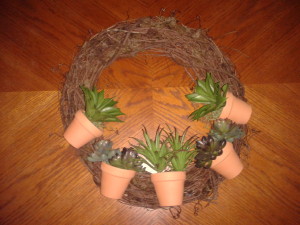
Flower Pot Wreath  - finished

This easy Flower Pot Wreath is a great craft project to create a simple transitional wreath for the late summer to early fall seasons.  The small flower pots add some dimension to the wreath and instead of traditional flowers I will be using artificial cactus. Below are the supplies and instructions needed to make this unusual Flower Pot Wreath.

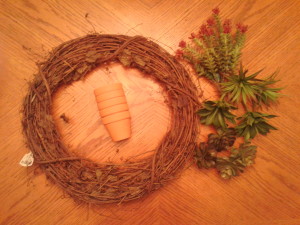
Flower Pot Wreath  – supplies

  • 1 Large grapevine wreath
  • 5 Small Terracotta Pots, an odd amount is more visually appealing to the eyes
  • A variety of several artificial cactus plants, one for each pot and some extras
  • Spanish moss
  • Hot glue gun and glue sticks
  • Wire, to secure the pots to the wreath

Flower Pot Wreath - supplies

Flower Pot Wreath – instructions

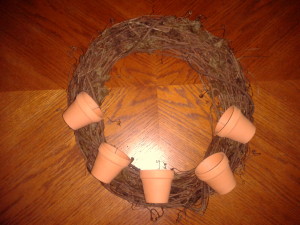
  1. Arrange the terracotta pots, evenly placed around the wreath.  (I spaced the pots on the lower portion of the wreath)
  2. Cut an 8” length of wire for each pot. Lace through the bottom hole and attach each pot to the wreath in the pre-determined positions.
  3. Fill each individual terracotta pot with some Spanish moss
  4. Hot glue the cactus plants into the pots, alternate the variety from pot to pot for an appealing arrangement.  Be sure to reserve a few of the cactus for later use.
  5. Now that the pots are attached and filled, hot glue extra cactus between the pots.  (I saved the longer type cactus for this purpose)

Flower Pot Wreath  1

Flower Pot Wreath 2

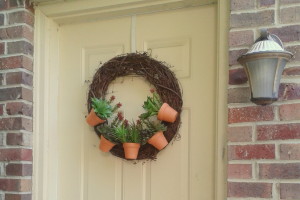
Once I completed the Flower Pot Wreath I hung it on the side door of our home that leads into the garage.  Once winter comes and the weather becomes colder, I will move the wreath indoors and place it downstairs to hang in our “California Room” (this room has been described in a previous post)

Flower Pot Wreath - hung on back door

This Flower Pot Wreath craft idea can be used in a variety of different ways for any season, maybe use daffodils for Spring or sunflowers for Fall.

Travel – Biltmore Estate in Asheville, NC

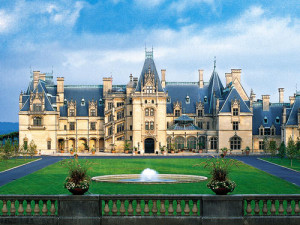
Biltmore Estate

Moving to the Midwest gave us the opportunity to visit so many wonderful new places … and we love to travel!!  One of those places on our “must see list” was the Biltmore Estate in Asheville, North Carolina.  We decided to go in January 2008 with plans that grew to include 14 family members from 4 different states.  Everybody was responsible for their own transportation and hotel reservations.  It turned out to be a wonderful extended weekend not only visiting the Biltmore but we also got to spend some quality time with three generations of family members.

HISTORY OF THE BILTMORE ESTATE

In 1880, at a time known as the Gilded Age, George Vanderbilt and his mother made regular visits to Asheville, North Carolina.  George loved the area and the climate so much that he wanted to build a summer home there, his “little mountain escape”.  The idea was to create a working estate similar to the ones found in Europe.  Construction of the main building began in 1889 and was finally completed in 1895.  It is the largest privately owned home in the United States at 175,000 square feet with 250 rooms.  Vanderbilt commissioned Richard Morris Hunt, a New York architect, to design the house in a Chateausque style.  Vanderbilt also hired landscape architect Frederick Olmstead to design the gardens which are bordered by a natural forest.

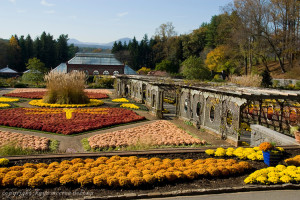
Biltmore Gardens

Vanderbilt intended for the estate to be self-supporting and he set-up several different farms involving poultry, cattle, hogs and also a dairy to provide milk and cheese products for the Biltmore kitchens.  In 1901, Vanderbilt established Biltmore Industries which made furniture inspired by those furnishings found on the estate and this provided local employment in the community.

At the time of Vanderbilt’s death in 1914, it is believed that his inheritance and personal wealth was significantly depleted due to the construction, maintenance and lavish entertaining expenses of the Biltmore Estate.  Edith was forced to sell 85,000 of the original 125,000 acres to the federal government as stipulated in her husband’s will with the provision that the land remain unaltered and eventually this property became the Pisqah National Forest.  Vanderbilt’s only child, Cornelia, opened the Biltmore House to the public in 1930 and family members continued to live there until 1956.  In 1964, the Biltmore was designated a National Historic Landmark.  Currently, the Biltmore Estate is still controlled by the Vanderbilt family and managed under the name of the Biltmore Company.

BRIEF TOUR OF THE BILTMORE ESTATE

Over one million visitors annually come to visit this major tourist attraction in Western North Carolina that includes the Biltmore House with 75 acres of formal gardens, several restaurants and gift shops, a winery and a 213 room hotel, the Inn on Biltmore Estate.

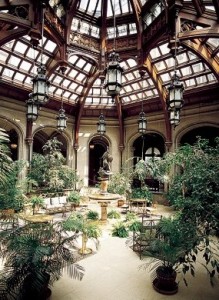
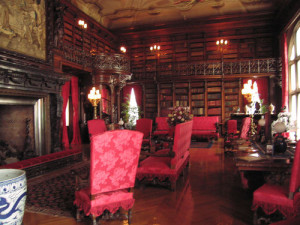
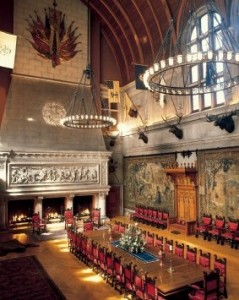
Upon entering the Biltmore House, visitors are immediately impressed by the elegant design of the Entrance Hall with the soaring limestone arches and limestone floors, the Victorian-style glass roofed Winter Garden room and the Grand Staircase.  Other rooms on the first floor include:  The Library which is filled with Vanderbilt’s massive book collection of more than 23,000 books; he was an avid reader and began acquiring books at the age of 11.  The Banquet Hall which is the largest room in the house with a 70 foot high barrel vaulted ceiling, a massive oak dining table with 64 chairs and a unique triple fireplace.  Additional rooms on this floor are the Salon with adjoining Music Room on the left and Breakfast room on the right.  The Billiard Room also leads into an area known as the Bachelor’s Wing with a Smoking Room and Gun Room.

Biltmore - Winter Garden RoomBiltmore - LibraryBiltmore - Banquet Room

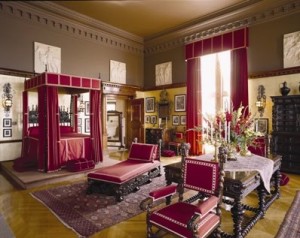
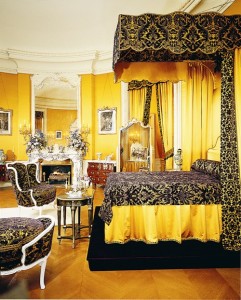
Ascending the Grand Staircase, rooms located on the second floor of the house are centered on a formal sitting area where guests would meet prior to meals or other activities hosted by the Vanderbilts at the Biltmore Estate.  This is an area for guests to socialize, play games, read or write letters.   Located nearby is the Vanderbilt’s private suite of rooms that included: Mr. Vanderbilt’s bedroom which is filled with carved walnut furnishings, 17th century engravings and 19th century French bronze sculptures.  Mrs. Vanderbilt’s oval-shaped bedroom is a very feminine room designed with silk wall coverings, cut-velvet drapes and bedding.  Additional elegantly decorated and spacious guests’ rooms are also located on the second and third floors with equally elegant names such as: the Sheraton Room, the Chippendale Room, Van Dyck Room and the Madonna Room.

Biltmore - Mr. Vanderbilt's Bedroom  Bitmore - Mrs. Vanderbilt's Bedroom

The Downstairs area is mainly the work space of the house with several kitchens, pantries, laundry rooms and servants’ bedrooms.  Also located on this floor are several recreational rooms for the Vanderbilts’ guests, such as the swimming pool, gymnasium, bowling and several dressing rooms.  In a former storage area that became known as the Halloween Room, this room  was later used by the Vanderbilt’s daughter, Cornelia and her husband, for hosting lively parties where guests were known to paint imaginative murals on the walls.

TRAVEL TIPS AND SUGGESTIONS

  • Arrive early to the Biltmore Estate.  We stayed in Asheville, NC at the Marriott Courtyard and arrived the day before to rest and relax from the 6 hour drive from our home.  The next day we were able to be there when the box office opened to start the house tour before it became too crowded.
  • Allow plenty of time at the Biltmore Estate.  I recommended at least two days touring not only the Biltmore house and gardens, but also wine tasting at the winery and the restaurants and shops at the Biltmore Village.  There are other things to do in Asheville, such as: biking, hiking, horseback riding, antique shopping, etc.  We also made a quick visit to the Thomas Wolfe house and museum located in Asheville which was very interesting.
  • Generally a visit during Sunday to Thursday is less crowded.  Also, consider getting tickets in advance and make reservations online or by phone.  Guests who arrive without reservations are not guaranteed tickets during busy weekends or the holiday season.
  • Dress in comfortable clothes and shoes, dress in layers because the mountain weather can be very unpredictable.  When we visited in late January the weather was comfortable in Asheville, but at the top of the mountain at the Biltmore Estate the wind was very cold and we were glad to have our warm jackets!
  • Parking is free and shuttle buses take you from the parking lot to the Biltmore House.  In order to see the other areas of the Estate, such as the beautiful gardens, the Deerpark restaurant, the winery or the Biltmore Village for shopping, you will need your car to drive to those separate areas.
  • Even though a tour of the Biltmore House is self-guided, we highly recommend the audio tour which provides interesting historical and architectural information that enhanced our visit.
  • The night before our visit to the Biltmore House we a delicious buffet and attentive service at the Deerpark restaurant.  “The Restaurant is housed in a historic barn original to the estate. Enjoy prepared-to-order specialties in addition to classic favorites like hand-carved prime rib. The delightful courtyard restaurant specializes in Southern family-style dishes.”  We highly recommend making a reservation.

Celebration – Grandparent’s Day

Grandparent’s Day is celebrated on the first Sunday in September and has been an official nationwide holiday in the United States since 1978.  As a result of the baby boomers, the number of grandparents is expected to rise from 65 million in 2011 to 80 million in 2020.  In recent years, grandparents have slowly become the choice of working parents that are in need of childcare.  Statistics from 2012 indicate that 30% of the children under five years old are cared for on a regular basis by a grandparent.

So, let’s take the time to remember and honor the grandparents in our lives who have brought so much unconditional love and support into our lives.  Through my experience over the years in celebrating Grandparent’s Day I have come to the wonderful conclusion that grandparents truly enjoy receiving homemade gifts from their grandchildren.  This is always a great idea because the kids get the pleasure of creating a truly personal gift for their grandparents and the grandparents are so happy to receive something special from their grandchildren, it’s a win-win situation!!

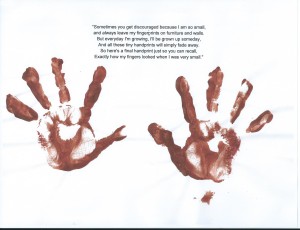
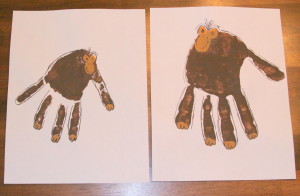
Any kind of craft project using a child’s handprint is a fun activity for the kids and the finished “artwork” is makes a wonderful gift idea for grandparents.  Here are a few craft ideas from previous blog posts: Childhood Handprints is a more traditional craft idea using your child’s handprints and a lovely poem and Zoo Animal Handprints is a fun creative way of using your child’s handprints and making them into zoo animals.  After the handprints are completed be sure to let the paint dry, then beautifully frame them to make a great Grandparent’s Day gift.

Child's handprintZoo hand print - monkey 1

Photos are also a great gift idea for Grandparent’s Day.  My husband takes amazing photos and every time we see the grandparents we always try to take those great three generation photos, on my husband’s paternal side he is very lucky to have four generations.  These types of photos are great to copy and send with Grandparent’s Day cards or enlarge the photos and frame them to make wonderful gifts.

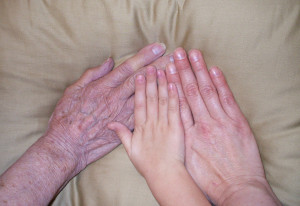
A few years ago when my Mom came to visit shortly after we moved to the Midwest we were taking our traditional three generation photos and I thought, “let’s do something fun and different”, so we took a photo of our hands.  It made an interesting photo of the contrast of a grandmother, mother and child hands.  Of course, I made an enlarged copy of the photo and it was an unusual and great idea for a Grandparent’s Day gift.

Three generation hands

Listed below are some ideas and suggestions for Grandparent’s Day gifts –

  1. Create a handmade card instead of a store-bought one.
  2. When giving or sending a card, it is a great opportunity to include the grandchildren’s school photos.
  3. Beautifully frame a picture drawn by the kids.
  4. Create a collage of 10 -20 photos of your children with their grandparents.
  5. Using photos, create a personalized calendar, be sure to note family birthdays and anniversaries.
  6. Help the kids bake a special dessert treat, make sure to consider the grandparent’s dietary needs such as sugar free cookies or cakes.
  7. Cook dinner at their home, bring a bouquet of flowers and set a beautiful table, this is a great idea for grandparents that are home-bound and have mobility restrictions.
  8. Have the older children offer to do chores for the grandparents, such as: cleaning the house or yard work.
  9. Arrange to go over to their home for an afternoon or evening of playing cards or board games.
  10. For out of town grandparents, plan ahead to have a delivery of flowers or food items.
  11. Plan a private recital for the grandparents if your child has a special talent like dance, choir or playing a musical instrument.
  12. Finally, here is a wonderful and easy craft idea –
  • Trace the handprint of the child, parent and grandparent individually onto a piece of paper; be sure to use the same right or left hand for all three hands.
  • Cut out the traced hand prints.
  • Arrange the “hands” by stacking the grandparent’s first, then the parent’s and use the child’s hand on top since it should be the smallest one, or arrange them side-by-side from oldest to youngest person.
  • Once you are pleased with the arrangement glue them to another piece of paper.
  • Be sure to write the date on the bottom portion of the paper.  Next to each individual hand write the person’s name and age.

Crown Jewels of England (Part Two)

Last month I posted the Crown Jewels of England (Part One) that featured interesting information about the royal regalia that is used during the coronation ceremony of the British Monarch.  Today’s post will have detailed information about a few of the other items in the royal collection, such as the Imperial State Crown, the Imperial Crown of India, the   Queen Victoria’s small diamond crown and the Crown of Queen Elizabeth, the Queen Mother.

The Imperial State Crown
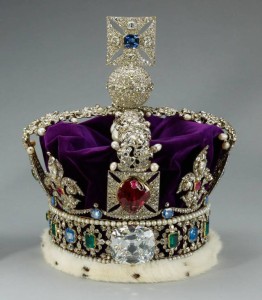
Imperial State CrownOne of the most famous crowns in the royal collection is the Imperial State Crown.  The original crown was made for Queen Victoria in 1838, but when the crown became un-repairable an exact copy was made in 1937 for the coronation of King George VI.  Then in 1953, the crown was altered to fit the smaller head of Queen Elizabeth II.

The Imperial State Crown is made with a gold frame with four crosses, four fleurs-de-lis and two crossing arches that were lowered by about one inch to give the crown a more feminine appearance for Queen Elizabeth.  At the top of the arches is a cross pattee and the crown includes 2,868 diamonds, 272 pearls, 17 sapphires, 11 emeralds and 5 rubies.  Several of the stones are historically famous; such as two of the four dangling pearls were once worn by Queen Elizabeth I, in addition there is the Black Prince’s Ruby, St. Edward’s Sapphire and the Stuart Sapphire.  The most famous gemstone in the Imperial State Crown is known as the Second Star of Africa which is the second largest stone cut from the world renowned Cullinan Diamond.

The Imperial State Crown is traditionally worn during the recessional of the Coronation ceremony when the monarch leaves Westminster Abbey.  The Crown is also worn by the monarch for the annual State Opening of Parliament.  Traditionally, the crown and other royal jewels worn for the occasion are transported to the Robing Room within the Parliament building and this is where the Crown, jewelry and royal robes are put on before the ceremony begins.

The Imperial Crown of India
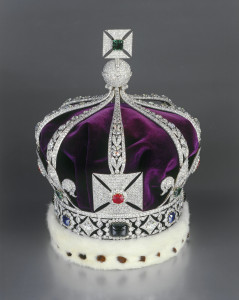
Imperial Crown of IndiaThe Imperial Crown of India was created for George V as the Emperor of India to wear at the Delphi Durbar in 1911.  In theory, when the monarch is crowned during the coronation ceremony in Westminster Abbey in London he becomes king or queen of England and all the Commonwealth countries.  But King George was advised by his ministers that his presence was need in India after the coronation and the Durbar was arranged but due to the tradition that the Crown Jewels are never to leave the United Kingdom this new crown was specially made for the occasion.   Due to the heavy weight the Imperial Crown of India was never worn again.

The crown has a silver frame laminated in gold and set with 6,100 diamonds.  The band is set with larger diamonds, emeralds and sapphires surrounded by more diamonds.  Above the band are four cross pattee set with rubies and four fleur-de-lis with emeralds surrounded with even more diamonds.  The eight half-arches are topped with a cross pattee with an emerald in the center, most British royal crowns traditionally have only four arches.

Queen Victoria’s Crown

Following the death of Prince Albert in 1861, Queen Victoria left London for the seclusion of her other homes and withdrew from any public engagements.  Out of respect for her beloved husband, she wore mourning clothes for the rest of her life. Deciding that her elaborate jewels were not appropriate for her status as a widow, she had a smaller diamond crown made that was more suitable and usually wore it over a veil of Honiton lace.  This is the image of the older Queen Victoria that is depicted in portraits, sculptures, photographs, coins and currency in the last decades of her reign.

The small crown, less than 4 inches in diameter was made in 1870, has a silver frame laminated in gold and wet with 1,187 diamonds.  When Queen Victoria died in 1901, the crown was placed on her coffin as it traveled from Osborne House to the state funeral in London.  Subsequently, the crown was worn by Queen Alexandra who later gave it to Queen Mary.  In 1937, King George suggested that the crown should be added permanently to the display of Crown Jewels at the Tower of London and it has not been worn seen that time.
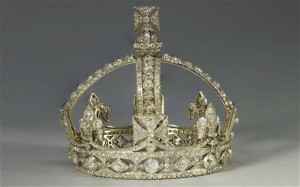
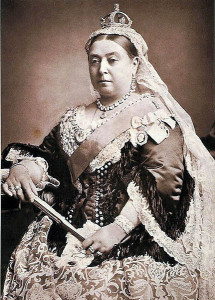
Queen Victoria crown 1 Queen Victoria wearing her crown
 The Crown of Queen Elizabeth, the Queen Mother

For the coronation of King George VI in 1937, a special crown was made for the Queen Consort.  The crown is made of platinum with a band set with diamonds with four alternating cross pattee and fluer-de-lis of four each and features four arches that are detachable which allows it to be worn as a circlet.  This is how it was worn by the Queen Elizabeth for the State Openings of Parliament during the reign of George VI and also how it was worn in 1953 for the coronation of her daughter, Queen Elizabeth II.

The crown is set with 2800 diamonds; the most notable one is the 105 carat Koh-I-Nor diamond displayed in the middle of the front cross.  The diamond was given to Queen Victoria in 1877 when she became Empress of India.  The crown also contains the almost 23 carat Lahore Diamond which was given to Queen Victoria by the East India Company in 1851 and a 17 carat diamond that was also given to Queen Victoria by the Sultan of the Ottoman Empire in 1856.

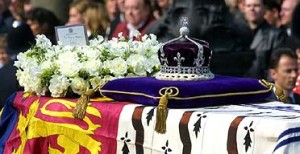
In 2002 when Queen Elizabeth, the Queen Mother died at the age of 101 the crown was set on her coffin during her state funeral.  The crown is now displayed with the Crown Jewels in the Tower of London.
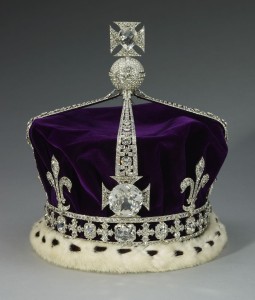
Queen Elizabeth, the Queen Mother crown Queen Elizabeth, the Queen Mother crown at funeral
 For more information about additional items in the royal collection, please check out last month’s post, The Crown Jewels of England (Part One).  In this post there is detailed information about the royal regalia used for the coronation ceremony of the English kings and queens since 1660.

Also, if you are interested in more information about the Royal Family and their jewels, please click on the links to the following posts:  The Queen’s Jewelry Collection (Part One and Part Two) and the Cambridge Emeralds.


Craft – Words into Art

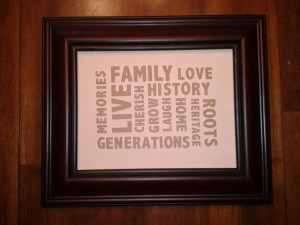
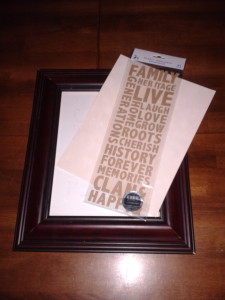
2013-09-08 09.53.41I was recently inspired by a photo I saw on Pinterest.  It was a simple piece of artwork using words arranged in a pattern and displayed in a beautiful frame.  It looked like an easy craft project to try with only a few supplies required.  The “Words as Art” took less than 30 minutes and the completed artwork looks great hanging in the hallway in our home.

2013-09-06 06.40.51

Words into Art – supplies

  • Frame
  • Scrapbook word or letters stickers
  • Scrapbook paper used as decorative backing
  • Scissors
  • Glue (optional if self-adhesive stickers are used)
  • Mat frame (optional)

Words into Art – instructions

  1. Remove glass and backing from frame.  If you are using a mat, purchase one with an 8 X 10” opening to fit a larger frame, this will create a border around the “words”.
  2. Cut scrapbook paper to fit the 8 X 10” opening of the frame or mat.  (Scrapbook paper generally comes in two popular sizes, 12 X12” or 8.5 X 11”)  For the selection of scrapbook paper I would suggest a solid color because it won’t distract from the “words”.  For color selection there are two choices, one is a background that blends with the “words” color for a soft effect or the other is a background that contrasts with the “words” color for a bold effect.
  3. Scrapbook word stickers are available in a variety of sizes and fonts.  Some are pre-packaged with different words; look for ones that are a solid color with a slight depth to create the dimension needed for this project.  If you can’t find the “words” you want, create them from individual letters made of foam or cardboard.
  4. Prior to attaching the “words” to the scrapbook paper, select the placement to fit into the 8 X 10” area.  Experiment with a variety of different positions until you are pleased with the arrangement.  If you are using a mat, be sure to lay the mat over the scrapbook paper and “words” to be sure that everything fits within the mat opening and does not cut-off the “words”.  Once you determined the placement of the “words”, attach them to the scrapbook paper working from the center to the outer edges.
  5. Attach the scrapbook paper with “words” to the frame backing.  I would suggest only replacing the glass if it is the non-glare type, if it is a standard glass type the glare of the glass will be distracting to reading the “words” and not as visually appealing.

This craft idea would also make a great gift for a birthday, new baby, wedding or housewarming gift; just choose the appropriate “words” for the occasion.  Another idea is to choose one word and repeat it several types in a variety of different sizes and fonts.  Use the person’s first name for a birthday or new baby gift and the last name for a wedding or housewarming gift.