Celebration – Victoria’s Day

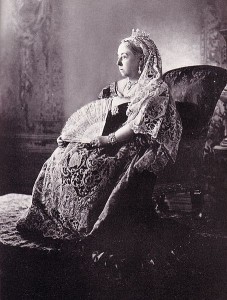
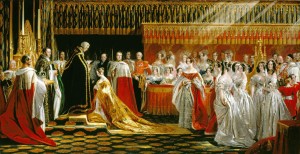
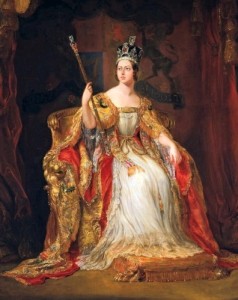
1838 - Queen Victoria coronation portrait by George Hayter 1   1897 Queen Victoria in Diamond Julbilee photograph by W&D Downey

This year on May 20th Victoria’s Day will be celebrated in Canada.  It is a federal holiday and the day is observed on the last Monday before or on May 24, which was the actual birthday of Queen Victoria.  The day is also known in Canada as the “official” Sovereign’s Birthday for the current British monarch, which is Queen Elizabeth II.

Years ago, I read several books by Jean Plaidy, aka Victoria Holt, about the life of Queen Victoria of England and I became fascinated by her.  I enjoyed reading about her life from the time of her ascension to the British throne, to her marriage to Prince Albert and her sudden widowhood after his untimely death, to the birth of her nine children and her difficult relationship with her son who was destined to become the future King Edward VII, through to the time of her death at the beginning of the 20th century.  For this particular post I will concentrate on Queen Victoria’s personal life and leave the political information and details of her almost 64 year reign for the experts!

A not so brief history of Queen Victoria

Queen Victoria (Alexandrina Victoria born: May 24, 1819 died: January 22, 1901) was the monarch of the United Kingdom of Great Britain and Ireland; later in 1876 she received the additional title of the Empress of India.  Queen Victoria reigned from 1837 to 1901, which is longer than any other British monarch.  (Queen Elizabeth, the current British monarch will soon break that record)  The almost 64 years of her reign became known in history as the Victorian era.  This period brought great industrial, cultural, political and scientific changes within the United Kingdom and also was a time that marked by the great worldwide expansion of the British Empire.

Victoria was the daughter of Prince Edward, the Duke of Kent and the Duchess Victoria, formerly the German born Princess of Saxe-Coburg-Saalfeld.  Prince Edward was the fourth son of King George III and she became fifth in the line of succession.  Within a year after her birth both Prince Edward and King George III died in 1820, making her uncle King George IV.  When the Duke of York died in 1827 and King George IV died in 1930, her last surviving uncle became King William IV making Victoria the heir presumptive.

Victoria was raised at Kensington Palace in London under the close supervision of her extremely protective mother.  Victoria’s life was very lonely and she was isolated from other children and most of her time was governed by private lessons with tutors and very little free time spent with her dolls and her King Charles spaniel, Dash. Victoria was held under a constant watch by her governess, Baroness Louise Lehzen, and at night she shared a bedroom with her mother.  These rules and restrictions were devised by the Duchess and the ambitious Sir John Convoy and they became known as the Kensington System.  With this system, the Duchess and Sir Conroy were positioning themselves to take power as regents if an underage Victoria took the throne before turning 18 years old.  Luckily King William IV lived long enough so this was avoided thus ending the plans of the Duchess and Sir Conroy.   At this same time another person was trying to control the life of the young Victoria.  Her uncle on her mother’s side, King Leopold of Belgian, hoped that his niece would marry his nephew Prince Albert.  A meeting was arranged in 1836, but fate soon intervened and King Leopold’s marriage plans were postponed. (Victoria’s mother, Albert’s father, Ernest the Duke of Saxe-Coburg-Gotha, and King Leopold were siblings and this lineage made the future Queen Victoria and Prince Albert first cousins)

1838 - Queen Victoria coronation portrait by George Hayter 2

King William IV died in 1837, and a young Victoria became queen of Great Britain at the age of 18 years old.  Almost a year later, her elaborate coronation took place at Westminster Abbey on June 28, 1838.  The crown that was previously used by the former British kings weighed seven pounds, too large for the young Queen’s head.  A new crown was made that was smaller, weighed about 31/2 pounds, and was covered with over 2,100 precious stones such as diamonds, pearls, rubies, sapphires and emeralds.  To prepare for the coronation, the streets of London were festively decorated and soldiers on foot and horseback lined the streets.  On the morning of the coronation, the future Queen Victoria left Buckingham Palace in a Grand State Carriage pulled by eight cream-colored horses.  Westminster Abbey has been the site of every coronation since Edward I in 1274 and every monarch has been crowned sitting in the Chair of St. Edward. (For more information regarding the Coronation regalia, please click on the link Crown Jewels of England – Part One)

Queen Victoria and Prince Albert quickly became engaged after their second meeting in 1839.  They were married on February 10, 1840 in the Chapel Royal at St. James’s Palace in Windsor followed by a wedding breakfast held at Buckingham Palace and a honeymoon at Windsor Castle.  Prince Albert was dressed in a red British Field Marshal’s uniform and proudly wore the Order of the Garter Star on his chest.  Queen Victoria wore a white satin wedding gown trimmed with Honiton lace and orange blossoms.  Instead of wearing a jeweled royal tiara, Victoria choose to wear a wreath of more orange blossoms over a long Honiton lace veil.  At the time, orange blossoms were traditionally worn by brides as a symbol of fertility.  The clothes of a royal wedding tend to be very lavish, but a normal bride would simply have chosen to wear her “best dress”.  It has been said that Queen Victoria started the fashion tradition of wearing a white wedding dress.  (For more information about the wedding of Queen Victoria and Prince Albert, please click on the link British Royal Weddings – Part One and for more information about Queen Victoria’s wedding dress, please click on the link British Royal Wedding Dress – Part One)

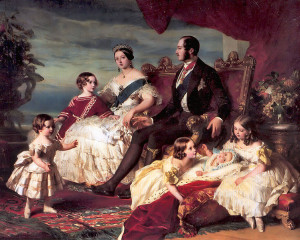
1846 Family of Queen Victoria and Prince Albert portrait by

It took a little time after their marriage for Queen Victoria to trust Prince Albert with any government information but eventually he came to be her most trusted political adviser and a very dominant and influential person in her life.  The royal couple had nine children: Princess Royal Victoria in 1840, Prince Albert Edward (known as Bertie, the future King Edward VII) in 1841, Princess Alice in 1843, Prince Alfred in 1844, Princess Helena in 1846, Princess Louise in 1848, Prince Arthur in 1850, Prince Leopold in 1853 and Princess Beatrice in 1857.  Despite the fact that she had so many children, Queen Victoria greatly disliked being pregnant and thought newborn babies were ugly.  Queen Victoria and Prince Albert’s choose wisely and married their children into royal and noble families throughout Europe.  With her nine children, forty-two grandchildren and thirty-seven great grandchildren who are all related throughout the world’s royal families Queen Victoria has been called the “Grandmother of Europe”.

In 1861, Victoria’s mother, the Duchess of Kent died.  The two had been estranged since the time of Victoria’s ascension.  Her mother’s death greatly affected Victoria and she went into a great depression cause by her intense grief. Unable to function, Prince Albert took over most of her duties despite the fact that he was ill with chronic stomach pains. Then, when their son Bertie, the Prince of Wales, became involved in a scandalous relationship with an actress and Prince Albert traveled to Cambridge to confront his son.  Prince Albert had extremely high moral standards and felt his son’s behavior was unacceptable and advised Bertie to remember his royal responsibilities. When Prince Albert returned from his trip he became very ill and was diagnosed with typhoid fever and died shortly after on December 14, 1861.  Queen Victoria was devastated by the death of her beloved husband and felt that Prince Albert’s intense worry over Bertie’s scandalous behavior brought on her husband’s illness and hastened his death.

With the death of Prince Albert, Queen Victoria went into deep mourning and withdrew from her royal duties too distraught to function.  She immediately cancelled all the royal court calendar events and after a period of official mourning never worn anything but black clothing, her widow’s veil and a small diamond crown.  Because of the way she dressed after Prince Albert’s death, Queen Victoria was called the “Widow of Windsor”.  She left London and remained isolated in her other royal residences and divided her time between Windsor Castle, Osborne House and Balmoral Castle in Scotland.  It was at Balmoral Castle that Queen Victoria came to increasingly rely on her personal servant named John Brown.  There have been rumors of a romantic relationship between them and even a possible secret marriage.  Despite these scandalous rumors, John Brown has been credited for coxing Queen Victoria out of her deep mourning and severe depression, causing her to return to her royal duties and a public life.

Unfortunately, more sorrow and death came to Queen Victoria’s life.  In 1871, her son Bertie contracted typhoid, the same disease that killed Prince Albert.  Bertie made a full recovery and his estranged relationship with his mother greatly improved after he was so close to death.  Sadly, in the following years three of Queen Victoria’s children died.  In 1878 Princess Alice died of diphtheria, in 1884 Prince Leopold died from a cerebral hemorrhage and in 1900 Prince Alfred died of throat cancer. Then, in 1883, John Brown’s loyalty to Queen Victoria ultimately cost him his life when he ignored his own health concerns, refusing to take care of himself when he first became ill and instead stubbornly continued to attend to his duties as her servant, he died from pneumonia.

In the remaining years of Queen Victoria’s life and reign as monarch, she eventually returned to a public life after her self-imposed isolation and eventually regained her popularity with the English people as their beloved matriarchal Queen.  In 1887, she celebrated 50 years on the throne with a lavish Golden Jubilee that was celebrated throughout England.  Then, in 1896, Queen Victoria became the longest reigned monarch in British history and she requested that any special celebration be postponed to coincide with her Diamond Jubilee.

In 1900, Queen Victoria continued to observe her annual tradition of celebration of Christmas at Osborne House on the Isle of Wright.  Severe rheumatism in her legs had made her unable to walk and her eyesight was extremely poor due to cataracts.  By the start of the new year and the dawn of a new century, she had become increasingly weak.  Queen Victoria died on January 22, 1901 at the age of 81 years old.  Her funeral took place at St. George’s Chapel at Windsor Castle and she was interred beside her beloved Prince Albert in the Frogmore Mausoleum.

1882 Queen Victoria photograph by Alexander Bassano

Queen Victoria facts and trivia

  • When Victoria was still heir presumptive to the British crown and before she became queen, she was forbidden from walking up or down the stairs by herself without holding onto someone’s hand.  Her over-protective mother had a strict set of rules and was fearful that her daughter would be pushed or tripped down the stairs and killed to make way for another heir.  From birth, Victoria was forced to share a room with her controlling mother and, as a defiant act of independence, one of her first orders after becoming Queen was to have her bed removed from her mother’s room and into another bedroom far away in another part of the palace.
  • When Queen Victoria ascended to the British throne in 1837, it prohibited her from receiving a marriage proposal from a man.  Then in 1839, five days after their second meeting, Queen Victoria quickly fell in love with Prince Albert and wished to marry him but protocol prevented him from asking for her hand and she had to propose to him!
  • There is a legend that all British Royal brides carry a sprig of myrtle that was grown from Queen Victoria’s bridal bouquet.  The origin of the myrtle is false, although it is still a fact that British Royal brides do carry a sprig of myrtle in their bouquets on their wedding day.  The true story is that Prince Albert’s grandmother gave Queen Victoria a posy of myrtle when she visited Germany.  The Queen had the myrtle planted at her home, Osborne House, on the Isle of Wight.  The myrtle plant still grows there today and this is the source of the myrtle that is carried in the British Royal bridal bouquets.
  • Queen Victoria youngest son, Prince Leopold, was affected by the blood-clotting disease hemophilia and two of her daughters, Princesses Alice and Beatrice, were also carriers of this disease.  Several of Queen Victoria’s descendants including her great-grandson, Tsarevich Alexei of Russia, also suffered from this disease.  The presence of the disease in her descendants and not her ancestors led to speculation that the Duke of Kent was not Victoria’s true father since male carriers always suffer from this disease.  There is no documented evidence of a hemophilia connection thru her mother, the Duchess of Kent.  It is likely possible that the hemophilia gene mutated because the Duke of Kent was over 50 at the time of Victoria’s birth and hemophilia frequently accurses in the children of older fathers.
  • Queen Victoria publicly endorsed the 19th century cocaine-based drink Vin Mariani; this drink would later inspired Coca-Cola in the United States.  Vin Mariani was a medicine or tonic created in 1863 by a French chemist named Angelo Mariani.  Originally the drink was made from Bordeaux wine and coca leaves and contained 7.6 mg of cocaine per fluid ounce of wine.  Vin Mariani was very popular during this time and other notable people endorsed the drink.  Thomas Edison claimed that the drink helped him stay awake for long hours and Ulysses S. Grant began drinking it while writing his memoirs.
  • Queen Victoria keep a series of detailed journals throughout her long life writing on an average of 2500 words per day.  After her death, her daughter Princess Beatrice had the daunting task or transcribing and editing the 122 volumes that covered Queen Victoria’s life from the time of her ascension to her death.  Unfortunately, Queen Victoria’s personal and intimate history, private feelings and observations that were written by her own hand were lost when Princess Beatrice burned the original journals.
  • Several years prior to her death, Queen Victoria had written very specific instructions regarding her death and funeral.  Her son and successor, King Edward VII gently put her into her coffin and she was dressed in a white dress and her wedding veil.  Within the coffin were several mementos: on her right side was an article of Price Albert’s clothing and a plaster cast of his hand, on her left side were a lock of John Brown’s hair and a small photo of him wrapped in a handkerchief and place in her left hand and concealed by a carefully placed bouquet of flowers.

Decor – Framing Small Items

Scattered around our home, there are many small and unusual framed items.  Some of these items are a collection of collectible items or cameos or historic royal medals.  These add personality and interest to our home decorations and are displayed throughout the house.

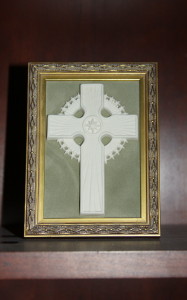
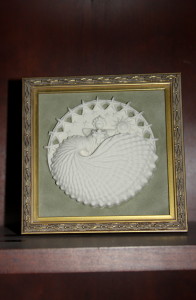
In my home office, I have recently added two wonderful collectible pieces by Margaret Furlong.  She is an artist located in Oregon that designs beautiful decorative pieces inspired by nature made in bisque porcelain.  The two pieces from her collection currently on the bookshelves in my home office are the “Heaven and Earth” and the “Hope for a New Millennium” which were purchased several years ago and originally were displayed in my daughter’s nursery in our California home.  To create these two framed collectible pieces, I purchased inexpensive gold frames that perfectly fit the Margaret Furlong pieces and two lovely pale green “velvet” scrapbook papers from the local craft store.  I removed the glass and backing from the frames then cut the “velvet” paper to fit the frame using the glass as a template.  I attached the collectible onto the paper with hot glue; carefully making sure that it would be perfectly centered within the frame, and then hot glued the paper with the collectible attached to the frame’s glass for additional support.  Finally, I placed everything back into the gold frame and it was ready to hang on the wall.  This easy craft project took 30 minutes to frame both pieces.  These two framed collectibles are a wonderful example of how to display small items in a beautiful way.

Framed collectible 2     Framed collectible 1

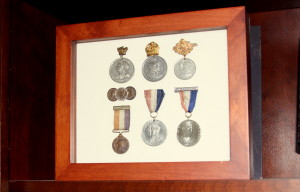
Displayed in my home office is a shadow box that displays commemorative medals of the British Kings and Queens.  As mentioned in this month’s Celebration post, Victoria’s Day, I am fascinated by the British Royal family.  My interest was sparked several years ago when I read a novel about Queen Victoria.  Since that time I have read numerous books about the royal family and while visiting England several years ago I had an opportunity to see the castles and country homes of the royal family which I had been reading about in their biographies.  This inspired a collection of commemorative medals of the British Kings and Queen.  The first one dates back to Queen Victoria and commemorates the Diamond Jubilee and her 60 year reign as Queen of England.  Additional commemorate medals include the coronations of the Kings and Queen that followed, King Edward VII, King George V, King Edward VIII, King George VI and finally the current Queen Elizabeth II.  One very unique pin marks the year 1937 when England had three kings.  During that one year England had three different kings, they were King George V who had recently died at the beginning of 1937, King Edward VII who abdicated before his coronation and then King George VI who was crowned at the end of 1937 and he is the father of the current Queen Elizabeth.  This particular pin is my favorite one in the collection.  All of these seven commemorative pins are in a walnut shadowbox and are wonderful way to display the collection in my home office.

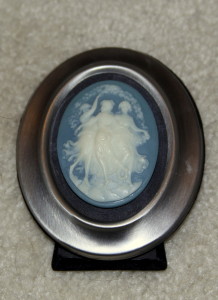
Framed collectible 3   Framed collectible 4

Several years ago while shopping on ebay, I came across a great source for cameos.  I purchased several not knowing exactly what I was going to use them for, originally I was thinking of using them for a jewelry project.  Instead, I decided to frame a lovely blue cameo the same way I framed the Margaret Furlong pieces.  I purchased a small silver frame from the local craft store, dark grey “velvet” scrapbook paper and used the same process, it worked out beautifully.  The framed cameo now sits on the side table in our master bedroom and is a lovely decorative accent.

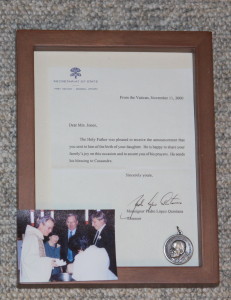
Down in our basement there is a bookshelf which is filled with family memorabilia (in the future I should write a post regarding the bookshelf and how everything is displayed!)  Anyway, there is a very special piece that commemorates our daughter’s baptism and the story behind this piece is very interesting.  First, I need to explain that both my mother’s parents emigrated from Poland through Ellis Island in the early 1900s.  Needless to say when Pope John Paul II became pope in 1978 my mother was very excited.  Several years ago when I was working on a special 80th birthday book for my mother, I wrote to the Pope hoping that he would respond and to my surprise he did write back with a lovely letter wishing her a happy birthday.  To conclude the story, when it came time for my daughter’s baptism, I again wrote to Pope John Paul II and received a letter blessing her on this special occasion and enclosed with the letter was a very special medal for her.  I copied the letter, reduced the size to fit the frame I had purchased, the original letter went into her baby book, and in the small shadowbox I included the medal the Pope sent along with a photo taken at her baptism.  This is an example of a very small item, the medal, being displayed in a wonderful way to commemorate a special and blessed event.

Framed collectible 1a

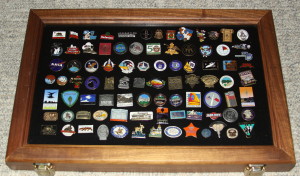
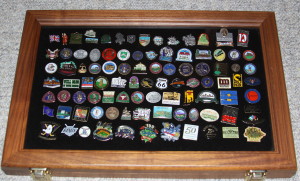
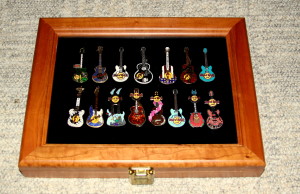
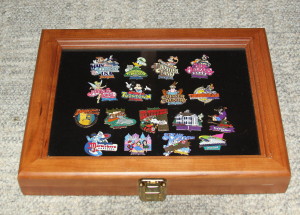
In the entertainment center down in the basement are several walnut cases specially made with a black liner and they are perfect for holding a collection of pins gathered during our road trips and overseas travels.  Almost every place visited on our travels I will purchase a pin as a souvenir and over the years I have collected hundreds.  Most of these pins are displayed in these special large walnut cases.  Check out this month’s Décor post, Travel Souvenirs, for more information regarding the other items we collect during our vacations and how they are displayed in our home.  Two small walnut cases are also displayed in the entertainment center.  One case holds a collection of Hard Rock Café guitar pins that were purchased while dining at the restaurants in several U.S. cities and other locations in Europe and Asia.  We like the food at the Hard Rock Café and if we are visiting a particular city on our travels I always check to see if there is one located there.  As mentioned in a previous post, Disney Memorabilia Collection, part of our Disneyland souvenirs is a collection of over two hundred Disney collectible pins.  Most of these pins were purchased during our visits to Disneyland or online from e-bay when I am looking for rare or discontinued pins.  A small part of the pin collection is displayed in one of the small walnut cases and the rest of the pins are stored away.  These walnut cases are an example of a terrific way to display a collection of small items and sometimes when we are down in the basement watching movies I will pull out one of the walnut cases and look at the pins and remember the places we have visited.

Pin collection 2    Pin collection 1
Pin collection 4    Pin collection 3

So, when you are purchasing small decorative items, think about displaying them in small frames that would look wonderful on bookshelves or tables in your home.  If you are a collector of small items like pins and medals, think about displaying the items together in shadowbox frames or special cases that are made specifically for this purpose.  My basic idea is that if you have purchased and collected these items take some time to display them in a decorative way to enjoy every day.  This idea is also a wonderful way to add interest and personality to a home.

Craft – Childhood Handprints

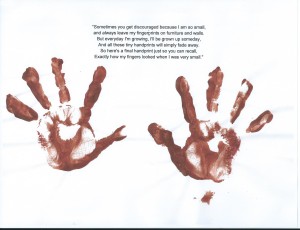
Child's handprintMother’s day is coming up this month and here is an easy and inexpensive craft project to do with the kids to create a very sentimental Mother’s Day gift.  This idea is also a great gift idea for Father’s Day, Grandparent’s Day or Christmas.

Children handprints, especially when they are very young, always make interesting art work for a home.  When children are at the preschool or kindergarten age their hands are very small and they make excellent tools for these simple art projects.

Follow these simple steps for a perfect handprint craft/art project.

  1. Before starting this craft project, be sure to assemble all the materials that you will need.  I used both acrylic black and brown paint for several sets of handprints. (I wasn’t sure which color I wanted to use so I took a couple of sets in each different color so that I would have more options to decide from when I did this project with my daughter)
  2. You will also need a paint brush to apply the paint onto the palm of the child’s hand.
  3. A very important tip when making handprints and using paint is to cover the work area completely with newspaper or a plastic tablecloth.  Another tip is to use an inexpensive apron to cover you and the child’s clothing while taking the handprints or another inexpensive solution is an oversized t-shirt, just be sure it is one that can be thrown out if it gets too much paint.  Position the work space within easy reach of a sink with running water and have paper towels on hand for spills and clean-up.  These simple steps will keep the project from getting too messy and therefore the clean-up time will be kept to a minimum.
  4. For this particular craft project pre-select a poem to use with the handprints.  The internet is a good source to find an appropriate poem, do a search for “handprint poem” and select one that you like.  Center the poem near the top of the page to allow enough room at the bottom for the handprints.  Be sure to include the name of the child and the year the handprint was taken.  Print several copies from a computer.  (I recommend at least four copies to start, this should be enough to allow for mistakes and to get at least one set of good handprints)
  5. Before starting the project take the time to explain to the child what will happen during the handprint process, children tend to cooperate more if they know what to expect.  A simple trick to taking good handprints is for the child to relax their hands and not roll their fingers into a ball.  This can be a very messy process if you have to move their fingers into a straight position.
  6. An important tip when taking handprints is to use a minimum amount of paint to create smudge-free prints.  Place the palm of the hand near the wrist down first and then place the fingers slowly down on the paper. Once the hand is completely placed, gently press down on all the areas of the hand with equal pressure for an even print.  Rest the hand for a moment and then lift straight up, this trick will help to eliminate smudges.  After you get a good handprint of the first hand move onto the second hand.
  7. After the both handprints are taken, allow it to dry for at least 24 hours.  Once the handprint is completely dry.

Please check out last month’s Craft post, Zoo Animal HandPrints, for another fun craft project using children’s handprints.

Craft – Floral Purse Arrangement

Floral purse green 2

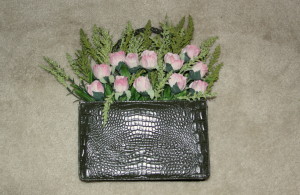
With Mother’s Day celebrated this month, why not consider creating one of these floral purses as a lovely gift.  This beautiful floral purse gift would also be a fun idea for a present for a daughter’s sweet sixteen or a best friend’s birthday.  This gift would also make a great bridal or wedding shower gift and for additional suggestions please check out the ideas at the end of this post.

To get stated creating one of these floral purses, just follow a few easy steps to create this amazing gift!

Floral purse green 1Floral Purse – instructions

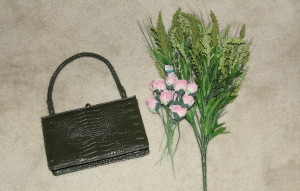
  1. To assemble a floral purse gift, the first thing to do is to find a great purse to use as the base for the floral arrangement.  Look for a beautiful purse in a local retail store or consider a vintage purse from an antique store.
  2. Before adding anything else to the purse, fill the bottom with tissue paper or a layer of small glass marbles if you need to add weight to the purse to keep it from tipping over.
  3. Next, depending on the color and style of the purse, add some flowers and greenery to coordinate.  Any type of flowers can be used, such as: roses, sunflowers, tulips, etc.  Don’t forget to use some greenery or berry sprays to add some accent color to compliment the flowers and the purse.
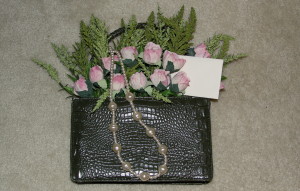
  4. Add some small additional gifts.  Consider one or two jewelry items, such as: a beautiful broach attached to the purse or artistically drape a necklace or bracelet among the flowers.  Consider other small gift items, such as: a wonderful perfume, body sprays and lotions or a collection of beauty products.
  5. Finally, be sure to attach a gift tag to the handle of the purse or tuck a birthday card into the flowers.

Floral purse green 3Floral purse gift ideas and suggestions

  1. A fun gift idea for a young girl’s sweet sixteen birthday gift is to purchase a fabulous designer bag, add some flowers and greenery.  Next, add some gift cards to their favorite stores or spa and nail salon certificates, tuck them into the flowers for an extra special present.  (The same idea could be used for a friend’s birthday gift)
  2. This idea could also be used for a wedding shower gift idea, consider adding gift cards from the store where the bridal couple has their registry.  For a kitchen themed shower, add several kitchen utensils and maybe a couple of favorite or family recipes written out on some cute recipe cards.
  3. For a daughter’s bridal shower, consider giving a lovely bridal purse for her to carry on her wedding day.  Think about adding something old, something new and something blue!  A family locket necklace, grandma’s broach, a vintage handkerchief or maybe even their first communion rosary for something old.  Something new could be the wedding purse or maybe new earrings, a bracelet or a necklace to wear on the wedding day.  Something blue could be a lovely blue garter or perhaps a pair of sapphire earrings or a blue handkerchief.  Don’t forget to put a lucky penny into the bottom of the purse!
  4. For a bridesmaid luncheon, the bride could consider giving matching purses for the bridesmaids to use on the wedding day and maybe artistically hanging matching necklaces among the flowers.  Don’t forget to attach a thank you note from the bride letting each one know how much she values their friendship and how excited she is to have them share in her special day.
  5. For a baby shower, use a beautiful diaper bag.  Fill it with a floral arrangement and tuck in several small baby items, maybe even toys.
  6. This idea could also be used for creating a lovely floral arrangement for a bedroom dresser or nightstand for a home.  The floral purse pictured in this post sits on the shelf in my master bedroom closet and it is the perfect decoration for the room!!

Celebration – Baby Showers

May is the month when Mother’s Day is celebrated and it seems like an appropriate time to talk about baby showers.  What a special time in a woman’s life when she is expecting a baby, especially if she is having her first child.  It is a perfect time for family and friends to gather to celebrate the upcoming birth and a wonderful way to gift the mom-to-be with a beautiful layette while enjoying some delicious food and good conversation.

The first thing to do when planning a baby shower is to decide on the date and location.  In regards to the date of the shower, be sure to pick a day close to the mother’s due date, but not too close.  Now, let me tell a funny story about my baby shower.  My friend was hosting my shower at her home and very early in morning on the day of the shower I went into labor, it was one month before my due date.  On the way to the hospital I called my friend to let her know what was happening and we talked about the possibility of cancelling the party but we decided it was too late; guests had come in from out of town, so she went ahead with the shower as originally planned.  Meanwhile, as the guests were arriving at my friend’s house, I’m in the hospital giving birth to my daughter.  To conclude the story, I wasn’t able to attend my own baby shower but I have some great photos of my friend opening up all the presents gather will my family and friends!

Once the date and location are decided, set a budget to keep the costs within reason.  Expenses can get quickly out of hand, so be sure to have a plan and stick to the budget.  The next step would be to pick a theme because that would suggest the type and style of the shower decorations.  Take a look online and search for baby shower themes, there are thousands to choose from.  Sometimes the parents-to-be will know the baby’s gender and this information can determine the colors to use for the party.    In regards to a specific theme, find out what the interests of the parents-to-be for inspiration. Maybe it is an interest in baseball, football or some other sports, maybe it is music or ballet, and maybe it is reading books or going to the movies.  As an example of a book theme, perhaps the parent-to-be loved a book when they were a child; that would be a great inspiration of a theme for a baby shower.  Alice in Wonderland, Wizard of Oz, Peter Rabbit, Winnie the Pooh, Tom Sawyer – any of these books would make wonderful themes.  Here are a couple of other suggestions: ask the guests to bring their favorite book to help build a home library for the new baby or maybe the cake can be in the shape of a stack of books.  So, the idea is to select a specific theme and use it to inspire the invitations, decorations, party favors and maybe even the cake.

Once the theme is decided, then it is time to think about the party decorations.  Decorations can be expensive, so consider keeping the cost to a minimum by creating them from simple supplies purchased from the local craft store.  Take a trip to the craft store and be inspired by the paper in the scrapbook aisle.  Scrapbook paper can be used for invitations, name tags, place cards, banners and all kinds of decorations for the party.  Do a search online for handmade baby shower decorations for great ideas.

Baby shower decorations can be created using some unusual baby items; take a look at the baby section of your local retail store,  For fun party favors, use small baby bottles filled either with colorful candy or soothing bath salts and be sure to tie a small thank you note to the bottle.  For name tags at the party here is a cute idea, set out a supply of cute diaper pins so guests can attach the tags to their clothing.  Check out this month’s Craft post, Baby Sock Corsage/Bouquet, for a cute idea using socks and other items of baby clothing, there are a list of supplies and simple instructions to make a special mom-to-be corsage and a very unique gift presentation.   Also there are ideas for using items of baby clothing to create baby shower decorations and party favors and even a unique “wearable guest book” as a signed t-shirt or onesie.

Shower decorations can come from items already owned.  Ask the parents-to-be if they have any childhood toys, these would make truly personal and unique items to use as decorations at the party.  Smaller items can be used on the buffet table and larger items can be placed around the room.  A precious heirloom to display would be a christening gown, special dress or outfit worn in their childhood.  Ask the parents-to-be for their baby pictures or photos from their childhood, these can be inexpensively framed and displayed on the buffet table or placed around the room.  Another great source for unusual one-of-a-kind items are antique stores.  Look for vintage toys that can be used as decorations or consider purchasing inexpensive mis-matched china and silverware for the buffet table.   A collection of vintage baby spoon, cups or rattles would look amazing hung on a small feather tree and displayed on a side table.

Consider creating a special gift for the mom-to-be, maybe a gift certificate to a wonderful spa for a massage and facial or a favorite beauty salon for a manicure or pedicure as a special way of pampering the new mother after the baby is born.      Another thoughtful gift is to purchase a beautiful photo album for all their baby’s photographs.  For the first page of the album, print the following words on special scrapbook paper.  “This special album is given with love today; a precious newborn will soon be on the way.  Create lots of memories and put the photos here to make each moment last; and soon your child will have a place to go to learn about their past.”

Don’t forget a gift for the father-to-be; he would appreciate being remembered during this time when the attention is on the mother-to-be and the new baby on the way.  Have the father-to-be arrive before the shower is over and present him with “A Daddy Emergency Kit”.  Use a container that can be closed, like a decorative box.  Then purchase the following items to put into the container and be sure to print and attach a humorous list of the contents.  Include the following:  a couple of disposable diapers, a small travel package of diaper wipes, a diaper cream or other ointment, a pair of disposable gloves and goggles for protection from flying objects, a face mask and clothespin for nose protection from unpleasant odors, tongs for soiled diaper removal and disposal, a baby washcloth, a couple of jars of baby food, a baby feeding spoon, a pacifier and a few small toys, and a couple of items for a change of clothing (t-shirt, onesie, socks)  These items are just some suggestions but be creative with the packaging and container contents.

Just remember the main purpose of a baby shower is to celebrate the upcoming birth with family and friends.  The other purpose is to provide the mother-to-be with the clothing and other items necessary for the baby’s first year.

Tips and suggestions for creating a great baby shower

  1. Start the planning process early, this will allow time to brainstorm creative ideas for a very memorable baby shower.  Talk to the mom-to-be and find out the baby’s due date and if the baby’s gender is known, this information will set the party’s date and can inspire a general theme.
  2. In regards to the baby shower theme, select a concept that reflects the parents-to-be interests or the baby’s gender.  Try to create a party that has a special and unique style and personalize the party decorations to fit the theme.
  3. Create a beautiful space for the party, set a wonderful environment for the guests.  Consider renting table, chairs, linens, china and glassware, these items can be within budget and will add the perfect touch to a very special event.
  4. If the party budget is small, check for items that you already own that can be used in creative ways to keep the cost down.  If you do need to purchase items for the party, be sure that they can be recycled for other uses later.
  5. During the party, be sure to keep the guest-of-honor and the invited guests comfortable.  Provide delicious food and beverages with a place to sit and engage in conversation.  Room temperature, bathroom facilities and food allergies are important issues to take under consideration.  Create some activities that will give the opportunity for the guests to mingle and get to know each other.
  6. Ask for help when planning the shower, family and friends can be a great source for ideas.  Use the computer as a wonderful resource, there are literally thousands of ideas for everything from the shower theme to decorations.  Don’t be timid on asking for help the day of the party, this is another time when extra people would be required to put up decorations, set out food, etc.