Decor – Nautical-themed Decorations

This month I wrote a Travel Post about the Royal Yacht Britannia.  The Britannia, which launched in 1953, has served the Queen as an official Royal residence for state visits and official receptions when traveling aboard.  The Britannia was also used for Royal family holidays and the honeymoons of several Royal couples throughout the years.  The Britannia was decommissioned in 1997 and is now a tourist attraction in Edinburg, Scotland.  Please click on the link for more detailed information about the history of the Royal Yacht Britannia.

So, inspired by the Britannia I decided to create two Nautical-themed Decorations which were easy craft projects, using just a few inexpensive and relatively easy to purchase items that could be made in just a short time.  The Nautical-themed Decorations would look wonderful in a beach or coastal home but could be used in any style of home.      

The first Nautical-themed Decoration used a wooden hook in the shape of an anchor, a black framed shadowbox and red, white and blue stripped scrapbook paper.  To start the craft project, I disassembled the shadowbox and set aside the backing and glass.  Using the backing as a guide to size, I cut the scrapbook paper to fit the interior of the shadowbox and then glued it to a piece of cardboard cut to the same dimensions.  This provided a hard, sturdy surface to hold the weight of the anchor hook.  I centered the anchor into place and then glued it to the scrapbook paper/cardboard.  Next, I replaced the glass and backing of the shadowbox and that completed the craft project.  (Décor Note: I choose to detach the metal hook from the wooden anchor but it could remain as a serviceable item for hanging)   

Anchor Hook  Framed Anchor

The second Nautical-themed Decoration took a little bit of research but was made in under an hour using a few inexpensive items.  The supplies included a simple wooden frame with a white mat, a burlap covered backing, several colors of scrapbook paper, cardboard letters painted black and small amount of jute rope.  To start the craft project, I used my home computer to find the nautical flag alphabet and with this information I used scrapbook paper to create the flags that would spell out our last name.  After making the small flags I attached these to a small length of jute rope which I strung from one side of the frame to the other.  With the painted black cardboard letter I spelled out “welcome” and glued these directly to the burlap backing.  (Décor Note: For this project I choose not to use the glass from the frame because of the thickness of the rope and paper flags.  By eliminating the glass it also omitted any glare to distract from the display)

Nautical flag final

Nautical flag alphabet

With these custom-made Nautical-themed Decorations I was able to create the perfect items for our home.           

Decor – Funeral decorations and memorbilia

This month in honor of Presidents Day I wrote a post on Presidential Funerals in which I discussed the traditions and customs involved in the planning of these events. Personally, in recent years I have helped to plan several funerals for family members and in the process I have searched the internet for ideas.  In general, craft information to create decorations or displays for a funeral are difficult to find and most websites that I found on the internet were for ready-made items to purchase.  In this post I discuss the numerous funeral or memorial items that I have made and I will also offer suggestions for additional items.  When planning the elements for a funeral or memorial service the focus should be on the deceased person and all the items used should in some way reflect their personality, interests or have special meaning that tells the story of their life.

Funeral or memorial service decorations

To start the decorations for a funeral or memorial service it is a good idea to have a welcome table for the invited guests which will usually be set up in the vestibule of a church or in the hallway or just inside the door of a mortuary lobby.   Place a large photo of the deceased person on the table along with some smaller photos, some type of book for guests to sign or write their memories of the deceased person.  A welcome table it is also a great place to set the funeral or memorial programs and holy cards for guests to pick up.  For my mom’s rosary service the night before her funeral we placed several photos on the tables around the room which we mixed in with the many floral arrangements. (Decor Tip:  For smaller photos use frames that have an easel backing or for larger photos in bigger frames use metal or wooden stands)        

Funeral display 1

For the service of my husband’s grandmother we set out the scrapbook which I had for the 60th anniversary of his grandparents on the welcome table, the book highlighted the couple’s life together throughout the years and it was wonderful for the guests to be able to glance through before the service.  (Craft Tip: This type of retrospective scrapbook is a relatively easy craft project to create in a few hours.  All that is needed are a photo album, several photos depicting the deceased throughout their life, a supply of scrapbook paper and some stickers or other embellishments)

Funeral display 3 Funeral display 5

Another type of display arrangement to create for a funeral or memorial service is by incorporating memorabilia of the deceased person.  For my husband’s grandfather’s service his special Pearl Harbor Survivor hats were set out on the table.  For my husband’s grandmother’s service several of her paintings were set out on the mantel of a fireplace with a specially made shadowbox displaying her many art show ribbons collected throughout the years. 

Funeral display 2Funeral display 4

For the memorial service for my husband’s nephew, I made a wreath decorated with artificial flowers and butterflies for the welcome table, butterflies were the general theme of the service (look for a photo of this wreath later in this post).  Since the deceased was a young boy, his mother wanted to display his many sports awards and also his school projects made throughout the years.  On the fireplace mantel in the room we set out more framed photos, sports awards and a stack of his favorite books.  Before the service started the guests moved about the room looking at all the displays.

Memorial displays 2 Memorial displays 1

Memorial displays 3

The elements or parts of a funeral or memorial service

When planning a funeral or memorial service there are usually numerous decisions to make in regards to selecting songs, prayers or poems.  Much like the choices made for the decorations, when planning the elements for a funeral or memorial service the focus should be on the deceased person and the selections made should reflect their personality, interests or have special meaning. 

A wonderful element for a funeral or a memorial service is a personalized video presentation which includes a selection of photos showing the life of the deceased person set to specially selected music.  Together my husband and I have done this for the funeral and memorial services of several relatives (and also for various milestone birthdays or anniversaries).  There are many different applications and programs that can be used to create a video and the one that you choose comes down to personal preference.

There are several things to keep in mind when making a personalized video for a funeral or memorial service.  The first thing to consider are that the photos chosen should span the years of the deceased person.  We usually select photos from childhood through to the end of their life including memorable events, special occasions or other milestones. Shown below is an unusual photo of the hands of three generations of women in my family which was taken just a few years before my mother passed away, the hands are of my mother, myself and my daughter.  We used this as the “title photo” for the video which listed her full name, date of birth and date of death.  (Special Tip: One thing to keep in mind when selecting photos is to try to include the family and friends that will be attending the service.  The second thing to consider is the music selection and it should be a song that holds special meaning.  Maybe the song could be the deceased person’s favorite song by their favorite musical artist or maybe one that you personally selected because of the meaning of the lyrics or a classical song or a church hymn.  Another Special Tip: In the past when we have created a video for a funeral we have used only one song and selected the number of photos to fill the time from the beginning to end of the song.  We found the length of one song, usually 2 to 4 minutes, works best because it holds the attention of the guests)

00- -Title

Another element that we used for my husband’s nephew’s memorial service was a special butterfly release.  The mother wanted the service to be a celebration of her son’s life, so at the end of the service the guests were invited outside to witness the release of the butterflies.  The immediate family members including grandparents, aunts and uncles said a few words before releasing individual butterflies and to conclude this portion of the service the parents and siblings of the boy released a large basket of several butterflies which fluttered into the afternoon sky providing a wonderful symbolic gesture and proved to be a very emotional end to the service. (Source Tip:  When planning the event we searched the internet for a local source for the butterfly release.  There is a little preparation involved with a butterfly release but it is worth the effort)

Another element to a funeral or memorial service are the items worn by the people taking part in the service.  For my mother’s funeral I made the boutonnieres for the pallbearers to wear, my mother had requested that all of her grandchildren carry her coffin into the chapel.  Her grandsons and grand-daughters wore white roses, my mother’s favorite flower, on their left side pined over their hearts.  I used artificial roses, a few leaves, green floral tape to create the boutonnieres and provided long pearl topped pins to fasten them to the shirts or dresses of the grandchildren.  (Craft Tip: Flowers chosen for a boutonniere can be traditional lilies, roses or perhaps the favorite flower of the deceased person)

Funeral boutonniere

Another item that I made for my sisters and myself to wear at my mother’s funeral service were special medallion brooches.  I found the metal and glass medallions at my local craft store, selected a photo of my mother and father which I copied and then minimized the size to fit the medallion.  Then I tied a black ribbon bow with a safety pin attached to use to pin it to our clothes.  Since both my mother and father had now passed away I wanted to honor their memory and also designate at the funeral that we were their daughters.  Something this simple to create was noticed by the guests at the funeral and I received many compliments about the medallions.  (Special Note: As a very meaningful gesture, I made two special medallions which I placed in my mother’s coffin.  One had a photo of her with her parents and siblings and the other was a photo of her with my dad and her four daughters)

Memorial brooch 3

For the memorial service of my husband’s nephew we used a theme of butterflies and I purchased inexpensive artificial butterflies from my local craft store which we pinned to the clothing of the immediate family, grandparents, aunts, uncles and great-grandparents.  This was a wonderful way to incorporate the theme of the service and also to identify the relatives of the deceased boy.

Preserving the memorabilia of a funeral or memorial service

After a funeral or memorial service there is sometimes memorabilia to preserve or to honor the deceased person.  The first item shown below was actually used at my wedding and was something I created to honor my father who had passed away several years earlier.  I used a photo of my father and found a special poem on the internet that I printed on my home computer and it perfectly reflected my feelings about him.  Shown below is the special memorial piece that I placed on a table with a floral arrangement and some candles.  I used a simple wooden frame, selected a double photo mat and then inserted both my father’s photo and the special poem.  Even though this item was used for a wedding the idea could also be a special piece to display on the welcome table at the funeral or memorial service or could be used afterwards to display in a home to remember and honor a deceased person.  Another idea instead of a traditional frame is to use a shadowbox frame that could include a boutonniere or flower from the funeral or memorial service.  

Framed memorial 1 Memorial poem 1

The next two items were created to preserve the memory of my husband’s nephew.  The first was the special wreath I created to displayed on the “welcome table” at the memorial service and it was saved to be used afterwards for a front door decoration.  I used a simple grapevine wreath, flowers and 12 blue butterflies were also attached to the wreath to reference the age of the boy at the time of his death.  The second item I created was a special piece which I presented to the mother after the service.  I used the program from the memorial service, some of the flowers and stems from the wreath and two of the butterflies which were originally used as boutonnieres.

OLYMPUS DIGITAL CAMERA  Framed memorial 2

For my mother’s funeral service I wanted to create a very special and sentimental wreath. The floral wreath that I made features white roses which were my Mother’s favorite flower. I used six white full roses to represent my parents and their four daughters, nine white rose buds to represent their nine grandchildren.  I finished the wreath with green hydrangeas and berries in a lovely pastel shade of rose pink.  By creating this special wreath instead of purchasing one from the local floral shop turned out to be a blessing.  Let me explain why it was a cathartic experience, first by taking the time to make the wreath I was able to honor my mother’s creative talent which was something she passed on to me.  Second, as I made the wreath I was able take the time to reflect on my memories of her and start to process my grief from her passing.  I still use the wreath as a floral decoration for my front door and instead of making me sad it brings me serenity and peace in remembering and honoring my mother.

Funeral wreath 1

Decor – Changing Christmas Displays (Part One)

During the holiday season, as most readers to my blog will know, I like to change my Christmas displays from year to year.  Sometimes, I will change the location of the displays to different rooms of our house or I will add various accessories or embellishments to the displays from year to year.  In this two part series I will show my annual Christmas displays and how they have changed throughout the years.  In Part One I will feature my Fontanini Nativity display and in Part Two I will show my Department 56 North Pole village display.

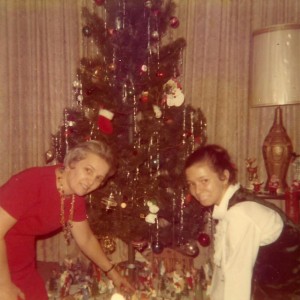
When I was growing up my mother had a beautiful nativity set with hundreds of pieces that she always set up under our Christmas tree every year.  One of favorite things to do during the holiday season was to lie on my stomach just looking at the display and the various figurines and sometimes, when my mother wasn’t looking, I would play with the pieces.  Unfortunately, after my mother passed away, I don’t know what happened to her nativity set.  It would have been nice to have one or two pieces for remembrance!  (below is a Christmas 1971 photo of my mother which shows just a small portion of my mother’s nativity set under the Christmas tree)

1971 Christmas - Mom and Barbara

When I first got married, I knew I wanted a nativity set to carry on the tradition for my own family.  There is a wonderful Christmas store in Solvang, California called the Jule Hus (solvangschristmasstore.com) and that is where I purchased my Fontanini Nativity set.  The small starter set came with a stable, Gloria the angel, Mary, Joseph and baby Jesus.  My nativity set will never be as big as my mother’s nativity set but it is just the right size to display anywhere in our house.

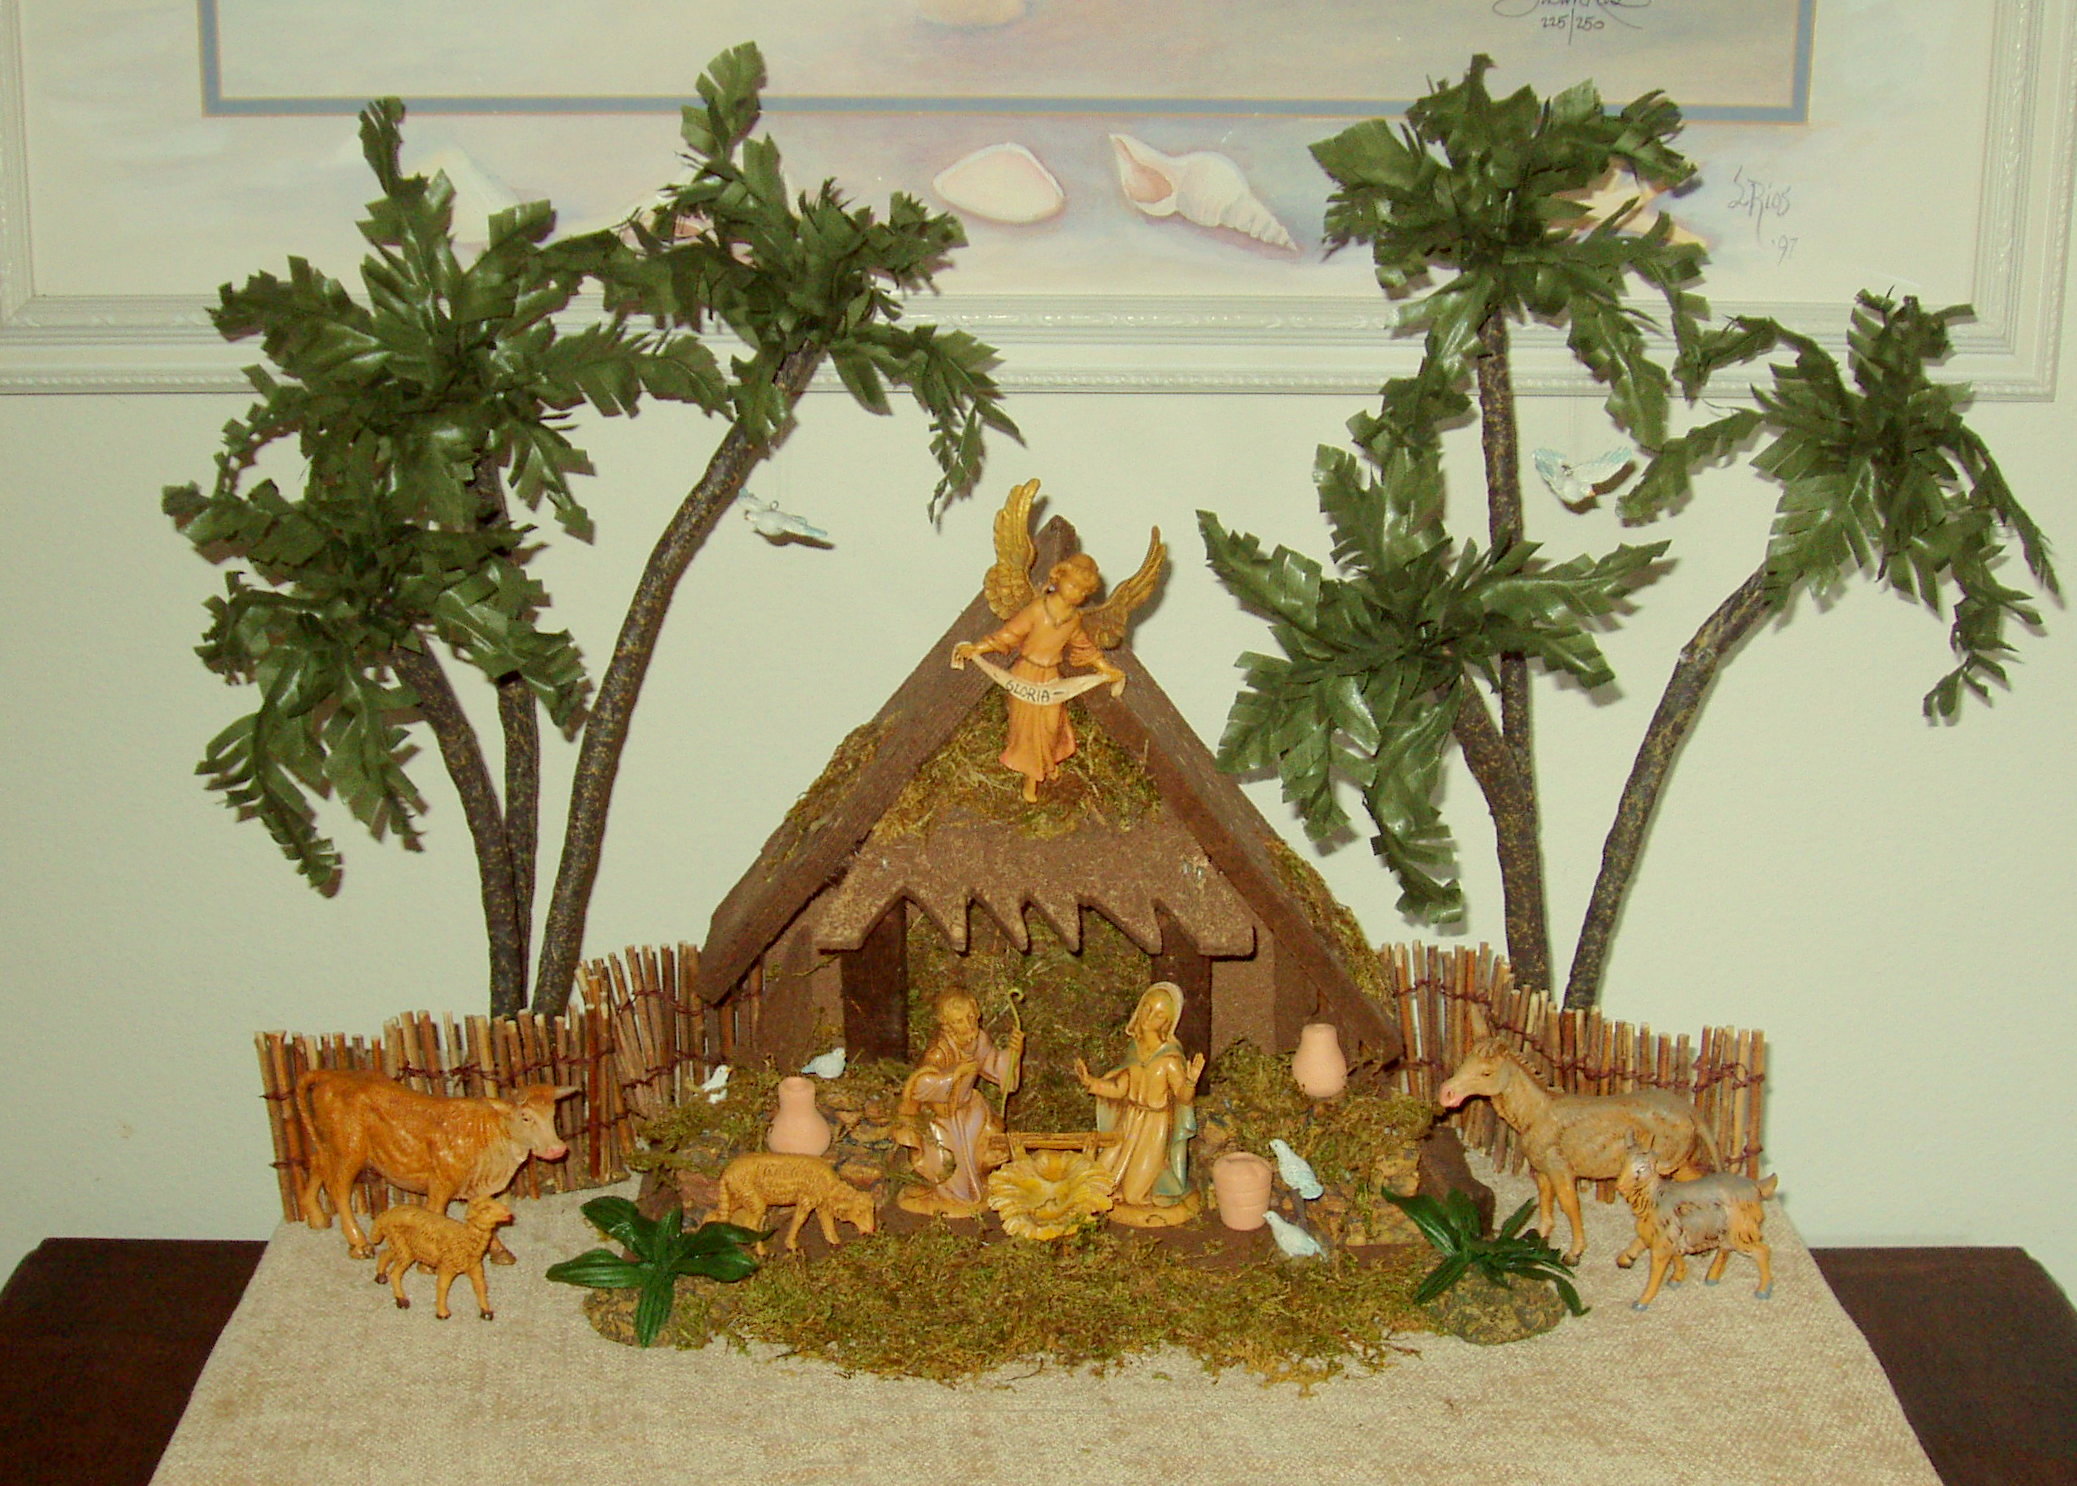
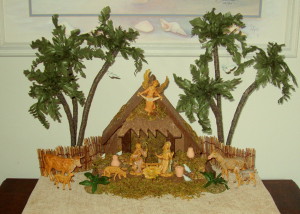
The first few years I traditionally displayed the nativity set under the Christmas tree but then as I bought more Fontanini pieces and accessories I wanted to get a little more creative.  One year I displayed them in our entrance hall on an antique sewing machine table.  I raised the nativity stable on a box covered with a piece of sand colored suede material (this material would be re-used again in a variety of different ways for my other nativity displays over the following years).  By that time I had added a few more Fontanini pieces to my collection, which included a donkey, cow, goat, two sheep and a couple of white doves, and set these additional pieces into the display.  To complete the display I added a set of palm trees and ferns, a wooden fence and a couple of miniature clay pots that I had purchased that year. 

OLYMPUS DIGITAL CAMERA

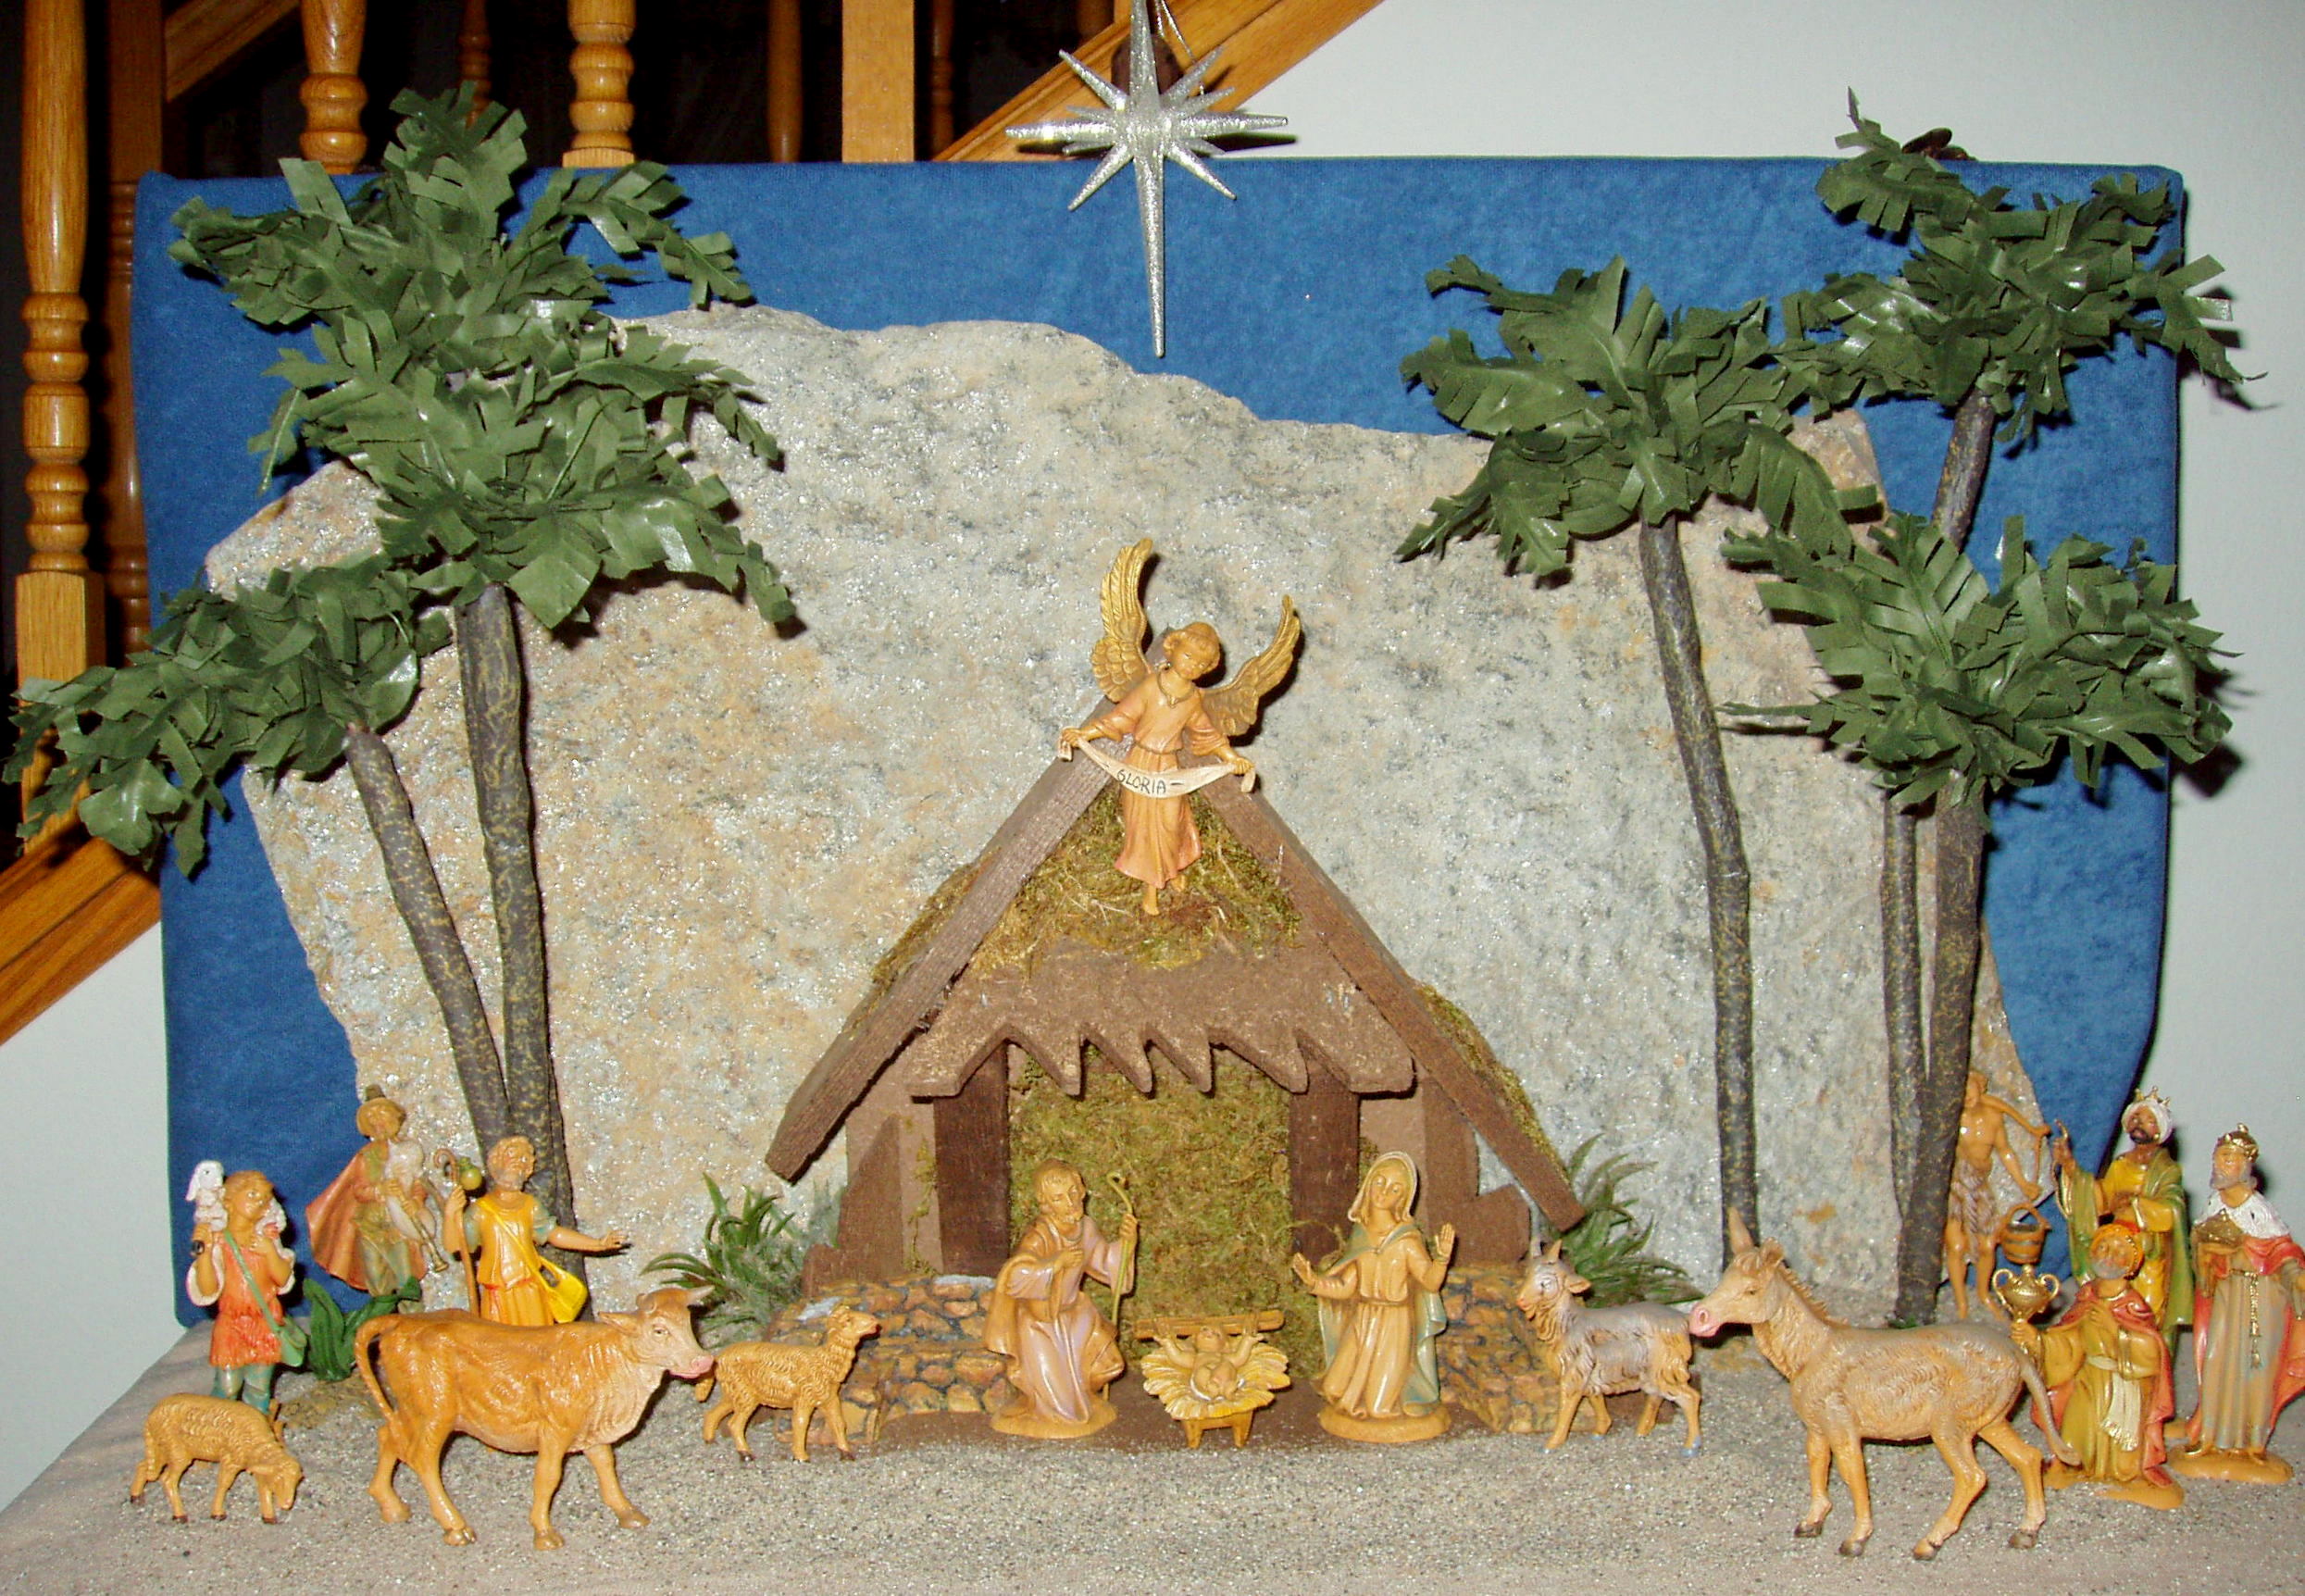
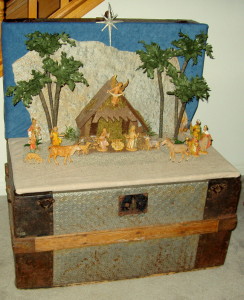
The following year I decided to display the nativity set inside an antique trunk in our living room.  I had my husband cut a piece of wood to fit the dimensions of the trunk to be used as the base and then covered it with the suede material and placed the nativity stable on top.  Next, I cut a large piece of Styrofoam board and covered it with variegated blue cotton fabric to use as a background and then I placed a large flat rock in front (the foam board with blue material would be used again in another year’s nativity display and also in another year for my Department 56 North Pole display).  Then, I set out my original Fontanini pieces and added the ones that I had purchased that year which included the three wise men, shepherds and villagers and a few more sheep and a dog.  To complete the display I had found a lovely white ornament which I hung over the nativity stable as the evening star. 

OLYMPUS DIGITAL CAMERAOLYMPUS DIGITAL CAMERA

The following year, we had recently purchased a large oak cabinet for our living room and I set up the nativity set on top displayed in a way similar to the previous year.  Because I could not safely support the weight, I decided not to use the large flat rock and instead draped the suede material to resemble small hills which added an extra dimension to the display.

OLYMPUS DIGITAL CAMERA

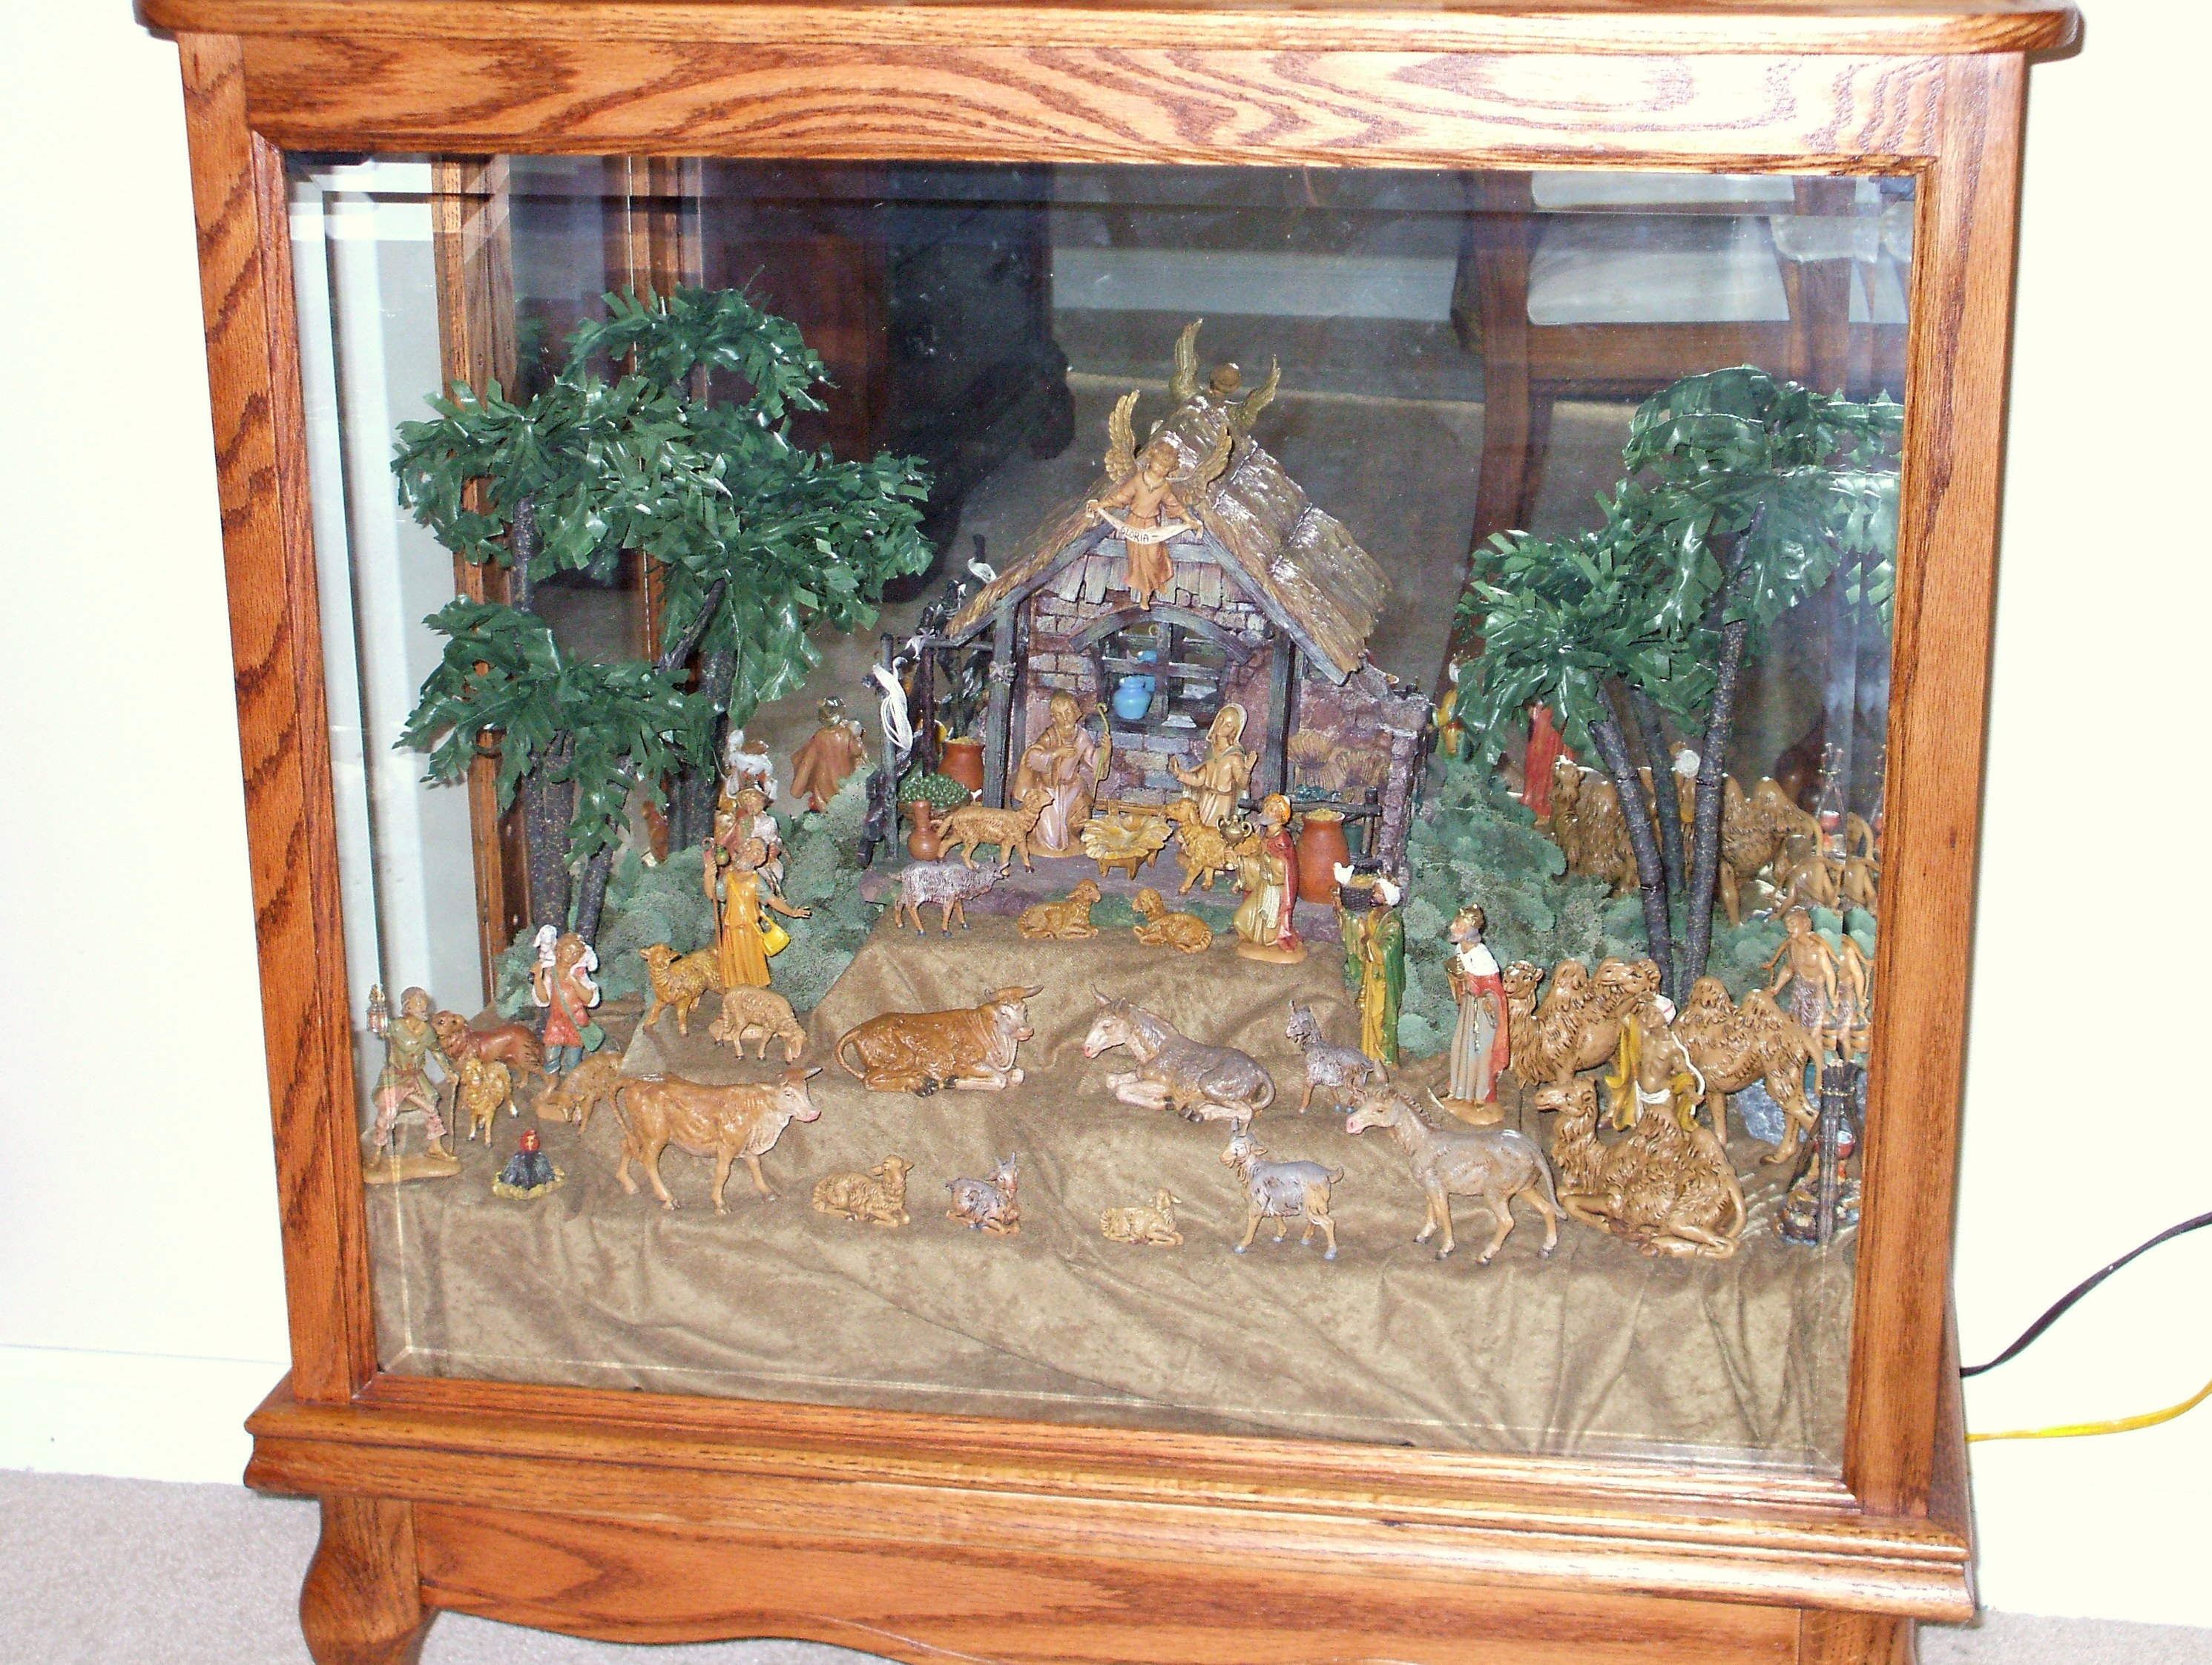
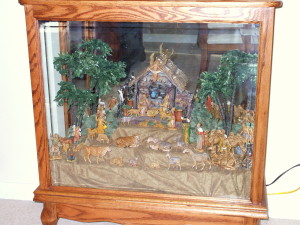
The next year I decided to move the nativity set into our dining room in an oak cabinet that we had recently purchased.  I removed one of the extra shelves and covered the remaining shelf with the suede material and tucked a box under the material and placed the nativity stable on top.  Then, then I added a new sheep shelter which I placed to the left of the stable and two campfire sets.  That year I had purchased several additional Fontanini animal figurines, which included several more sheep, goats, an extra donkey & cow and three camels and herder from the wise men’s caravan.

OLYMPUS DIGITAL CAMERAThe following year, I displayed the nativity set in the same oak cabinet in the dining room but I decided to add more layers to the display.  By separating the Fontanini pieces into the additional layers allowed more room to display the collection and provided a better view of the individual pieces.  As an example of my ever changing nativity display, I had purchased at an after Christmas sale the previous year another nativity stable made of resin with more detailed features which I set out in the center as the focal point of the display (I kept the original wooden stable for possible use in the future for another craft project).

2007 Christmas 2

The next Christmas we had moved from California to our current home in the Midwest.  That year I decided to display the nativity set on top of an antique piano in our library room at the new house, it was a sentimental piece of furniture that had previously been in my husband childhood home in Berlin when his family had lived there for a few years.  Once again, I used the suede material with a small box placed underneath and to the left side to provide some height in the display.  The nativity stable was set on top and because of the size of the surface of the piano top I decided that I would edited down the Fontanini nativity display and only used a portion of my collection (this is another example of changing a display from year to year)

2009 Christmas

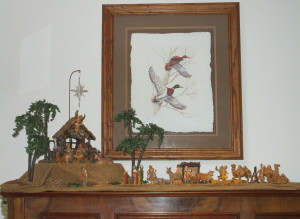
By the next Christmas, my husband’s grandmother had passed away and we had inherited an antique table that had been in her family for several years.  I thought that it would be a wonderful idea to honor her memory and incorporate this sentimental piece of furniture into the nativity display.  The table was placed in our library and I covered it with the suede material.  Next, I placed in the center a small piece of Styrofoam which I had painted in several colors of tan and brow to match the material and placed the stable on top.  Once again I edited down the collection to fit the dimensions of the surface of the table and used only selected a small portion of my Fontanini collection.  To add some additional interest, I scattered some sand around the display to create the illusion of the desert location of Bethlehem.

2011 Christmas  22011 Christmas 1

The following year, in keeping with my ever changing Christmas decorating from year to year, I decided to display the nativity set on a larger table which was placed in front of the windows in our library.  Once again, the suede material was used and I positioned the nativity stable on top of pervious Styrofoam base used last year.  Next, I placed the nativity stable on top of the Styrofoam base and set out only a small portion of my Fontanini collection.

2012 Christmas 
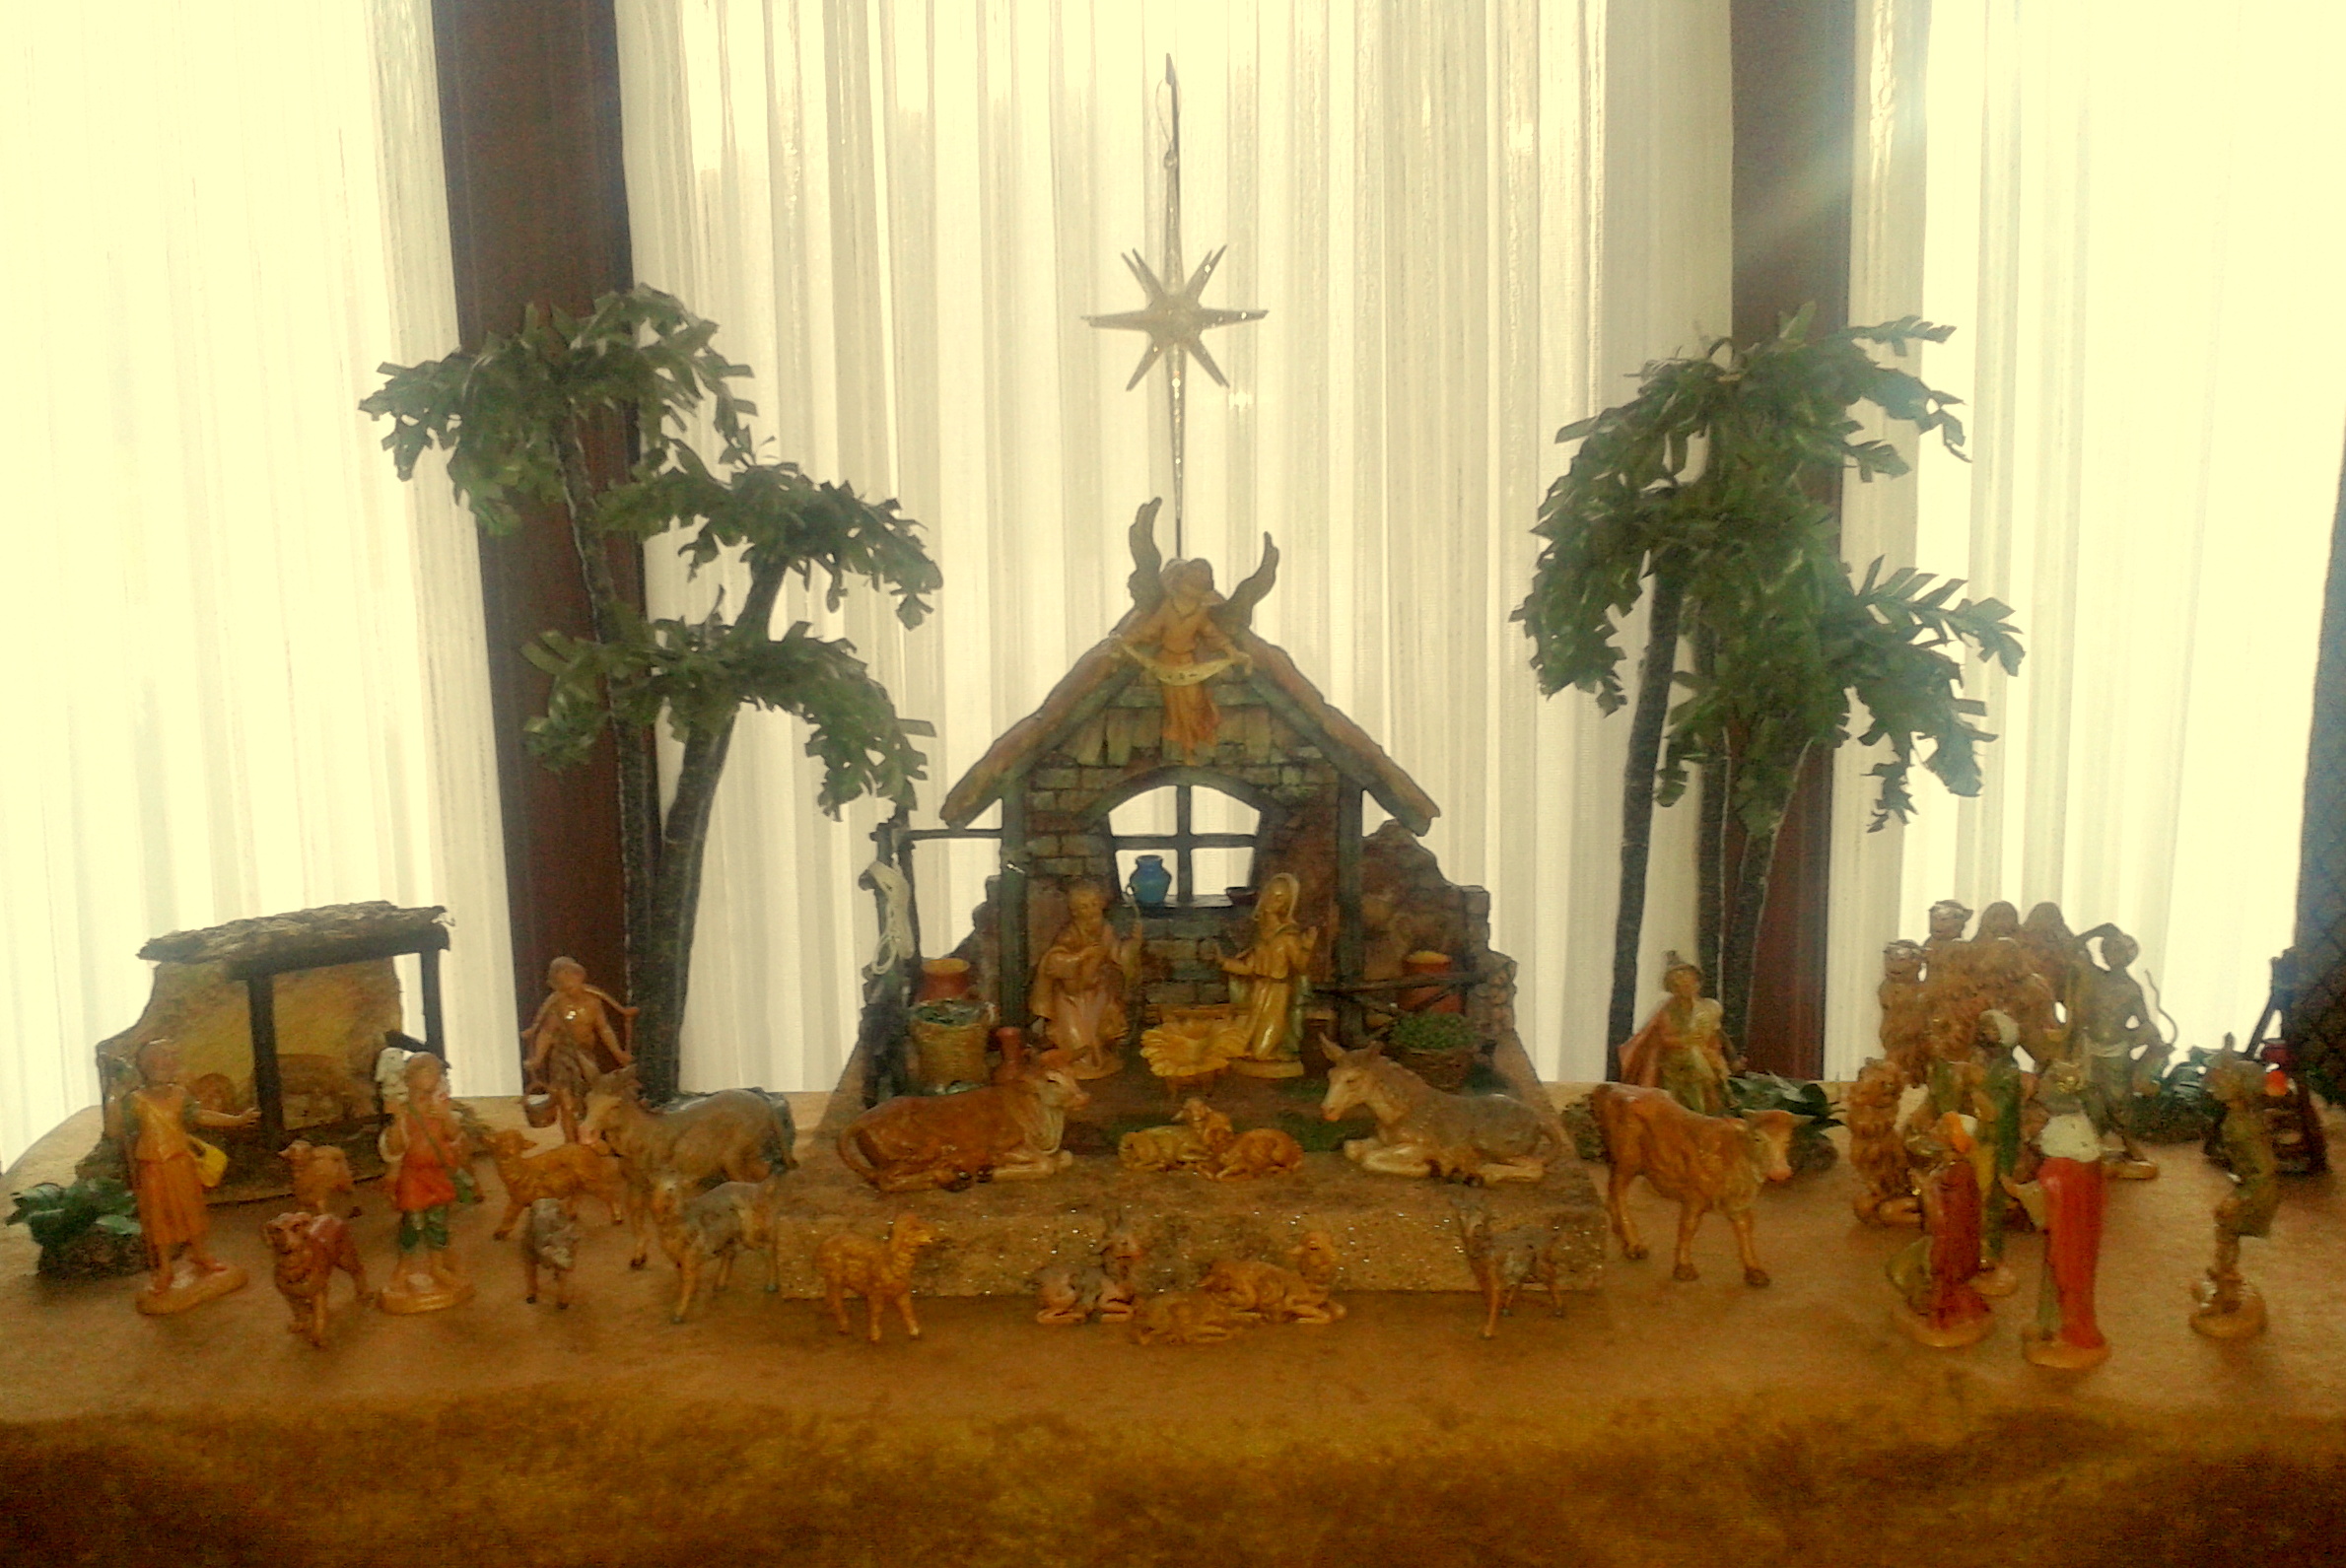
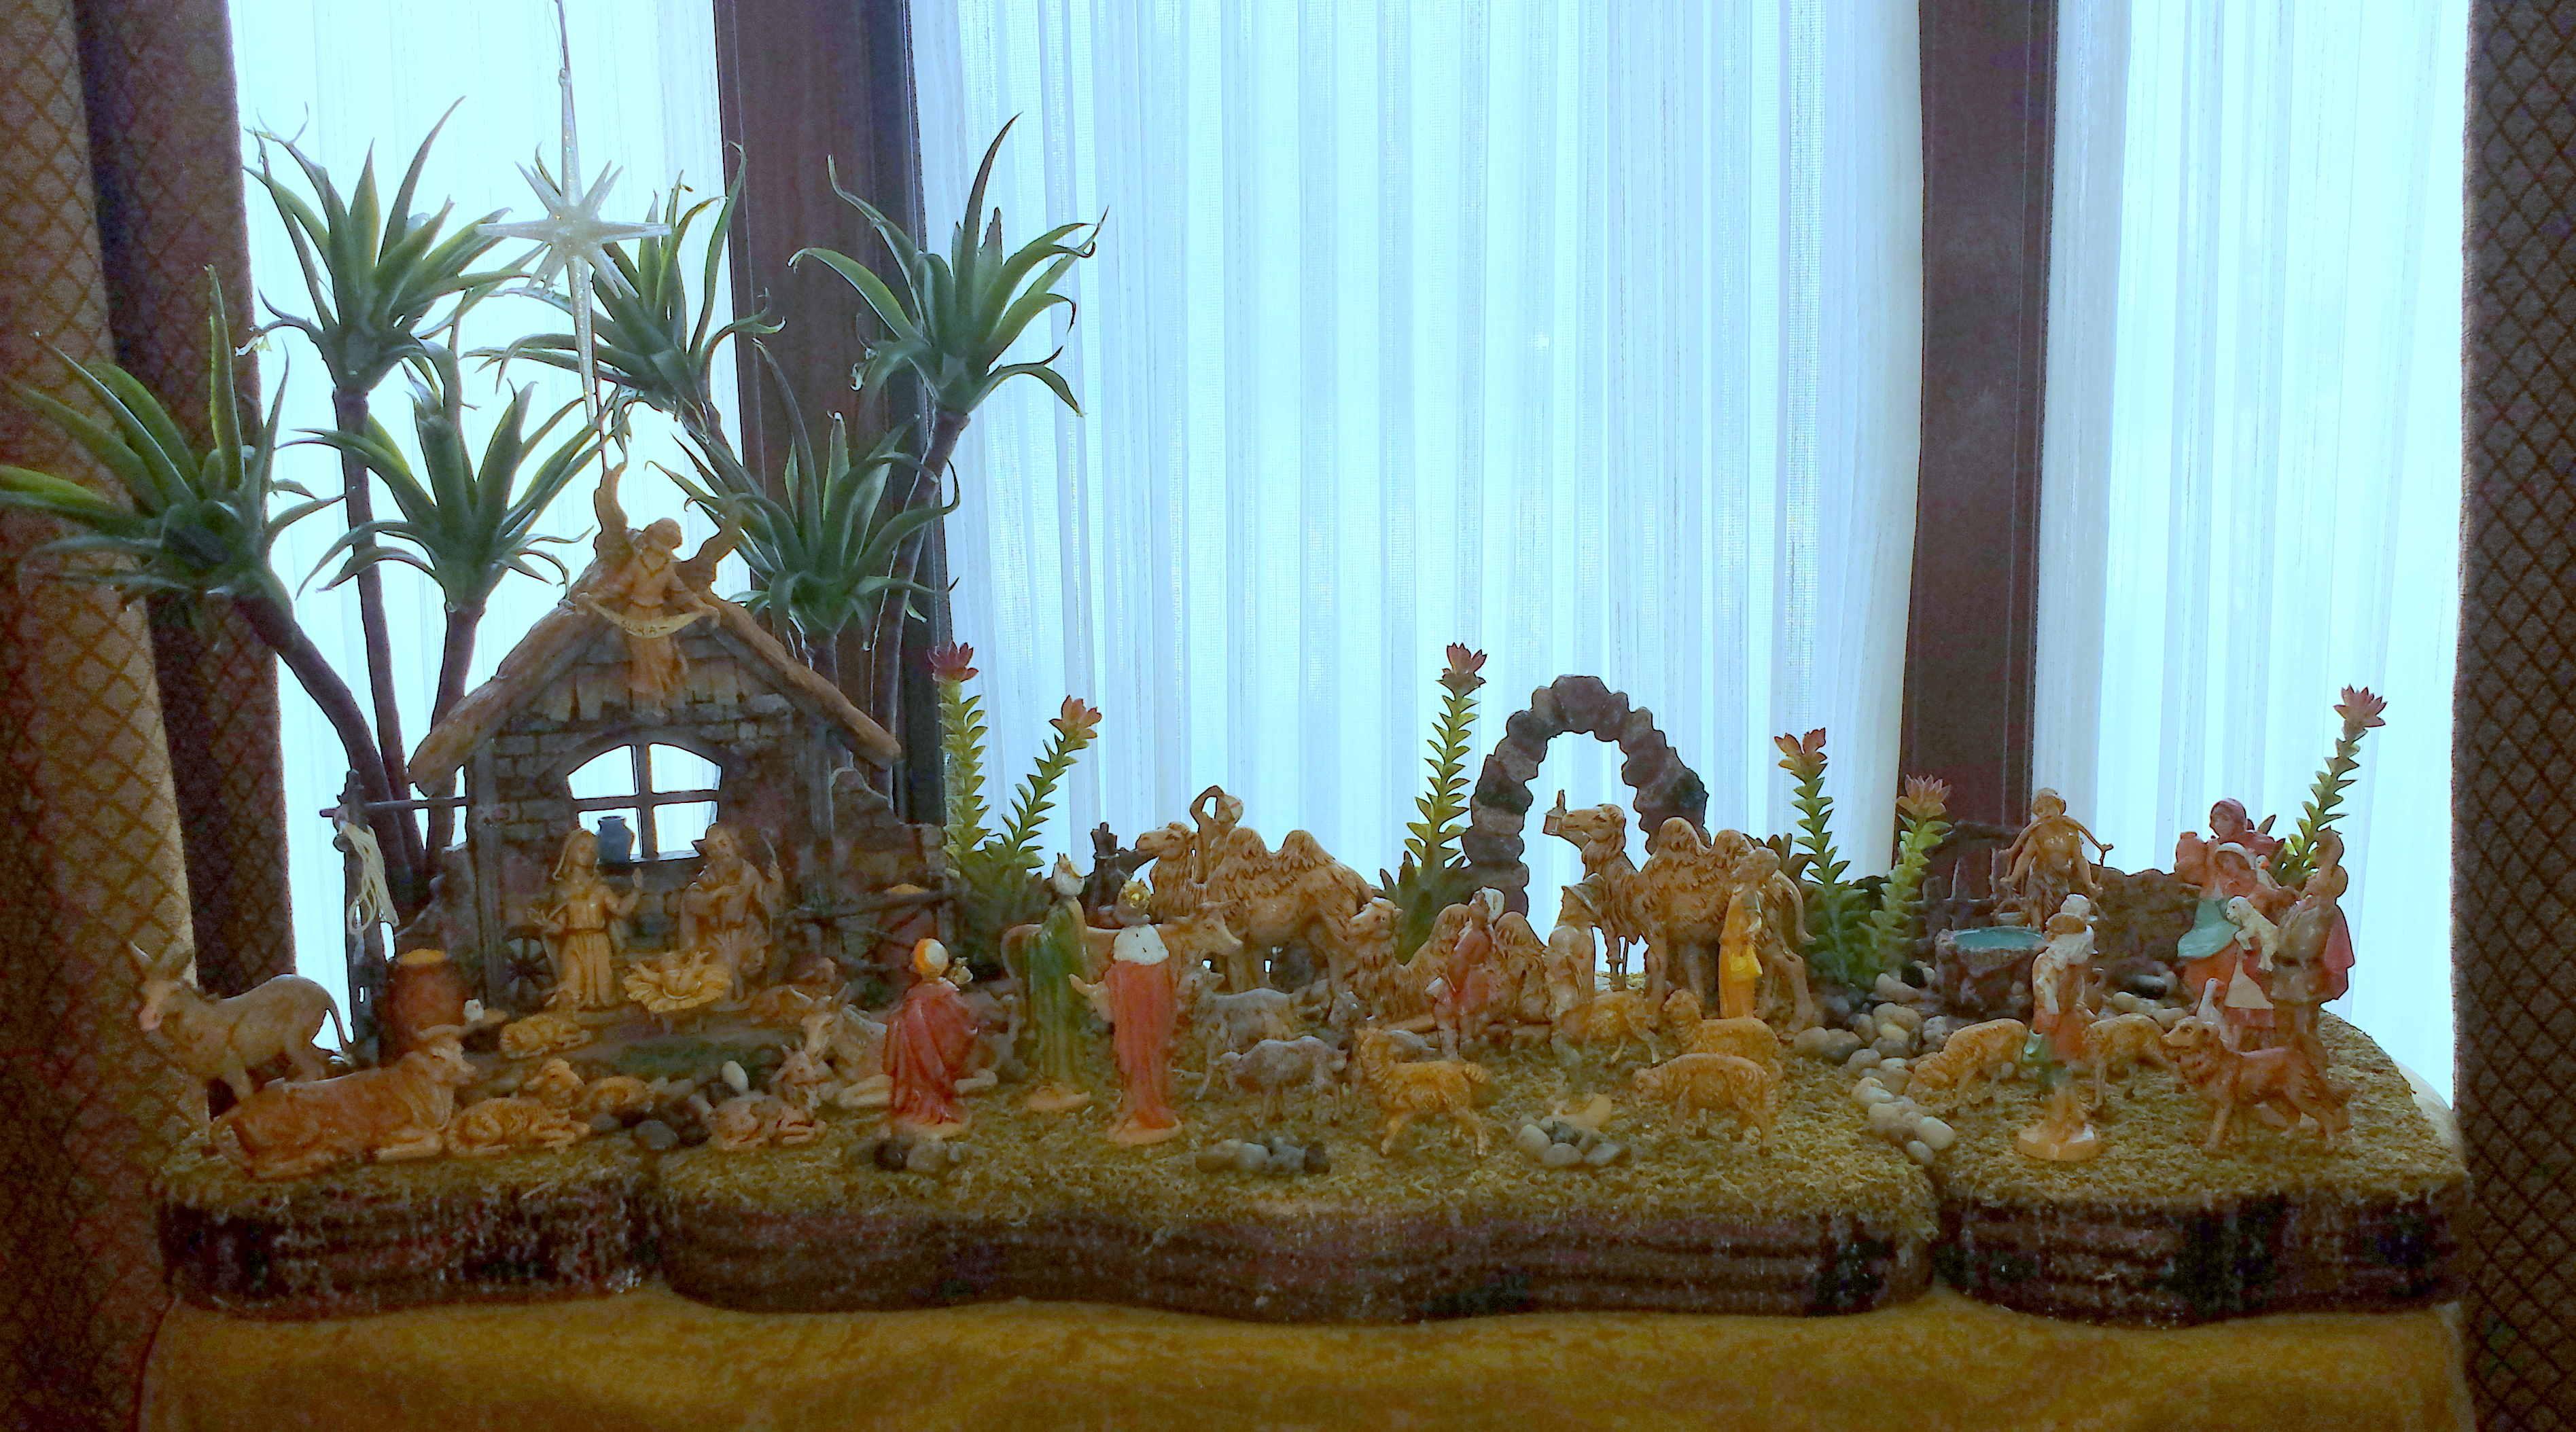
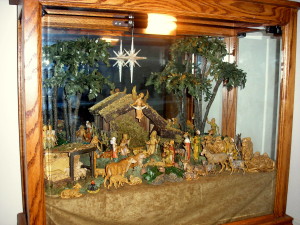
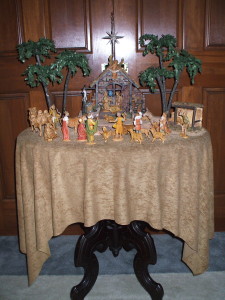
The next year I decided to create a more elaborate nativity display on the same table in our library.  I used a new moss covered base set with two “rock” fences and a “rock” arch piece placed to the back of the display.  Next, the palm trees that I had been using for years were starting to show some wear so I decided to repair them instead of purchasing new ones, I also redesigned a resin water well that I had used in previous displays (these are great examples of keeping the cost down by refurbishing existing items).  Next, I set out some recently purchased display accessories, such as clay ports of grain, basket of fish and another one of olives.  I also added to my Fontanini collection and had purchased four additional figures of a shepherd and several villagers.  (This display was featured in a previous post from my blog and for more detailed information on how it was created please click on the link to Setting up a Fontanini Display)

2013 Christmas

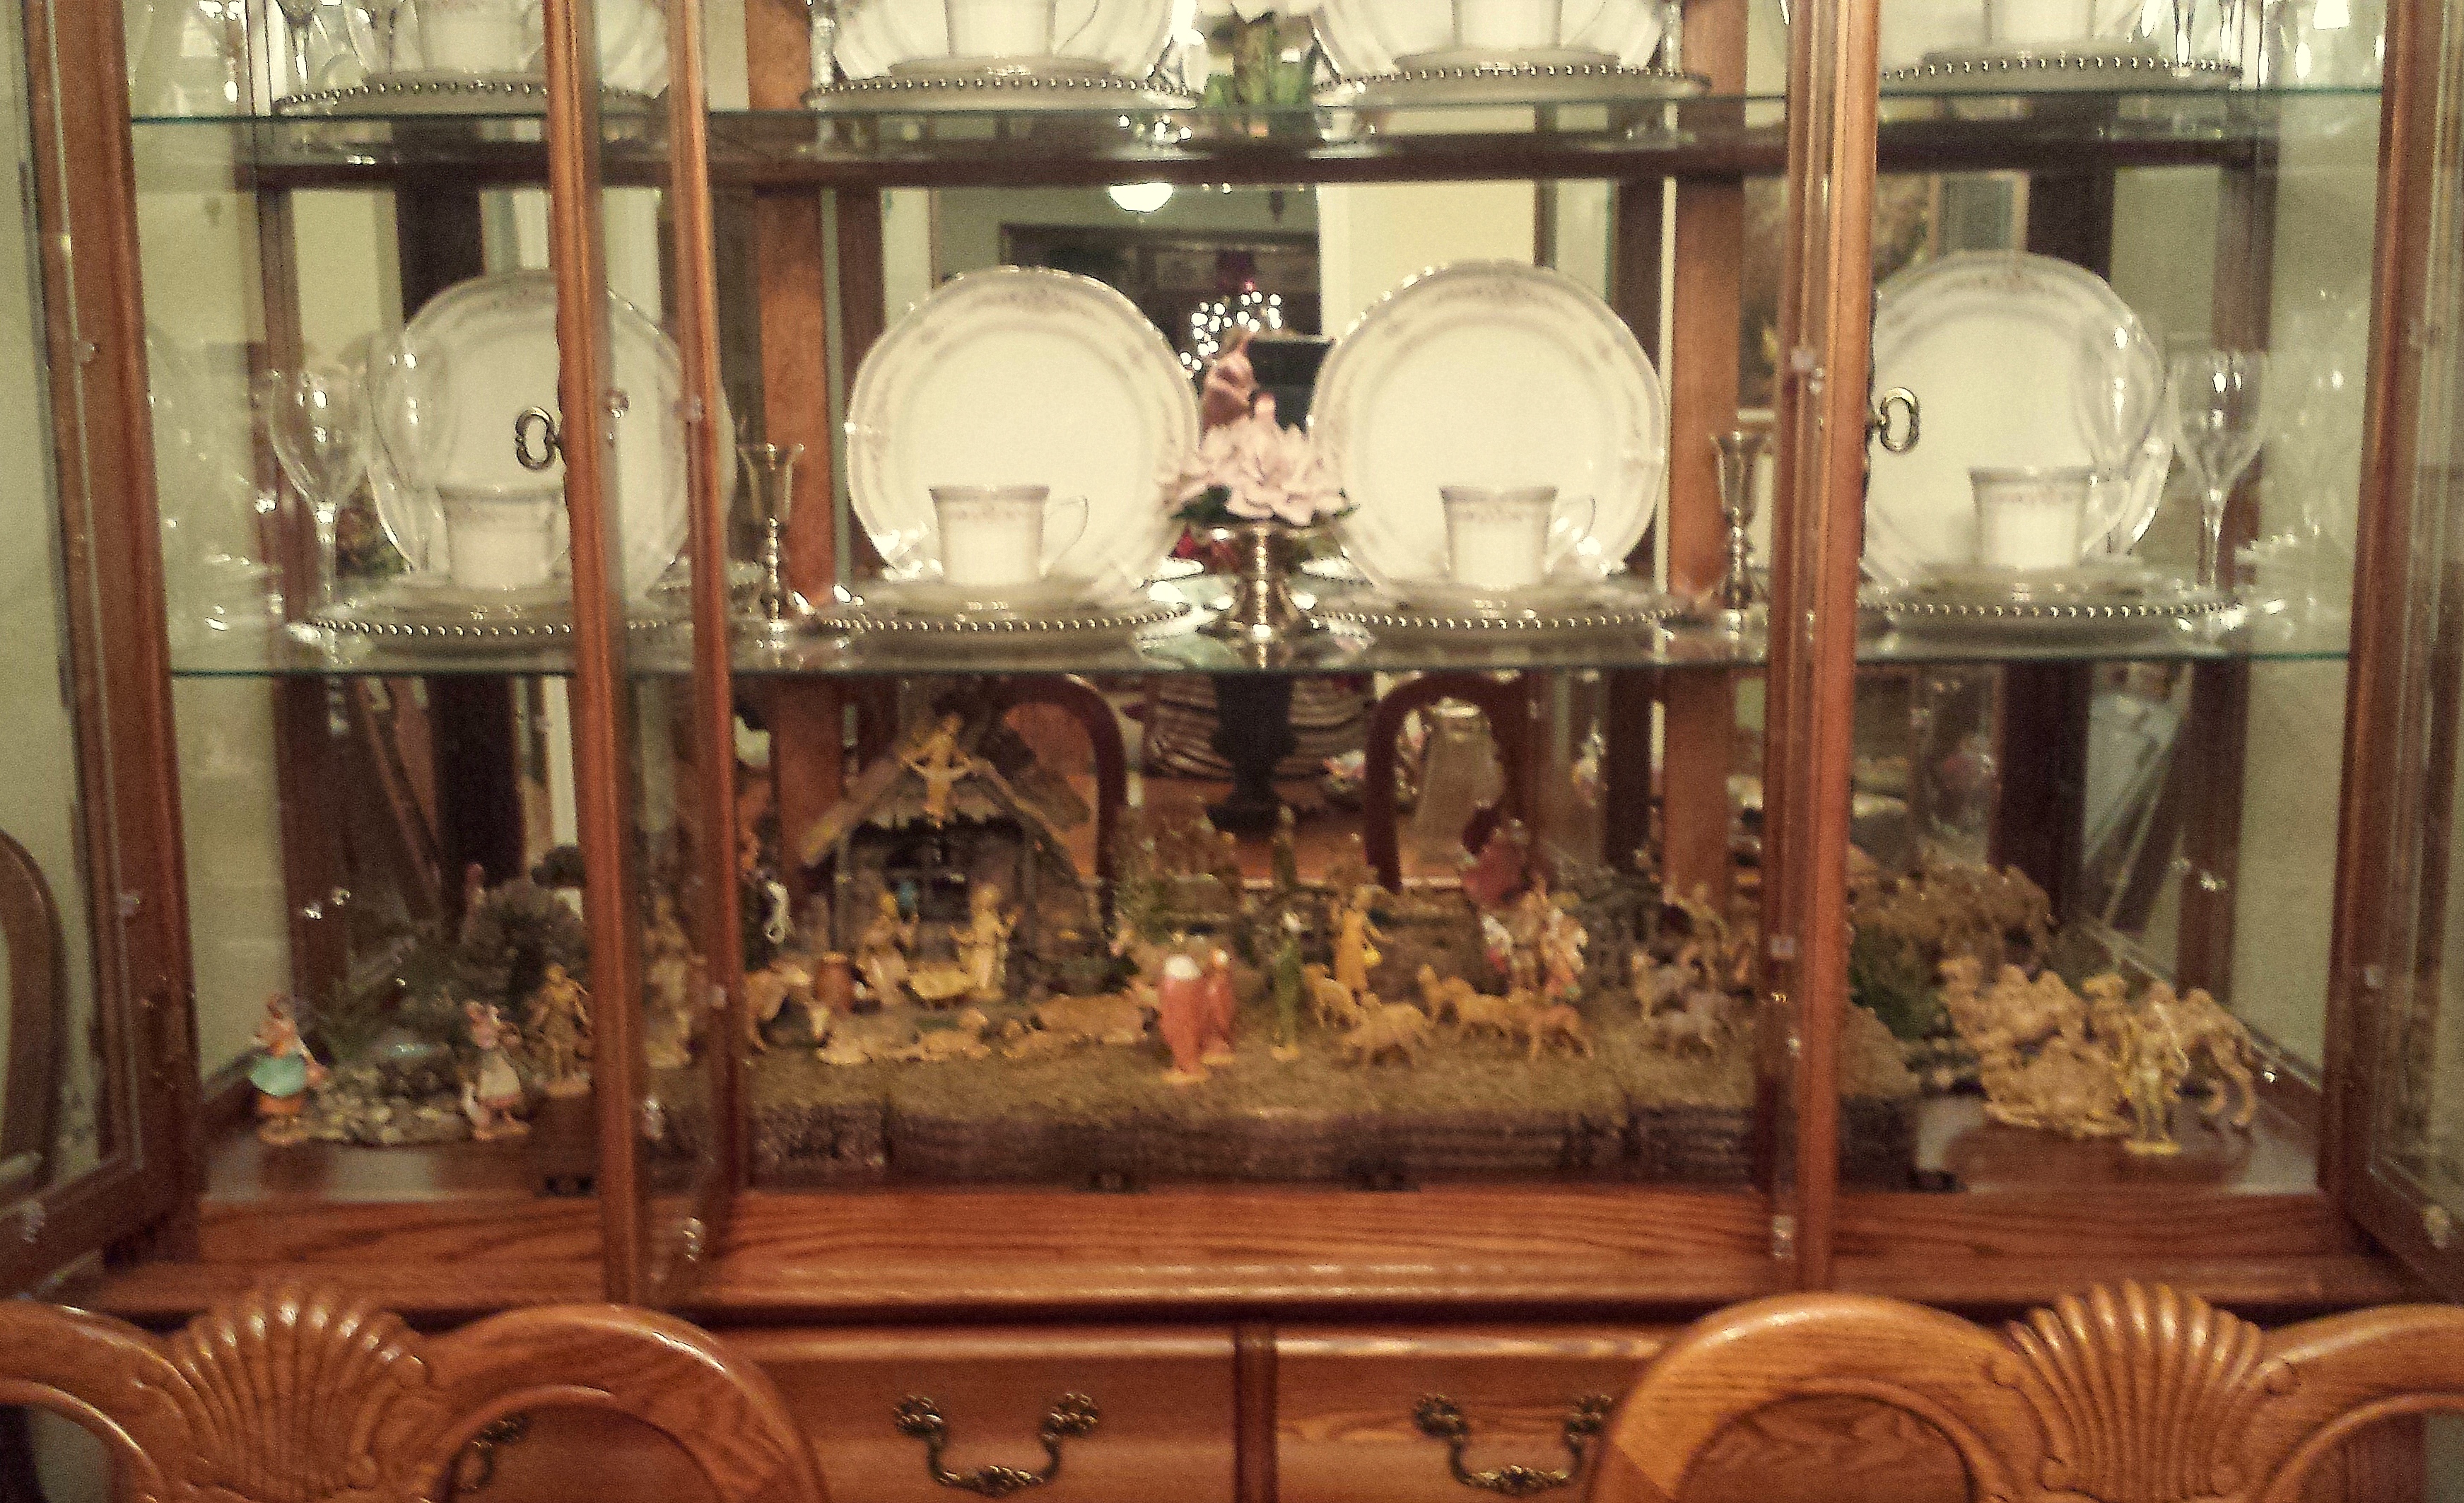
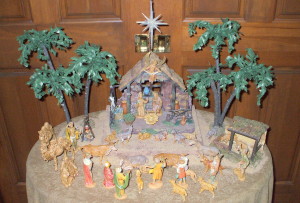
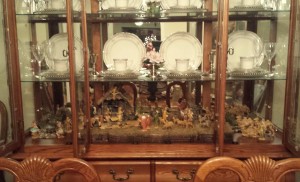
The following year I decided to move my nativity display into the dining room in our home, this was one area of the house that I hadn’t used yet for the nativity set.  I emptied everything out the bottom shelf of the oak china cabinet to make room for the display.  I used the three piece moss-covered base and set the nativity stable in the center and then arranged all the other Fontanini figures and accessories, although I didn’t use the palm trees because height size was too tall it fit in the china cabinet.

2014 Christmas

For this year’s nativity display, I kept it in the dining room but moved it to an antique tea table.  I used only two sections of the moss-covered base stacked on top of each other.  I also changed the palm trees because the weight of the heavy cactus top caused them to be unbalanced.  I replace them with lighter cactus tops and gave some weight to the base of the palm tree by hot-gluing on some metal discs underneath, this worked great and solved the problem of the toppling trees!  Once again, I edited down my Fontanini collection using only a few pieces that would fit the dimensions of the tea table.

2015 Christmas 1

As this post has shown in detail, a nativity display can be frequently changed from year to year by moving it to different rooms or areas of your home and also by adding accessories or other decorations to the display.  I hope this will inspire my readers to think about the options for displaying a nativity set in several different ways!

One last special note:  As you might have noticed in some of the photos shown in this post, the figure of baby Jesus is missing from the manger.  The reason for this is because our family tradition every year during the holiday season is that the manger in the nativity display stays empty until Christmas Eve.  On that evening we read from a beautifully illustrated book that tells the story of the birth of Jesus.  After we are done reading, my daughter will put baby Jesus in the manger and we say a prayer.  It is a lovely moment to remind us of the true meaning of Christmas.