Craft – Easter Floral Eggs

Floral Easter Eggs

This Easter I wanted to create beautiful Floral Eggs to add to our Easter decorations.  I had seen these types of eggs in magazines and I thought they looked different from the other Easter Eggs that I had previously made.  When shopping in the local craft store I found several colors of small plastic flowers that would be perfect for the craft project.

Below is a list of supplies and instructions to make the Floral Eggs:

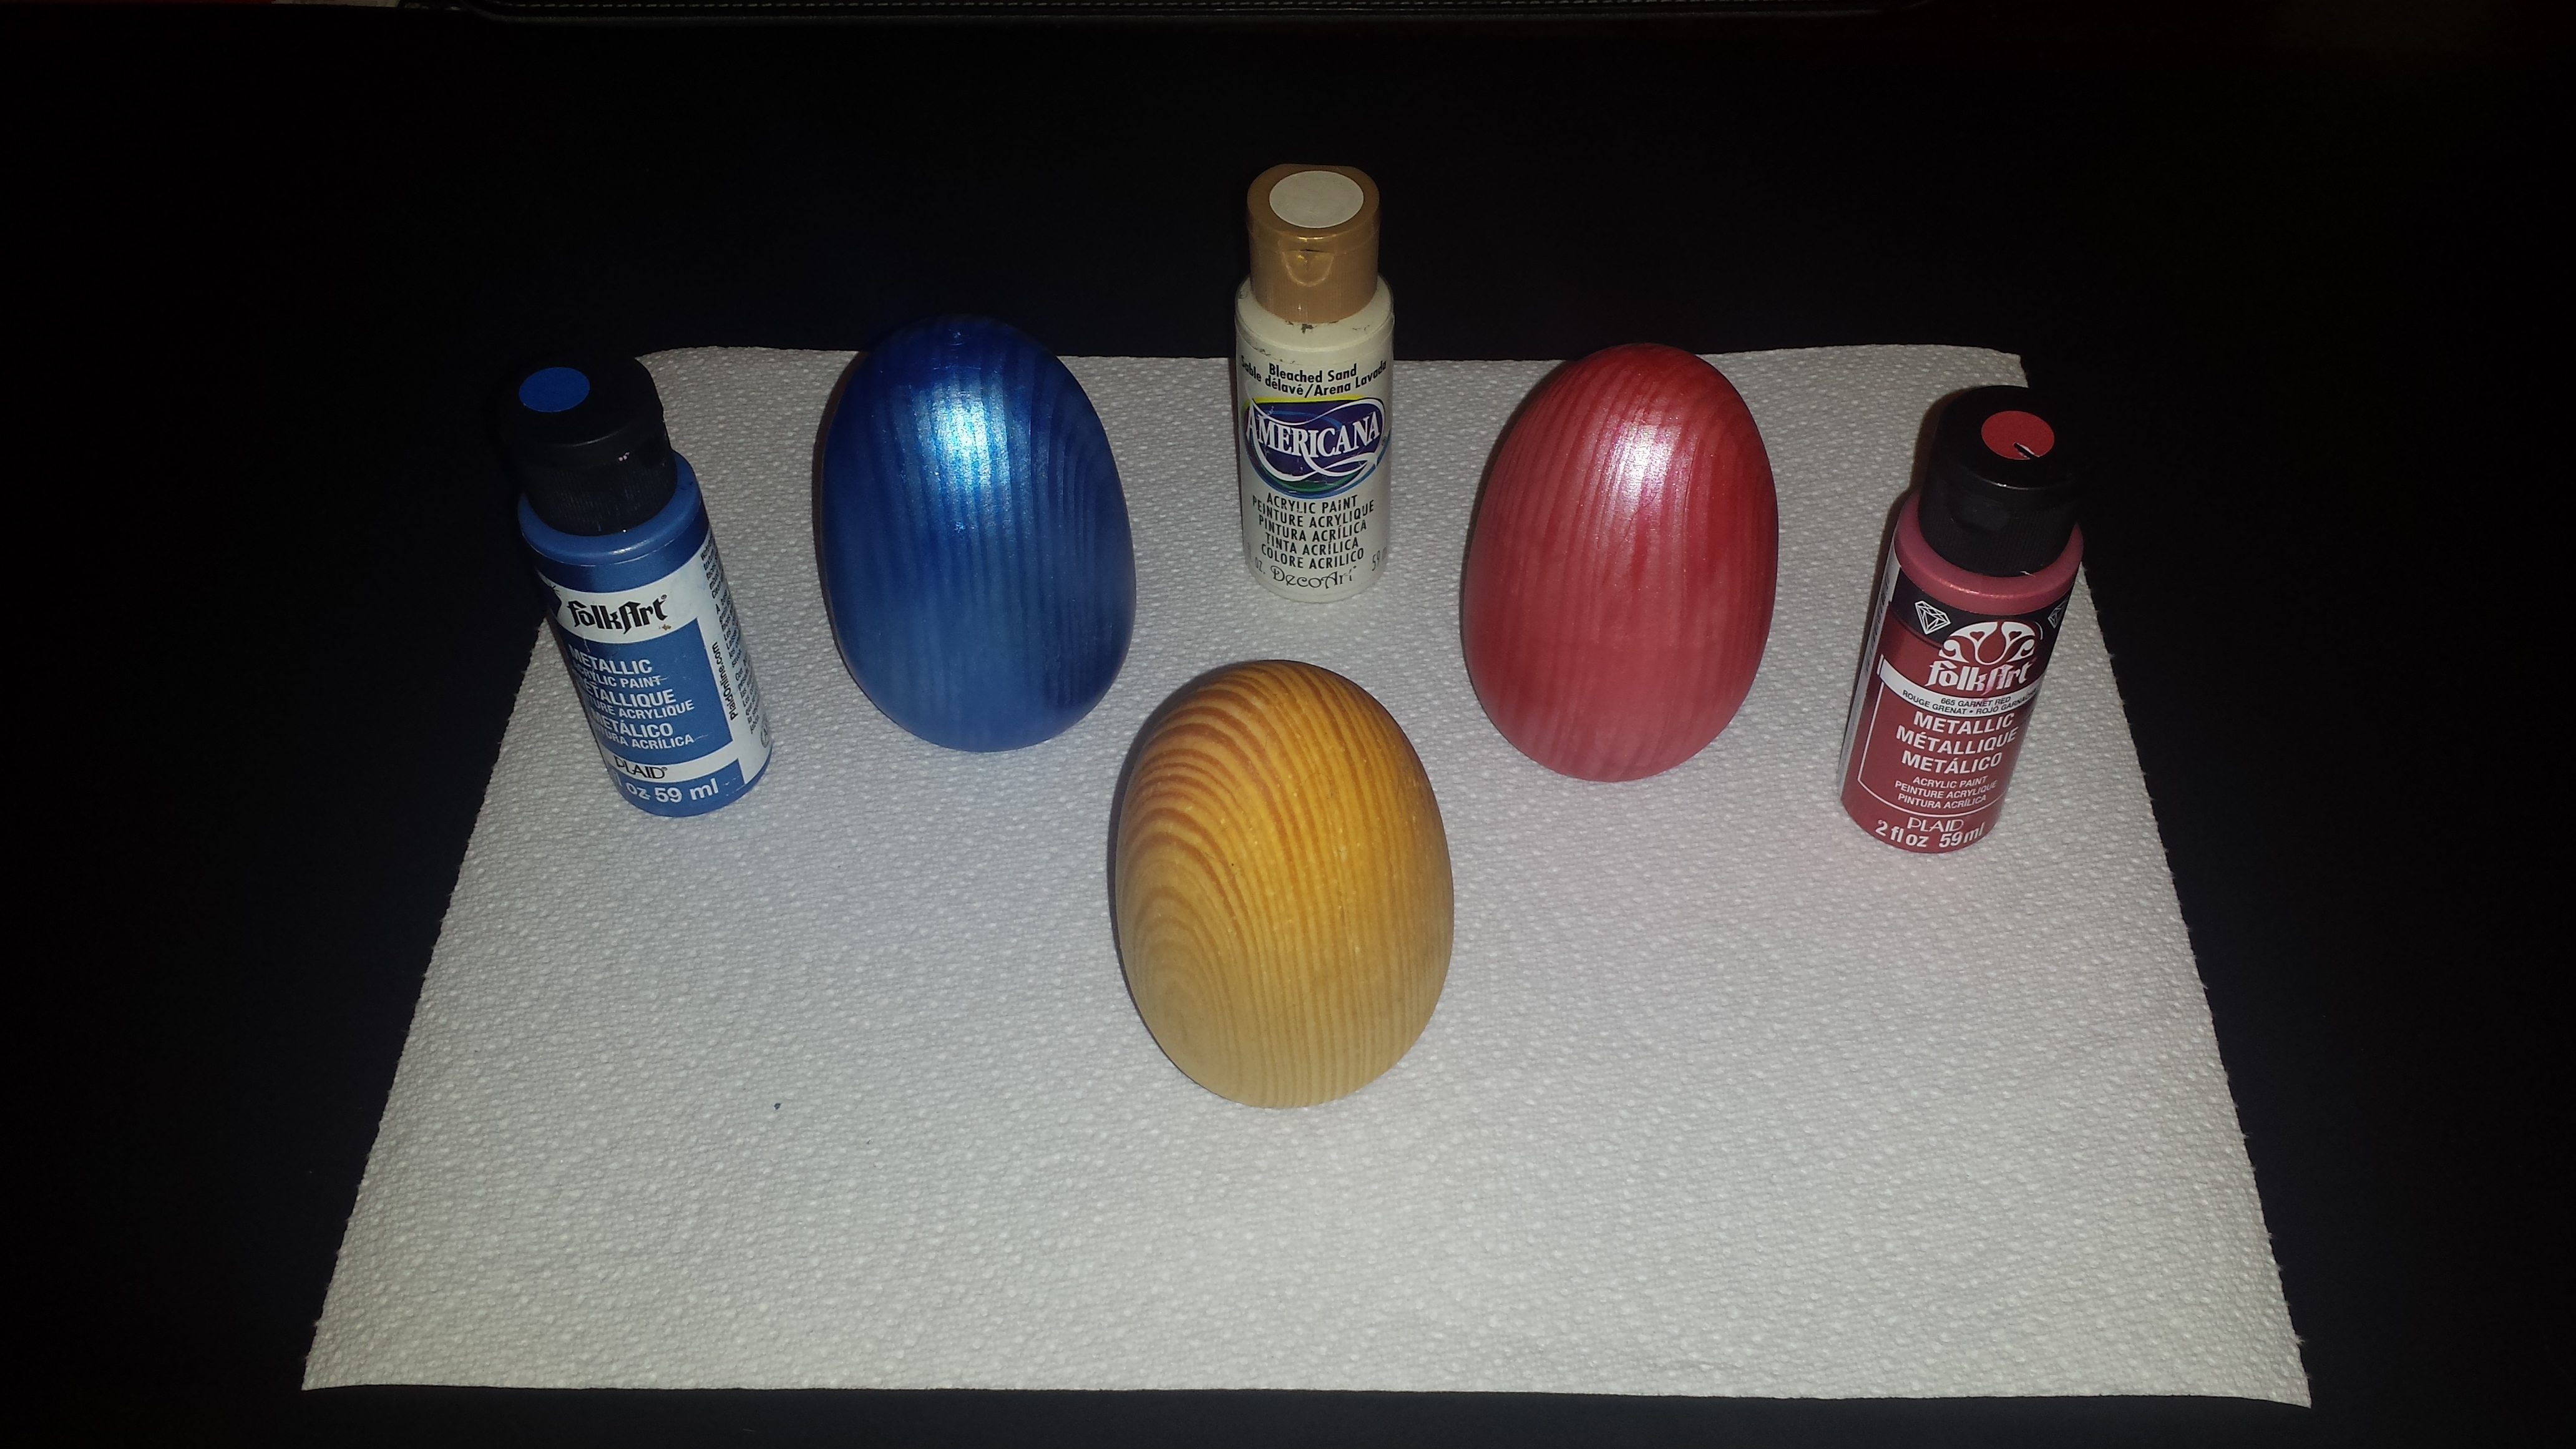
Floral Easter Egg supplies

Floral Easter Eggs - supplies

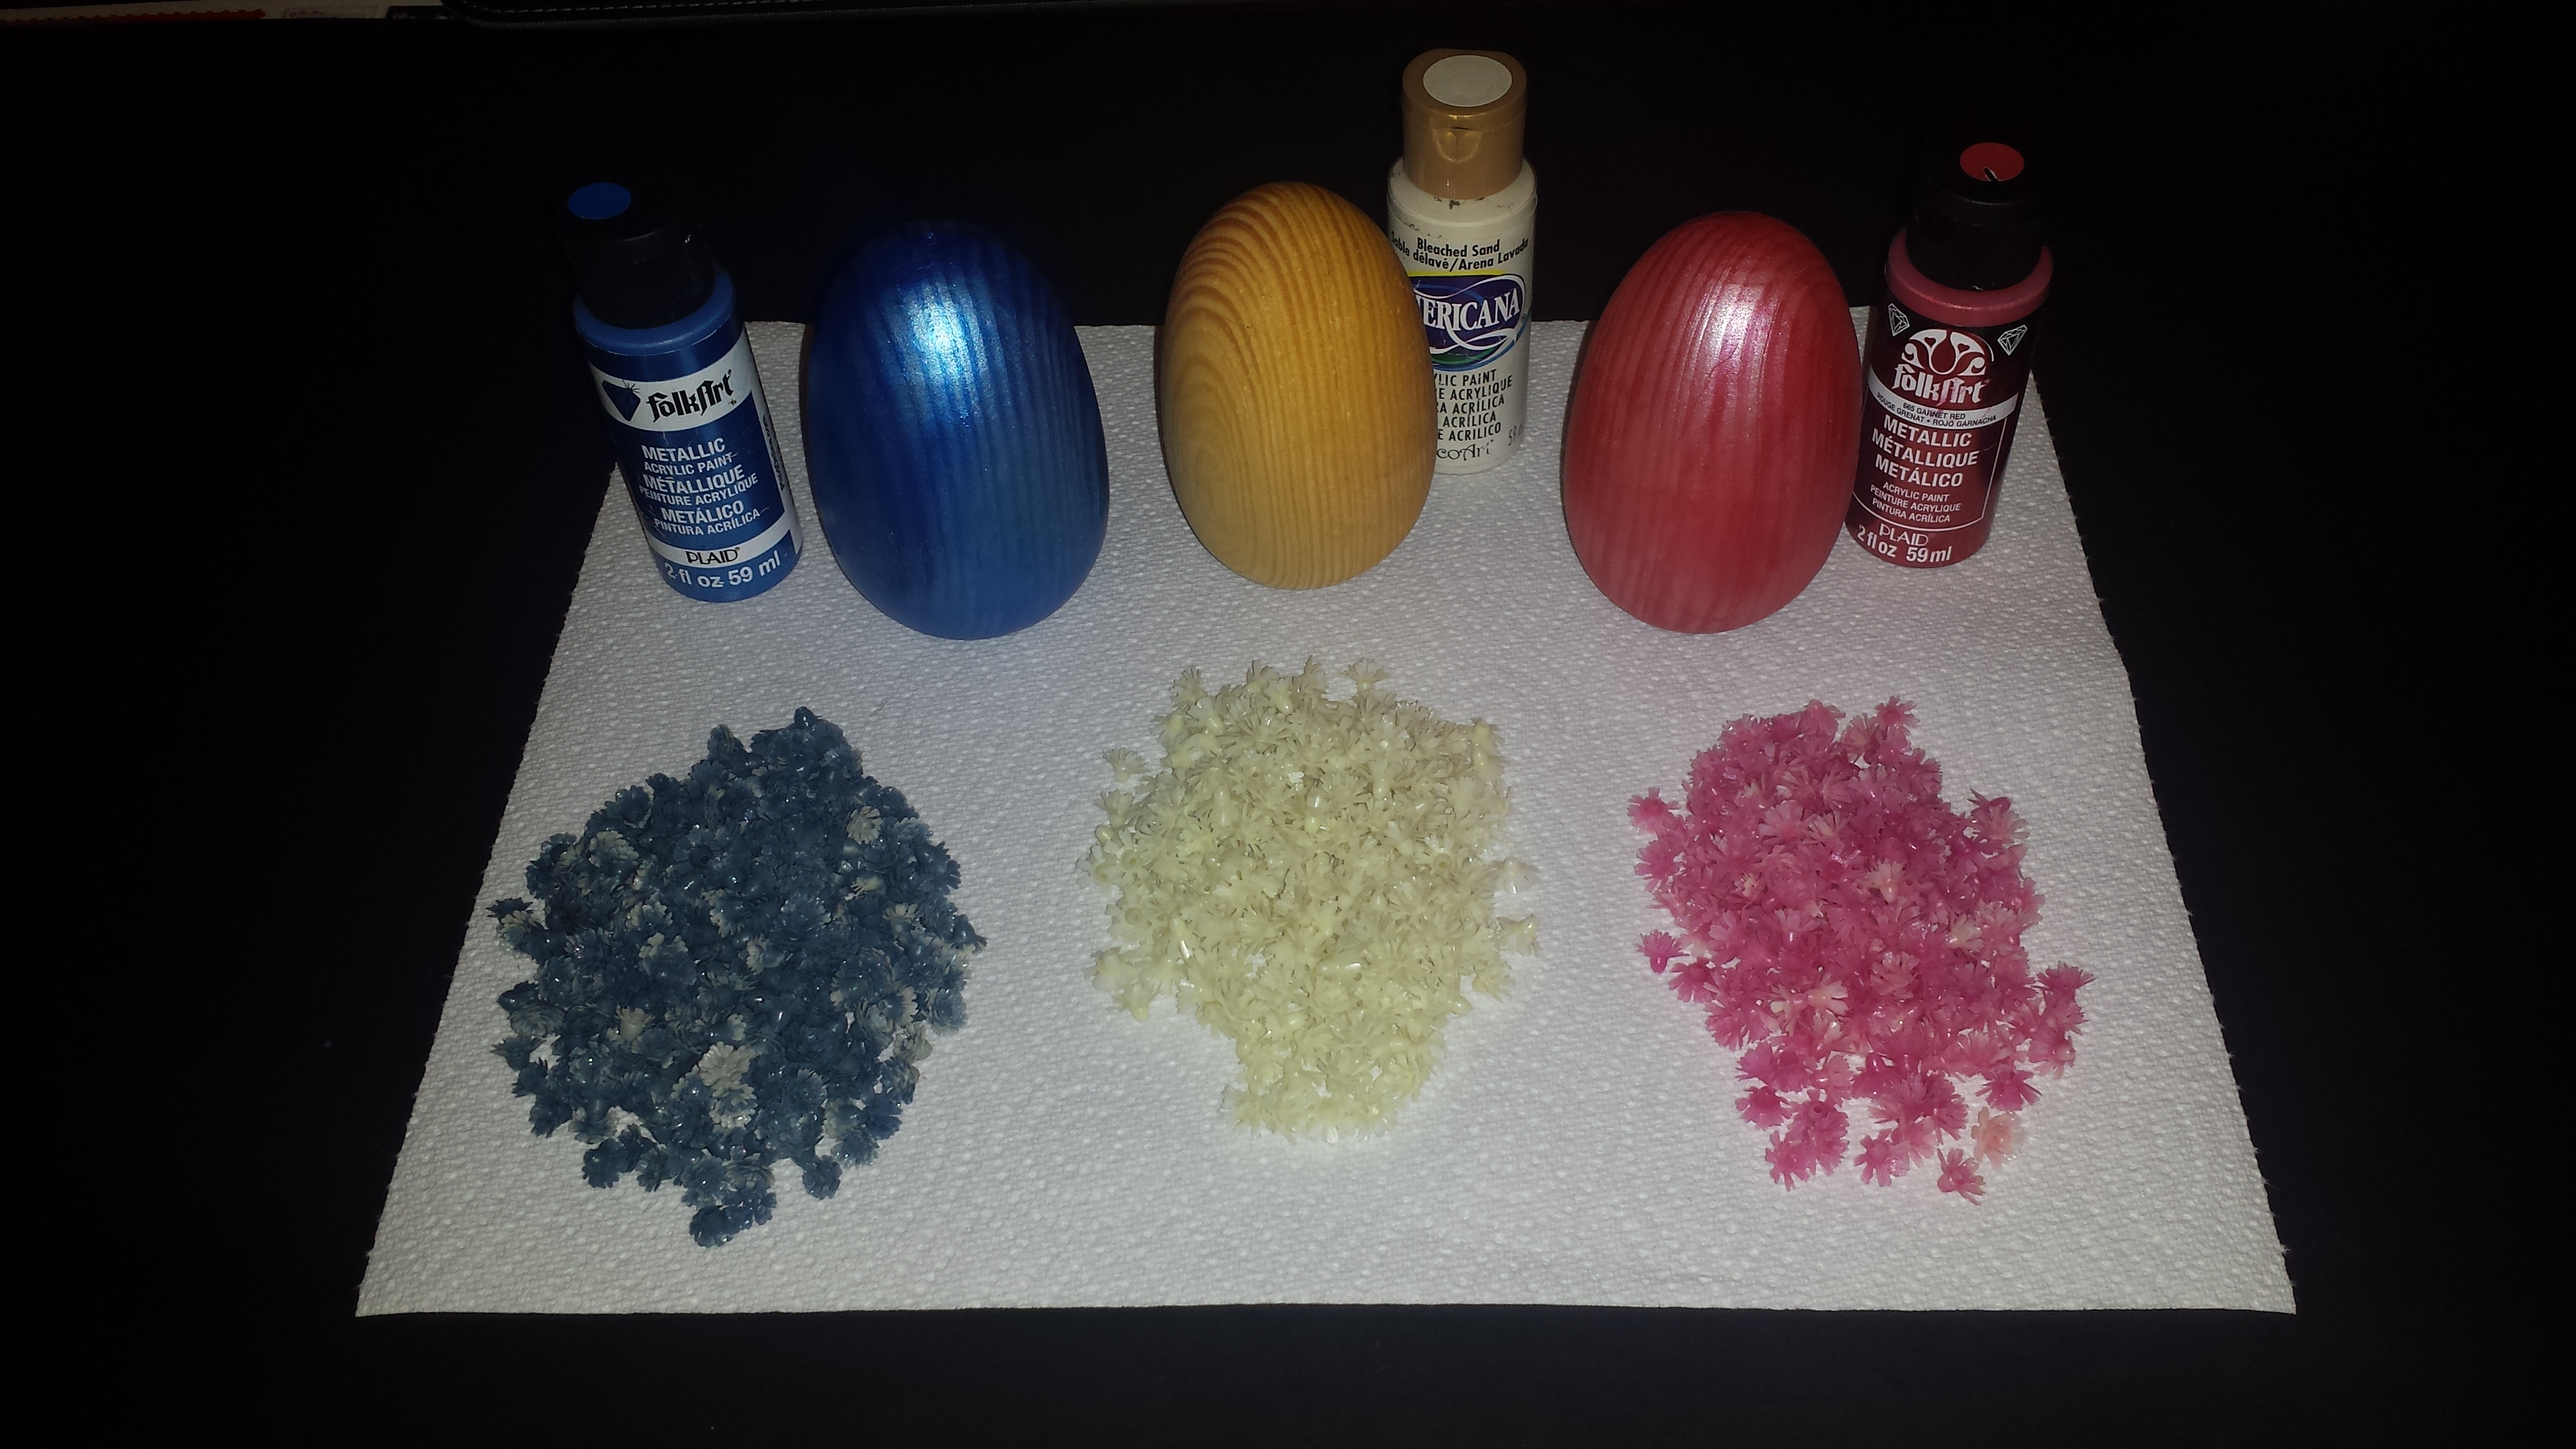
  • Wooden egg (be sure to purchase one with a flat base)
  • Small flowers (when shopping for supplies calculate the amount of flowers required to cover the surface of the egg)
  • Paint (to match the color of the flowers selected)
  • Scissors (for clipping the flowers from the stem)
  • Hot glue gun and glue sticks
  • Sandpaper (optional)

Floral Easter Egg instructions  

  1. Start by sanding any rough edges of the wooden eggs (this is considered optional)
  2. Paint the entire surface of the wooden egg with the exception of the bottom, let paint dry completely.
    Floral Easter Eggs - step
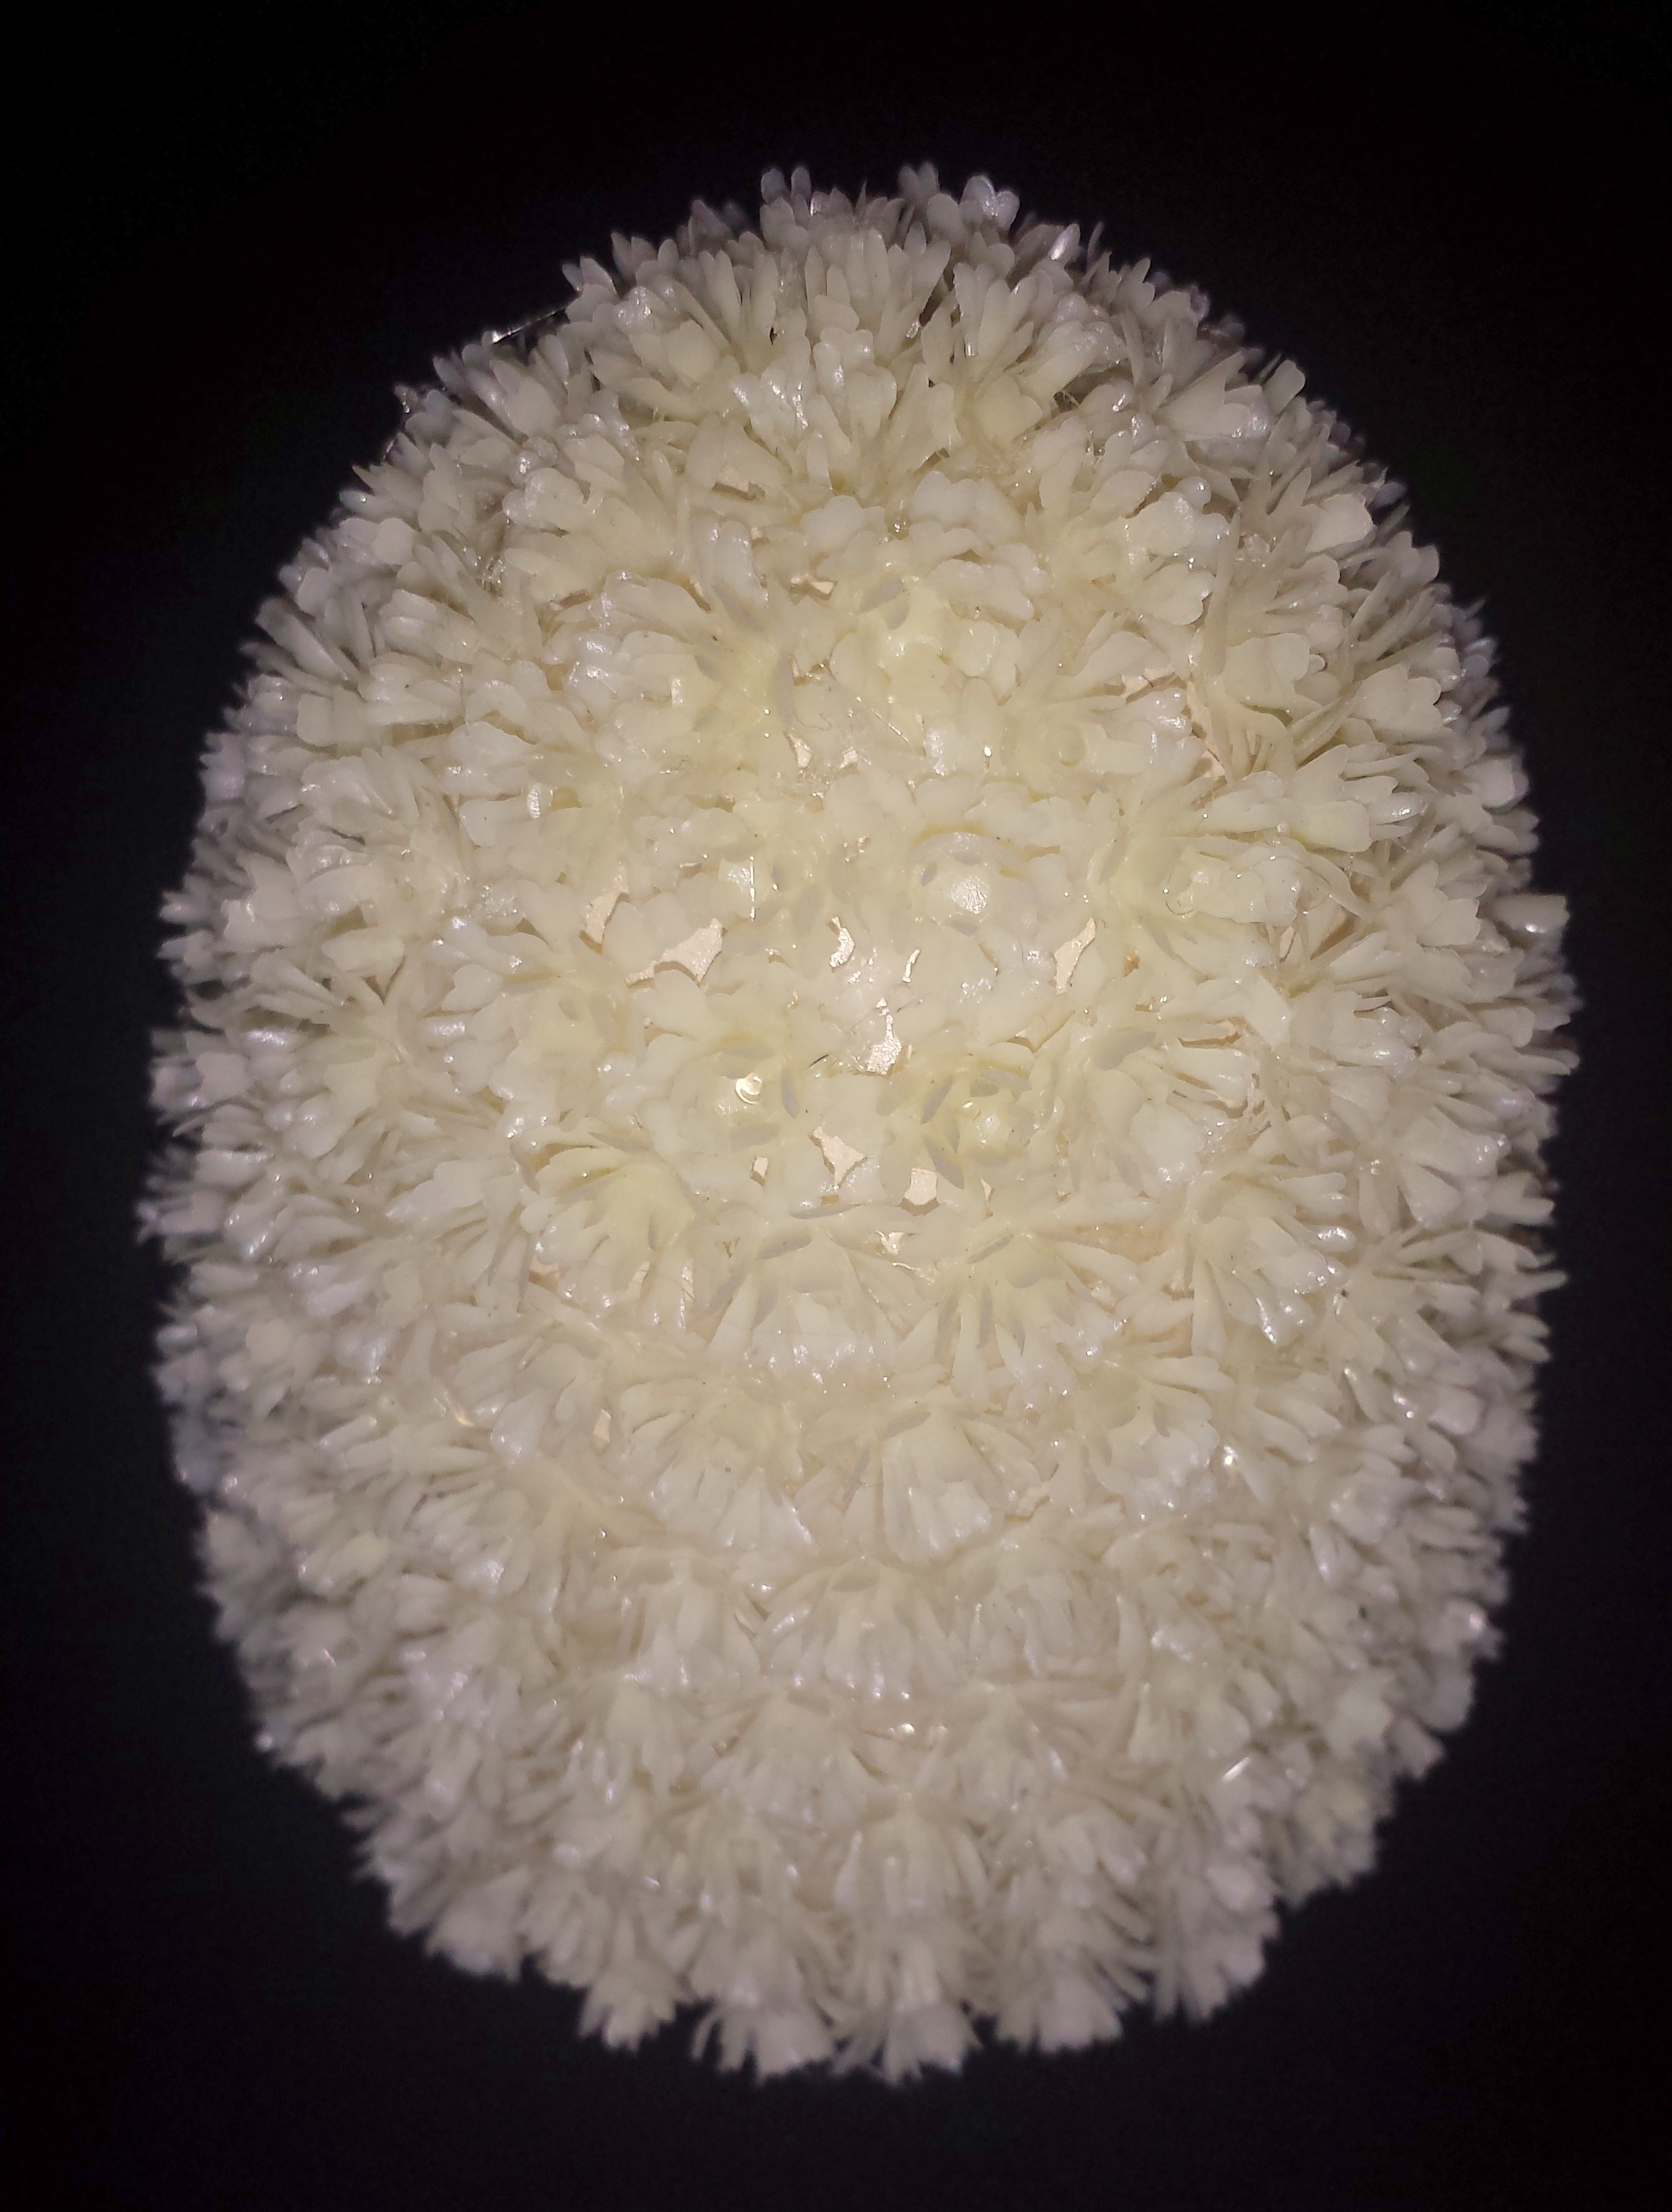
  3. Prepare the flowers by snipping the flowers from the stems (be sure to clip the flowers as close to the bottom as possible, this will help the flowers sit flat against the wooden egg)
  4. Start at the top of the wooden egg and glue the first flower, work down the surface of the egg placing each flower tightly together. (Craft Tip: when I first started this craft project I glued each flower one at a time.  Then, I found a faster way but putting a one inch section of hot glue on the wooden egg and quickly placing several flowers at one time)

Easter Floral Eggs - step 4 start    Floral Easter Eggs - step 4 complete

Other types of supplies can be used to create different Easter egg variations, simply following steps 1, 2, skip 3 and 4.

  • Pearls beads – white, ivory or a variety of colors can be used
  • Crystals beads – clear, aurora borealis or a variety of colors can be used

For additional ideas for decorating a home or creating a wonderful variety of decorated Easter eggs with complete instructions and supply lists, please click on the following links:  Elegant Easter Eggs décor post, Faberge Inspired Eggs and Elegant Eggs craft post.

Craft – Valentine’s Day Shadowboxes

Love

Today’s Craft project will show three different versions of Valentine’s Day Shadowboxes.  These would make wonderful holiday decorative items and would look great on a fireplace mantel or bookshelf.  They could also be given as gifts for family, friends or maybe a special teacher.

The tip for making this craft project is that after you have selected the shadowbox that you will use, check out your favorite craft store for inexpensive items that would fit into the dimensions and depth of the shadowbox.  This is where your creatively can be used to make a customized and one-of-a-kind Valentine’s Day Shadowbox.

The three items that I selected were a red sequin heart for shadowbox #1, a wooden love for shadowbox #2 and two interlocking puzzle photo frames for shadowbox #3.

Valentine’s Day Shadowbox #1 – supplies and instructions

  • Shadowbox
  • Red sequin heart
  • White sparkle scrapbook paper
  • Black self-stick black letters
  1. Disassemble the shadowbox, remove the backing.
  2. Using the cardboard backing, trace the size onto the scrapbook paper and cut.
  3. Attach the red sequin to the scrapbook paper using glue, allow time to dry completely.
  4. Reassemble the shadowbox.
  5. Using the self-stick letters, spell out “You Captured My Heart” and attach letter to the glass front.

 You Captured My Heart

Valentine’s Day Shadowbox #2 – supplies and instructions

  • Shadowbox
  • Wooden word (I used one that spelled “love” which I painted red and black, then I attached self-stick black sequin onto the black letters for extra sprakle!)
  • Valentine’s Day themed scrapbook paper
  1. Disassemble the shadowbox, remove the backing.
  2. Using the cardboard backing, trace the size onto the scrapbook paper and cut.
  3. Attach the wooden love to the scrapbook paper using glue, allow time to dry completely.
  4. Reassemble the shadowbox.

Love

Valentine’s Day Shadowbox #3 – supplies and instructions

  • Shadowbox
  • 2 pink puzzle photo frames
  • 2 small black and white photos, copied to fit the size of the puzzle frames
  • Valentine’s Day themed scrapbook paper
  1. Disassemble the shadowbox, remove the backing.
  2. Using the cardboard backing, trace the size onto the scrapbook paper and cut.
  3. Copy/print two black and white photos to fit the size of the puzzle frames.
  4. Attach the photos to the puzzle frames using glue or tape.
  5. Attach the puzzle frames to the scrapbook paper using glue.
  6. Reassemble the shadowbox.

Puzzle Pieces

Craft – Heraldic Shield

Heraldic shield - final

Inspired by the three part series on Hampton Court that I recently posted, I decided to create a coat of arms similar to the ones seen at that grand palace which sits near the River Thames.  Shown below is the ceiling of the Great Gatehouse at Hampton Court which shows a wonderful example of a heraldic shield in the center and several additional symbols set around the circle.

Great Gatehouse ceiling

Before starting this craft project, I would advise doing some research on the internet to get an idea of the various parts of a heraldic shield or a coat of arms.  This will help to determine the different ways to create a personalized heraldic shield that tells a story about your family.

Shape and general appearance –

To start this project, I first determined the shape of the shield (there are so many different shapes!).  Once I decided on the shape, I knew I wanted to divide the shield into three parts to represent myself, my husband and our daughter.

Color for the shield –

I selected three different colors for each of the three sections of the shield.  The colors I choose were: red which meant patient and victorious, blue which meant truth and loyalty and green which meant hope and joy.  The red would represent me, blue would be my husband and green would be for my daughter because it is her favorite color.

Symbols –

Next, I thought about what symbols I wanted to use on the shield.  This was the fun part of the project because I walked the aisles of my local craft store in search of the items that I needed.  In the scrapbook section I found a small plastic acorn (my terrier-mix dog is named “Acorn”) and a plastic dragon (my daughter was born in the “Year of the Dragon”) and in the wood section I found a ready-made wooden laurel wreath.  Each element had a specific meaning: the acorn meant independence and strength, the dragon meant valiant defender and protector and the laurel wreath meant peace and triumph.

Heraldic shield -supplies

Heraldic Shield Supplies

  • Un-finished wooden picture frame
  • Piece of wood
  • Various symbols (I used a plastic acorn and dragon and a wooden laurel wreath)
  • Paint (I used metallic bronze, gold, red, blue and green)
  • Paint brushes
  • Black Sharpie
  • Hot glue gun, glue sticks
  • Sandpaper
  • Jig saw
  • Piece of paper (to create the shield template)

Heraldic Shield Instructions

  1. Before starting, determine the shape of the shield and the placement of the different symbols.
    Heraldic shield - mock-up
  2. Using a sheet of white paper, create a template for the shape of the shield that will fit the dimensions of the piece of wood.
    Heraldic shield 1    Heraldic shield 1a
  3. Using a jig saw, cut the piece of wood to the shape of the shield.  (Craft Tip: My husband taped the area where the cut was to be made to prevent the wood from splitting)
  4. Using sandpaper, smooth the rough surfaces of the shield and the frame to prepare them for painting.
  5. Next, glue the plastic acorn to the wooden laurel wreath.
  6. Paint the wooden frame using a metallic bronze paint.  Then, paint the acorn/laurel wreath and the dragon using a gold paint.  Allow paint to dry completely.
    Heraldic shield 2    Heraldic shield 2a
  7. Using a pencil, draw lines on the wooden shield to create three sections.  Paint the first section with a red metallic paint, the next with metallic blue paint and the final section with a green metallic paint.  Allow the paint to dry completely.
  8. Using a black Sharpie pen, draw lines dividing each of the three sections.
  9. Using a hot glue gun, attach the shield to the wooden frame
  10. Using a hot glue gun, attach the acorn/laurel wreath and dragon to the wooden shield.

Heraldic shield 4    Heraldic shield - final

P.S. – Since finishing this craft project of the Heraldic Shield, I thought that painting the acorn and the dragon in silver added an extra dimension to the finished shield and you could see the acorn better.

Heraldic shield - final with silver paint


Craft -Twelve Days of Christmas Shadowbox

20141228_190202

The Twelve Days of Christmas Shadowbox described in this craft post is a wonderful way to create a special piece of holiday artwork to display in a home either hung on the wall or placed on an easel in a bookcase or on the mantel.  This craft project is relatively simple to create requiring just a few supplies that should be available at a minimum cost.

“The Twelve Days of Christmas is an old English Christmas carol dating back to 1780.  The song is sung as a cumulative song which means that each of the twelves verses describes a special gift and is sung as a progressive addition to the previous verses.  The twelve gifts are:

A partridge in a pear tree,
Two turtle doves,
Three French hens,
Four calling birds,
Five golden rings,
Six geese a-laying,
Seven swans a-swimming,
Eight maids a-milking,
Nine ladies dancing,
Ten lords a-leaping,
Eleven pipers piping,
and
Twelve drummers drumming.

Special Note: The time period referred to in to the classic holiday song, “The Twelve Days of Christmas”, begins on Christmas Day and running through to the day before the Epiphany or January 5th.

Twelve Days of Christmas Shadowbox supplies

  • Wooden shadowbox with twelve divided spaces
  • “Twelve days of Christmas” illustrations, copies printed on a computer
  • One sheet of 12”x12” scrapbook paper, used for the shadowbox background
  • Black paint and paintbrush
  • Glue stick
  • Scissors
  • Sandpaper (optional)
  • Wooden or plastic numbers ranging from 1 to 12 (optional)

Twelve Days of Christmas Shadowbox instructions

Prior to starting the assembly of the shadowbox you need to find illustrations or photos to represent each of the “twelve days of Christmas”, so I highly recommend doing this a few days in advance.  Using my computer, I did a search on the internet for images for each of the “twelve days of Christmas”.  Here is a list of what is needed: a partridge in a pear tree, turtle doves, French hens, calling birds, golden rings, geese, swans, maids milking, ladies dancing, lords a leaping, piper and a drummer.

  1. Use sandpaper to smooth any rough edges of the wooden shadowbox.
  2. Paint the shadowbox using black paint, be sure to cover the surface of the outer and interior edges of the shadowbox and the twelve individual spaces.  (Craft Tip: Do not paint the center area of each divided space; leave the space clear for glue to attach the scrapbook paper)
    20141224_101805
  3. Measure and cut scrapbook paper to fit into the divided spaces of the shadowbox, cut twelve pieces.  Glue each scrapbook piece into the twelve divided spaces of the shadowbox.  (Craft Tip: The first piece of scrapbook paper will become the “template” to cut the additional eleven pieces required for the project)
    20141224_110032    20141224_111143
  4. After finding each image to represent the “twelve days of Christmas” copy to a file.  Then, print a copy of each image in a size that would fit into each of the twelve individual spaces of the shadowbox. (Craft Tip:  I used a wallet size print, then trimmed the copy so that there would be space all around the four sides to show the scrapbook paper.
  5. Optional step – Paint the wooden numbers, 1 to 12, with black paint.  Glue each to right corner of each of the twelve divided spaces.

20141226_124206


Craft – Grandparent’s Day photo frames

In honor of Grandparent’s Day, which is celebrated on the first Sunday in September, here is a simple craft idea for a sentimental way to remember and display photographs of those grandparents that are no longer with us.  My parents have been gone now for several years and this year I wanted to display their photos in our home in a special way for my children to remember their maternal grandparents.

Shown below are two different ways that I could display each of the photos of my parents which are framed using ivory mats and simple wooden frames.  Each version features items that hold special meaning –

Father/Grandfather photo frame

The first version uses items that were once used by my father.  I used four wrenches from my father’s tool box and arranged them around a simple wooden 5×7 frame holding the photo of my father.  Other ideas which could be attached to the frame are car keys, fishing hooks or golf tees.  Another idea for a bigger 8×10 frame would be to use a large single wretch, screwdriver, hammer or other tools.

The second version uses a personal item of my father, his stripped bowtie.  Other ideas for items that could be attached to the frame are cuff links, military id tags or maybe a special tie wrapped around the frame.

Grandparents photo frame 5    Grandparents photo frame 3

Mother/Grandmother photo frame

The first version uses items that were once used by my mother.  I used a string of my mother’s pearls and a cameo that my mother gave to me as a gift.  I arranged the pearls in soft curves and attached the cameo at the top to cover the necklace clasp.  Both these items, one from my mother’s personal jewelry and the other a special gift from her, have important meaning to me.  The second version features a pair of rhinestone fur clips which are attached to the bottom of the frame.

Grandparents photo frame 2    Grandparents photo frame 1

I hope these photo frames inspire the idea of creating and decorating Grandparent’s Day photo frame to honor and remember those grandparent’s that are no longer with us.

For more information about the history of Grandparent’s Day and for additional gift ideas, please click on the link.