Craft – Jeweled Pumpkins

Classic Jeweled Pumpkin final 1  Halloween Jeweled Pumpkin final

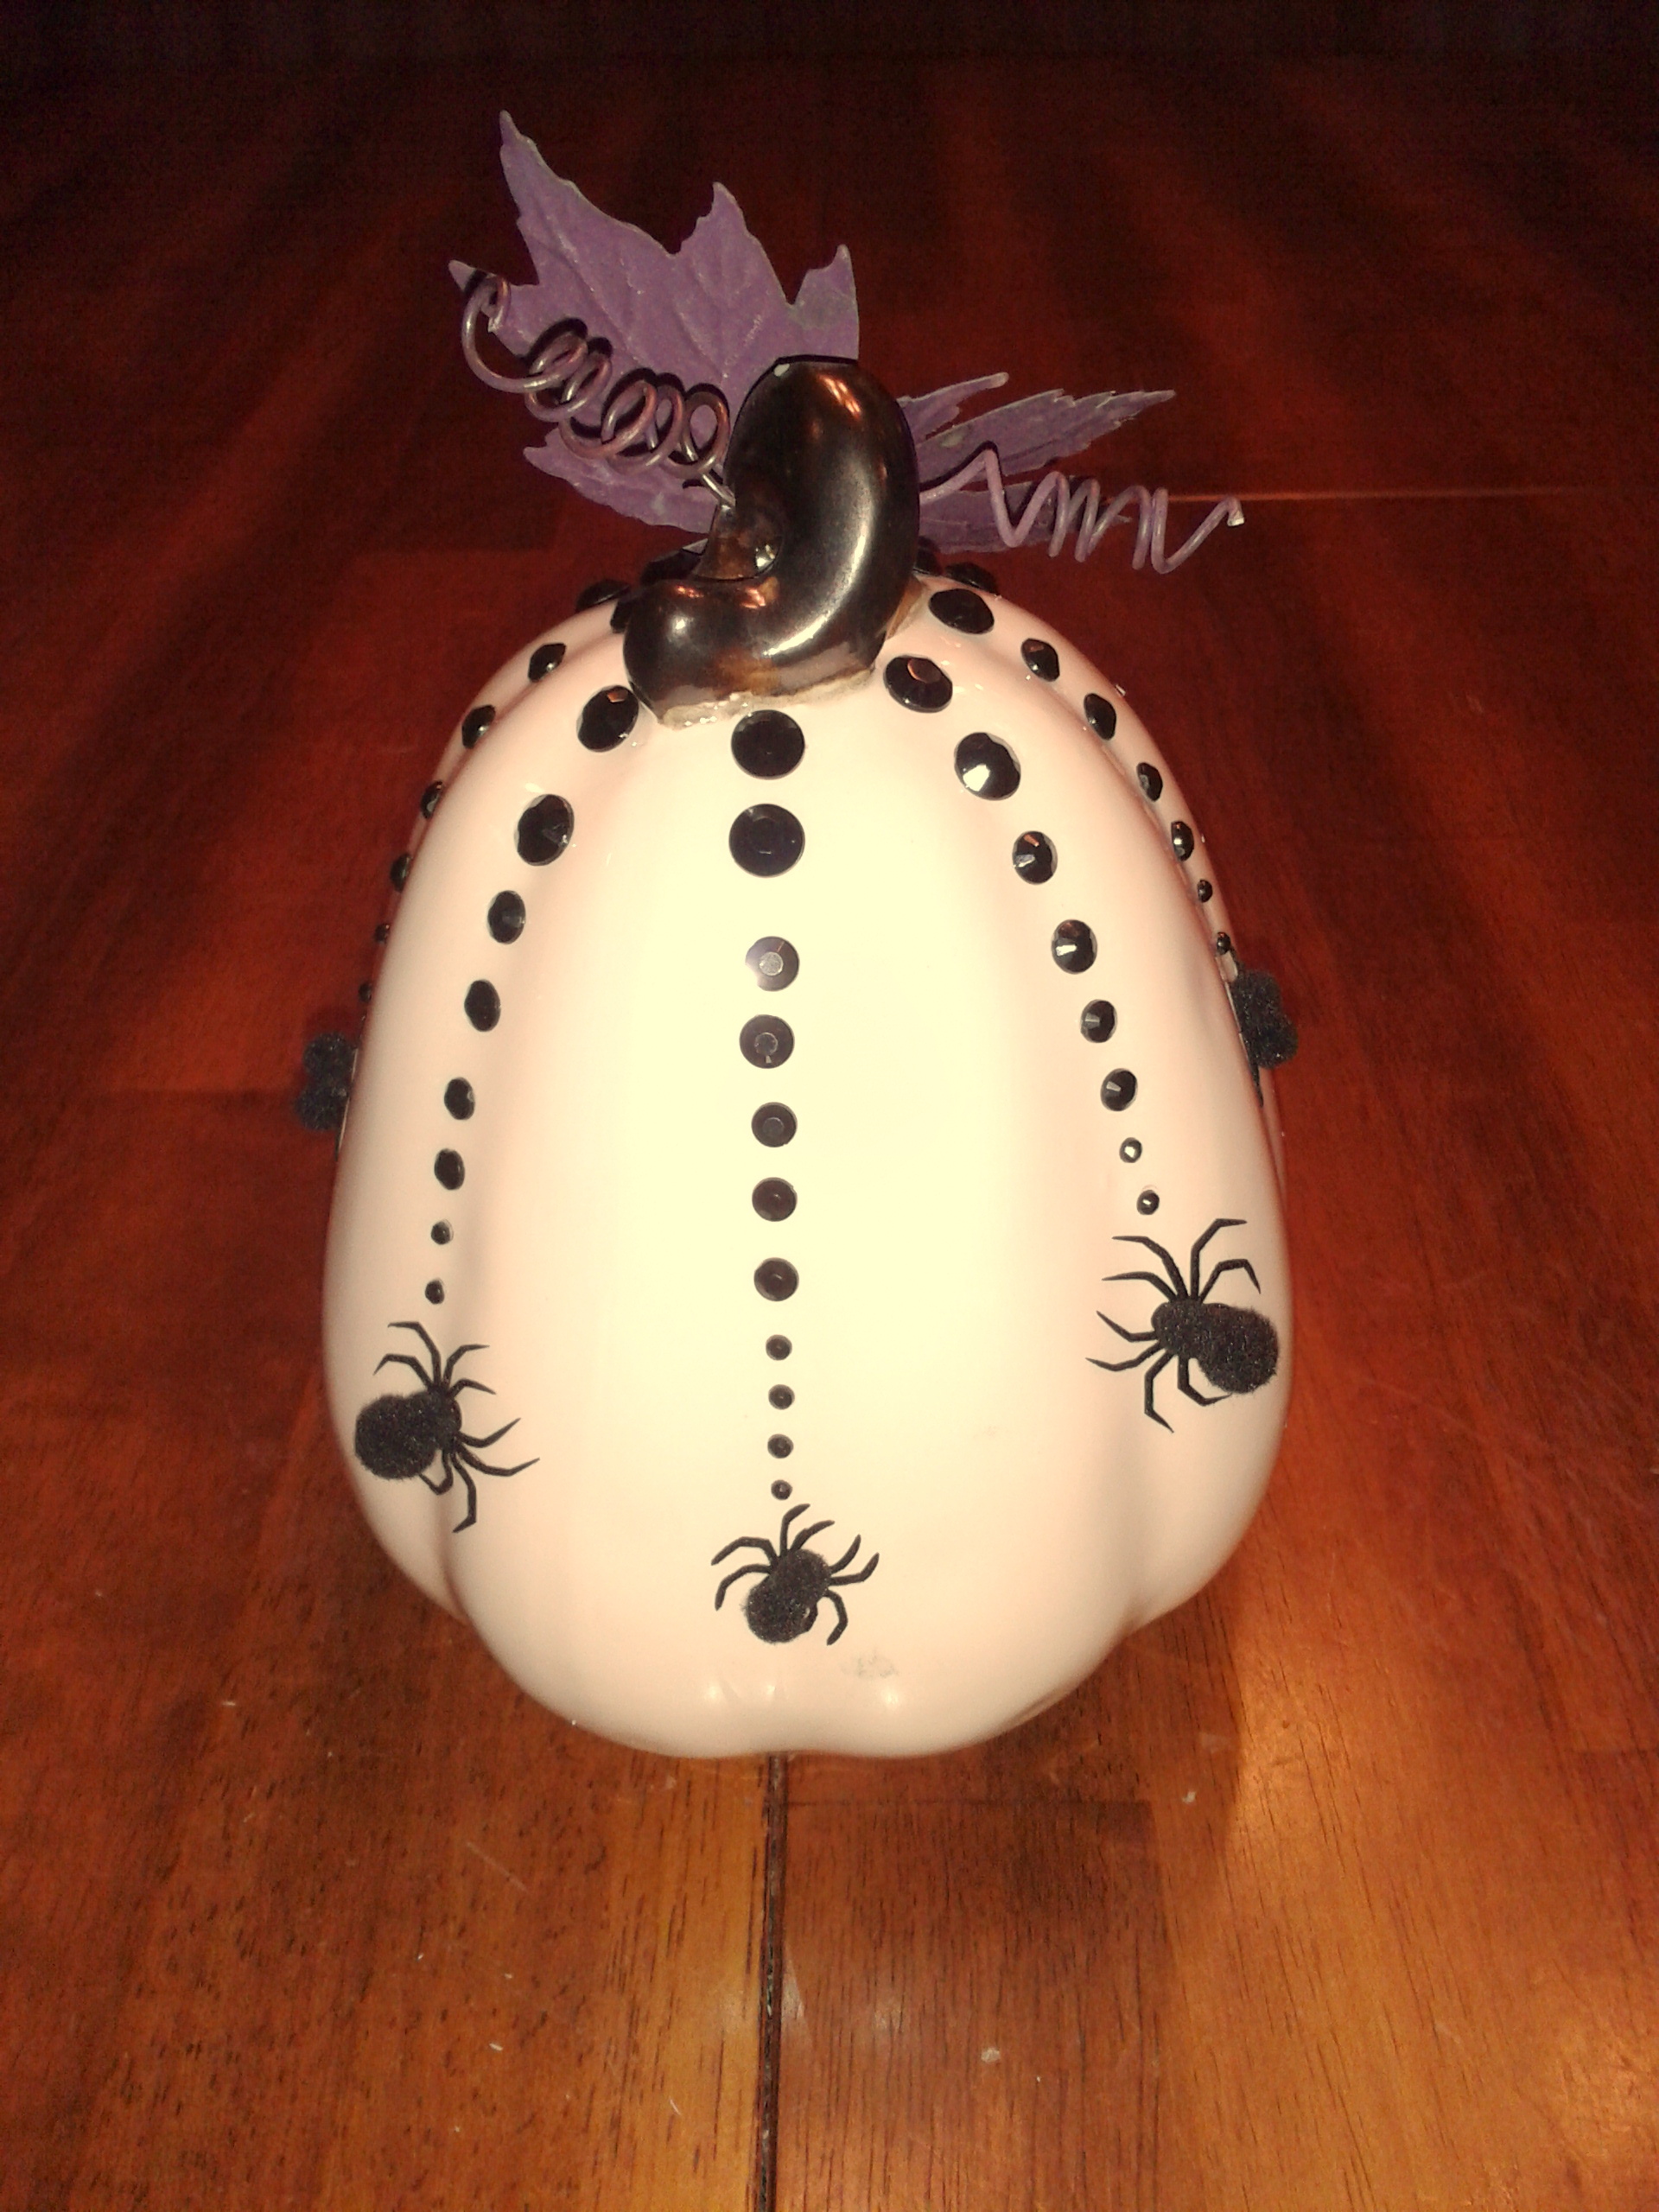
For the past several years I have seen jeweled pumpkins in retail stores and this year I decided to make two different styles.  The first style is a Classic Jeweled Pumpkin which is an elegant ceramic pumpkin painted a beautiful metallic bronze color with individually glued topaz crystals.  I created two of these pumpkins to display in the china cabinet in our dining room for the upcoming fall season.  The other style is a Halloween Jeweled Pumpkin which is a lovely ivory porcelain pumpkin with individually glued black crystals and spiders.  This pumpkin is also displayed in our dining room on top of a tall chest of drawers.

Classic Jeweled Pumpkin supplies

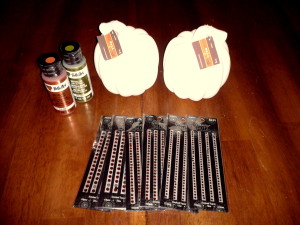
Classic Jeweled Pumpkin – supplies

A small pumpkin
Metallic bronze paint
Metallic green paint
Paint brushes
Topaz crystals, flat back
Glue stick
Tweezers and toothpicks (optional)


Classic Jeweled Pumpkin – instructions

  1. Paint the pumpkin using the metallic bronze; paint the pumpkin stem using the metallic green paint.  Allow the pumpkin to dry completely.  (Craft Note: I used two unpainted ceramic pumpkins for this craft project, but wooden or papier-mâché pumpkins can also be used. I also selected traditional paint and matching crystal colors)
  2. When the paint is completely dried, hot glue individual crystals onto the pumpkins.  Follow the natural “stems” of the pumpkin.  (Craft Note: I used a toothpick to apply the glue to the back of the crystal and then tweezers for placing the crystals, this allowed for greater control when positioning them)

In the photo below  – the painted pumpkin is on the left and the pumpkin on the right shows the pumpkin with the crystals added.

Classic Jeweled Pumpkin final  Classic Jeweled Pumpkin on display in china cabinet

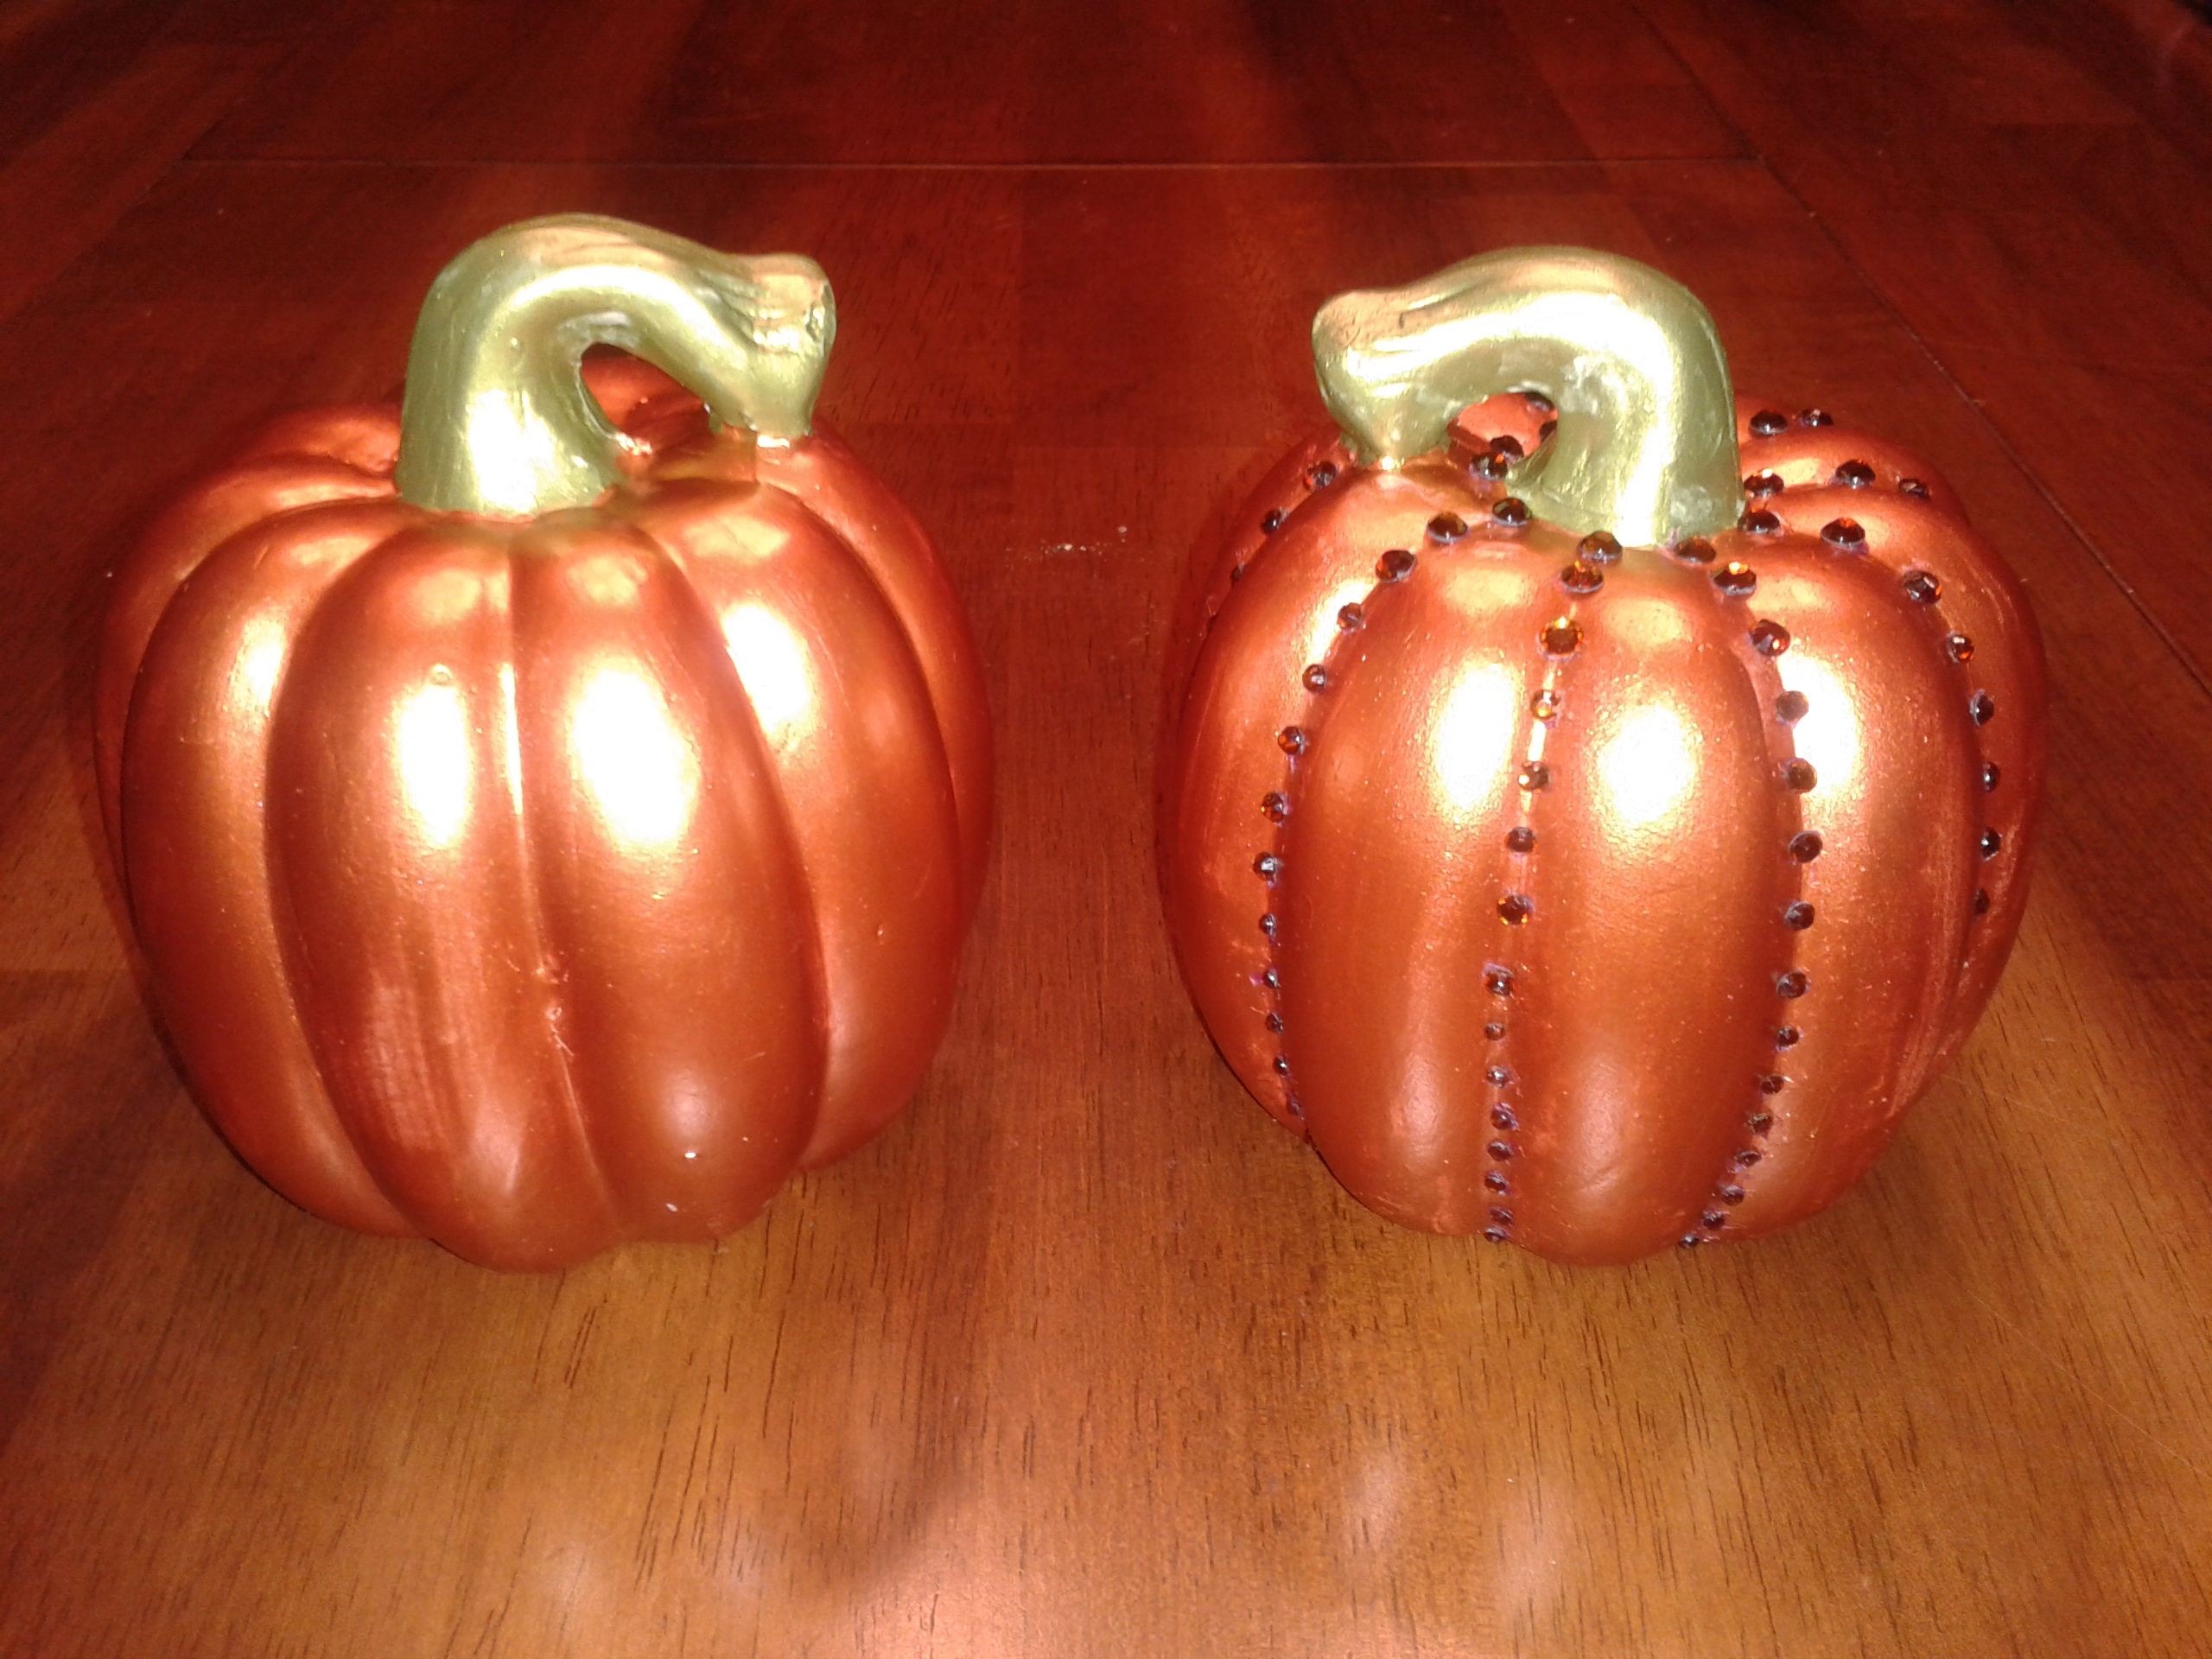
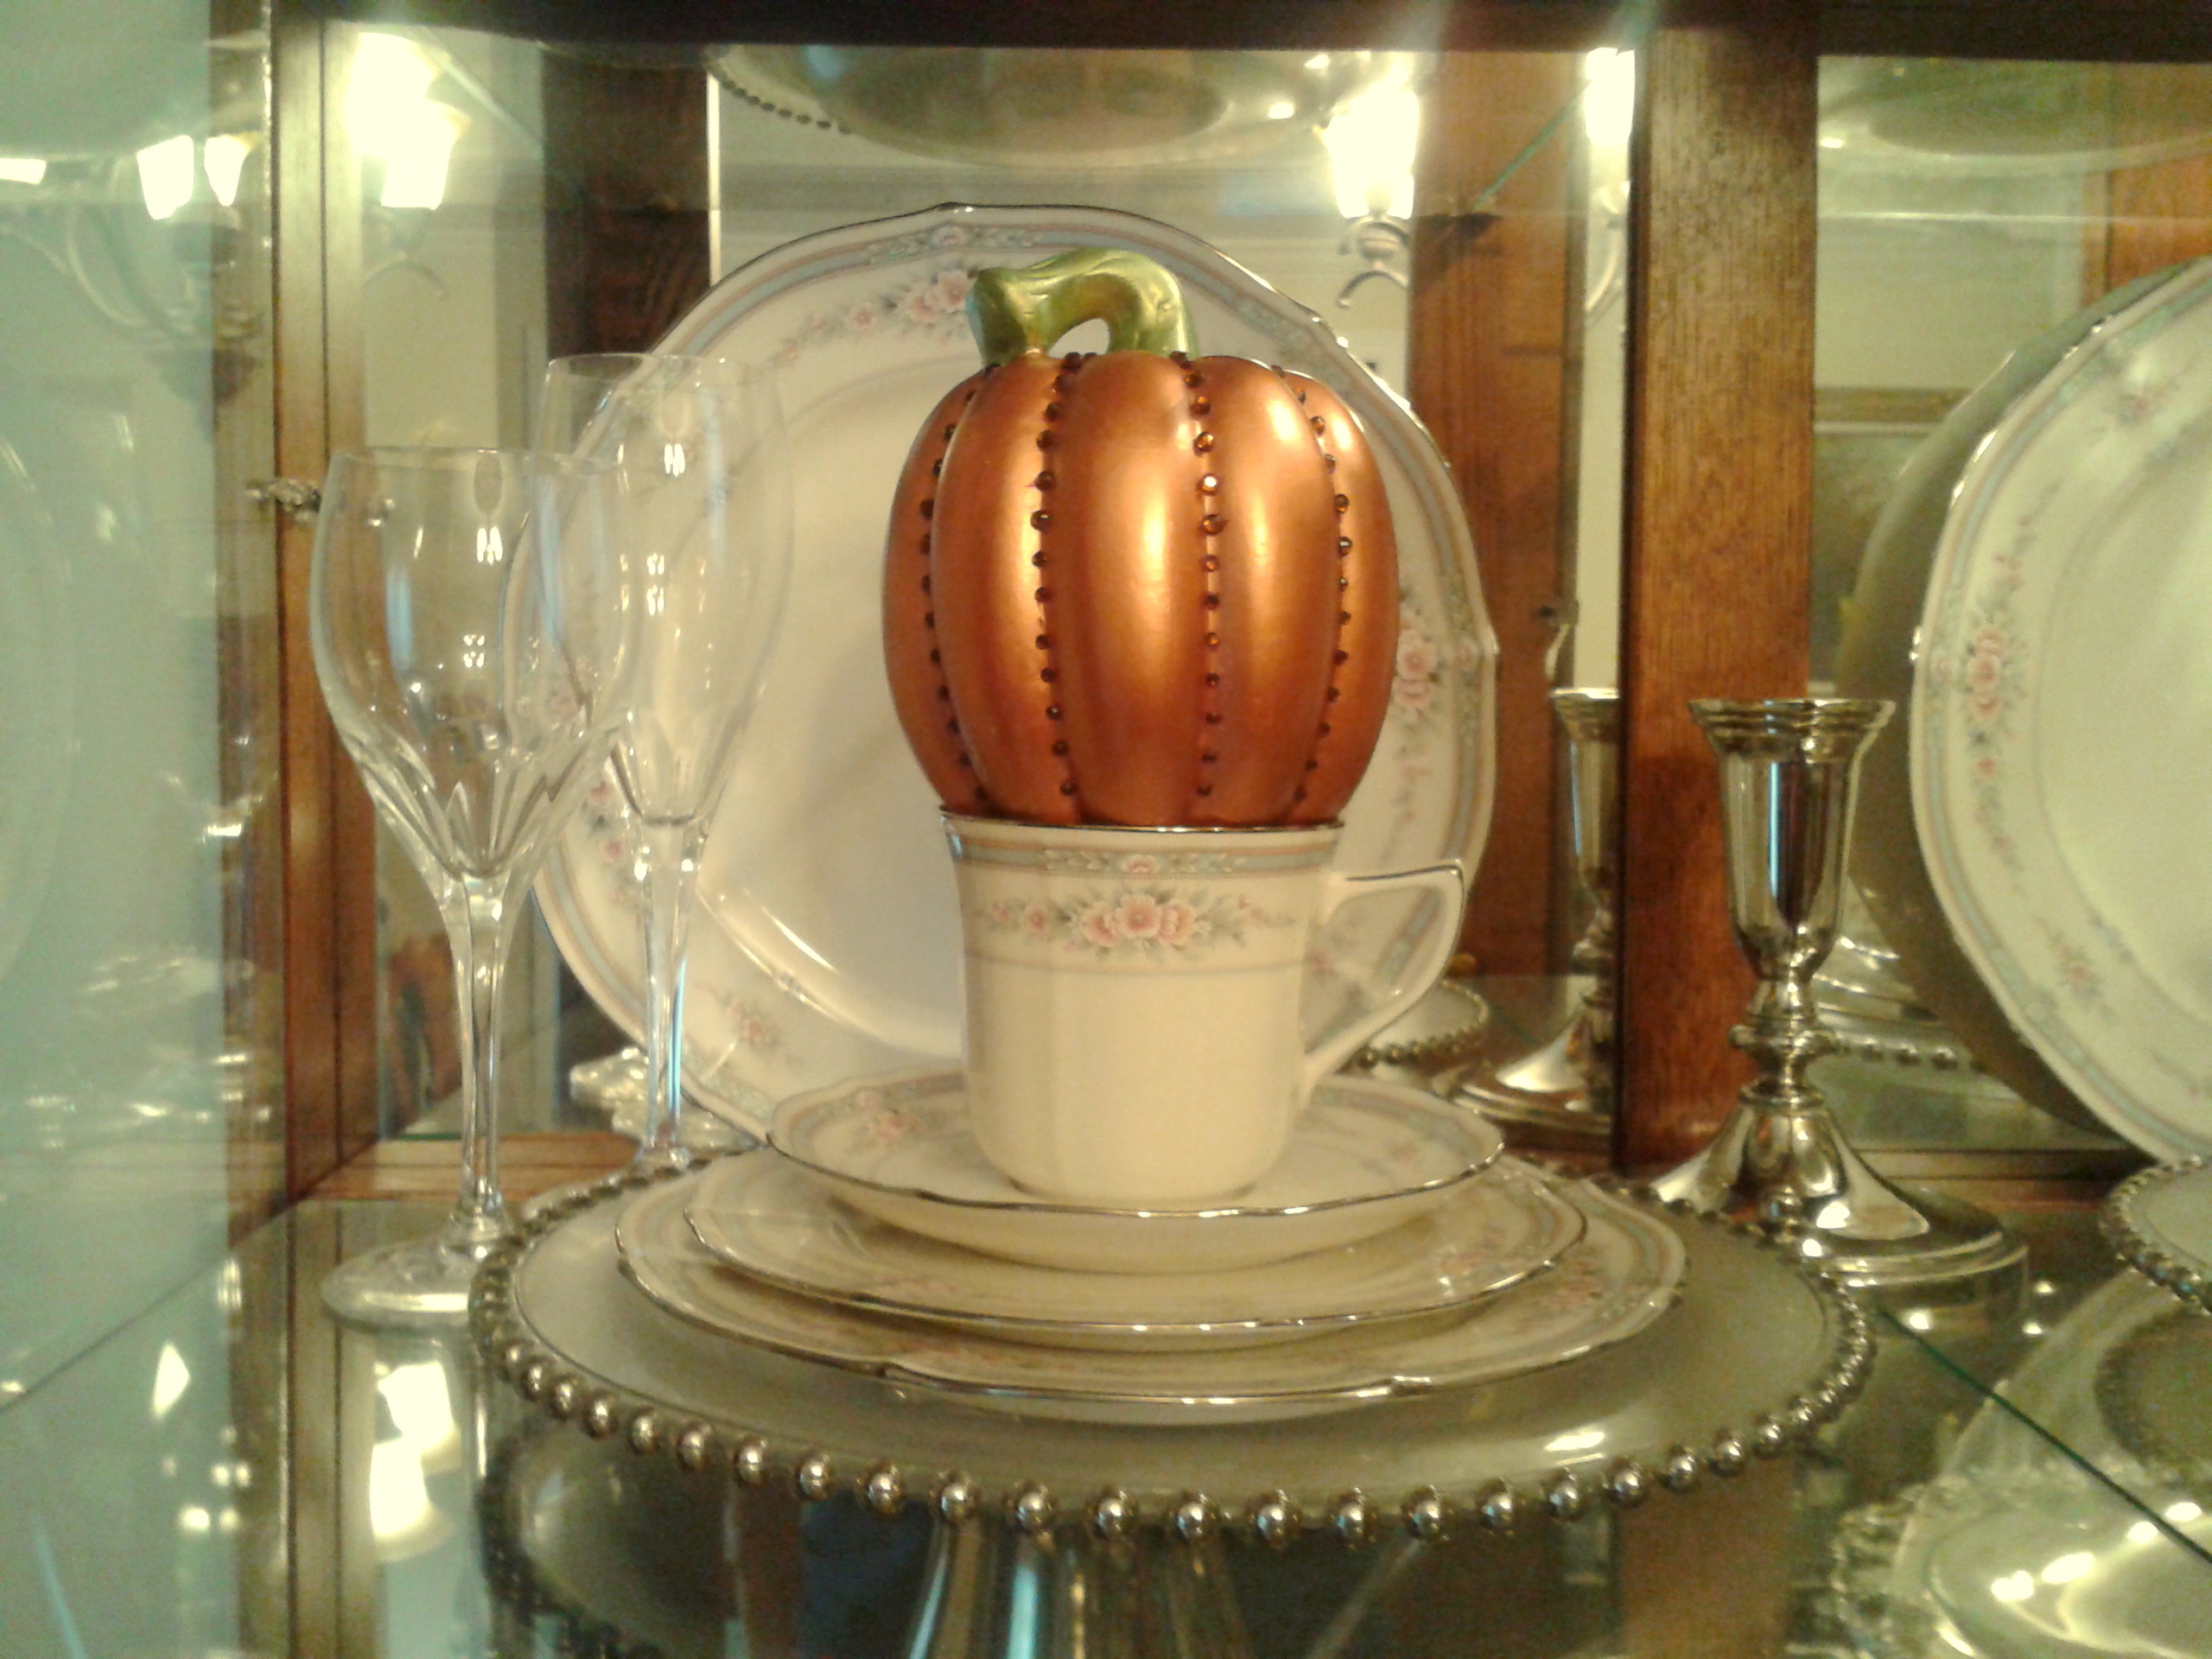
The Classic Jeweled Pumpkin instructions are very simple but the craft project can be very time consuming because of the painting process and, depending on the amount of crystals used, the application process can also take some time to complete.  The end result is a very elegant home accessory that would look wonderful displayed in any room of the house.

I used very traditional colors for the two Classic Jeweled Pumpkins but any color combinations of paint and crystals can be used.  One suggested color combination is ivory pearlized paint with “diamond” crystals or white pearls.  The color combinations can be endless and the idea is to create a custom look would match your room decor.

Halloween Jeweled Pumpkin supplies

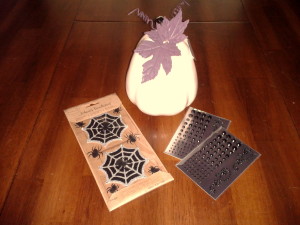
Halloween Jeweled Pumpkin  – supplies

Ivory porcelain pumpkin
Black crystals in a variety of different sizes, flat back
Black spiders
Glue stick
Tweezers and toothpicks (optional)

Halloween Jeweled Pumpkin instructions

  1. I used an ivory porcelain pumpkin that I purchased from a local craft store, but if you cannot find one use an unpainted ceramic, wooden or papier-mâché pumpkin.  Paint the pumpkin an ivory color, white can be too harsh of a color, and allow it to dry completely.
  2. Starting with the largest sized black crystal to the smallest, place the crystals in a straight line in each of the “seams” of the pumpkin.  For visual interest vary the length of each line of black crystals.  (Craft Note: I used a toothpick to apply the glue to the back of the crystal and then tweezers for placing the crystals, this allowed for greater control when positioning the crystal)
  3. Add a spider to the end of each line of black crystals; this will look like the spiders are creating a web!  (Craft Note: I used 3-dimensional spiders that had self-adhesive backs, I found them in the scrapbook section of a local craft store)

Halloween Jeweled Pumpkin final

Craft – Nightmare Before Christmas wreath

Jack SkellingtonThis quirky Halloween wreath is inspired by Tim Burton’s 1993 movie, “The Nightmare Before Christmas”.  Jack Skellington, the main character in the movie, is the Pumpkin King who lives in the fantasy world of Halloween Town.  The town is filled with ghosts, vampires, werewolves, witches and other monsters who only celebrate the one holiday of Halloween.  Jack has a very unusual appearance; he is a skeleton who wears a black pin-striped suit and a bow tie that resembles a bat.  For more information about the making of the movie and a brief synopsis of the film, please check out yesterday’s post, The Nightmare Before Christmas movie.

I have been planning on making a Nightmare Before Christmas wreath for several years and this year I finally came up with a design that I liked.  Below is a list of supplies and instructions to make this unique Halloween wreath.

Nightmare Before Christmas wreath – supplies

1 black wreath, (a pine wreath spray painted black would work if you can’t find one)
5 round and flat bisque ornaments
Black Sharpie
1 small Santa hat
Several black berry sprays (I found these in the Halloween section of local craft store)
3” wide black and white striped ribbon
Hot glue gun and glue sticks
wire, cut into 5 4-inch lengths

Nightmare Before Christmas - supplies

Nightmare Before Christmas wreath – instructions

  1. Using the 5 round bisque ornaments, draw 5 different faces of Jack Skellington with a pencil.  When you are satisfied with the faces, trace over the designs using a black Sharpie, be sure to fill in the eyes completely.
    Nightmare Before Christmas - Jack faces 1  Nightmare Before Christmas - Jack faces 2
  2. Choose one of the Jack faces and using hot glue attach a small Santa Hat.  This Jack will be the “Sandy Claws” for the Nightmare Before Christmas wreath.
    Nightmare Before Christmas - Sandy Claws
  3. Position “Sandy Claws” in the center of the lower section of the black wreath, position the remaining 4 Jack faces around the wreath.  Individually attach each Jack face with wire to the wreath.
    Nightmare Before Christmas  - adding berries
  4. Hot glue black berry sprays to the wreath; evenly space the berries around the wreath.
  5. Using the black and white striped ribbon make a bow and attach it to the wreath just below the “Sandy Claws”.
    Nightmare Before Christmas - finished

Craft – Halloween Signs

Haloween sign - Treat or Treat finished sign  Haloween sign - Eat Drink and Be Scary  finished sign

Last year I made a Christmas sign to hang over our fireplace mantel where I displayed my Department 56 North Pole Village in our family room.  Then, when I was decorating my home office where I write my lifestyle blog, I made a sign for The Enchanted Manor.  (To take a look at the Christmas and home office signs, please see the photos from these two Décor Posts, Department 56 North Pole Village and Home Office)  Both these signs turned out great and I was very happy with the results, so this year I decided to make two new signs for Halloween.

The inspiration for the signs starts with the popular wall decals that are sold in the craft stores.  Usually these self-adhesive decals are directly attached to the walls, but I decided to use them in a different way and make seasonal holiday signs that I can be display in our home.  With a little bit of paint and a few additional items to add some interest to the signs, these craft projects may take a little longer to create but I think the results are worth the effort!  I have seen seasonal signs in retail stores that sell for a minimum of $50 or more and I can create great looking custom signs for a fraction of that cost.

In this post I will explain the steps needed to create my custom Halloween signs.

Step one

The first item needed to create a seasonal sign is a self-adhesive wall decal or wooden letters.  Wall decals are very popular and there is a great selection available in local craft store.  If you can’t find the exact wording needed for your sign, consider using large wooden letters.  The two Halloween signs created for this craft project will be using decals, one is “Trick or Treat” and the other is “Eat Drink & Be Scary”.

Haloween sign - checking placement

Step two

After the decal for the craft project is selected, I will shop for additional items to use as embellishments.  Select decorative items that match the theme of the decal which also add interest and some dimension to the sign.  For the “Trick or Treat” sign I found some resin candy corns to use.  For the “Eat Drink & Be Scary” sign I found a small resin pumpkin wearing a witch hat and some spiders.

Step three

Select a board that will fit the decal’s measurements with additional space around the decal of a minimum of 3 inches.  Wood can be used for this craft project but there is always a risk of the wood warping or splitting over time.  For my seasonal signs I used MDF board which usually costs less than a piece of wood and the surface is much smoother and no sanding is required.  Next, with the help of my husband, he cut the MDF boards to match the measurements I needed for the two signs.

Step four

Select a color for the sign’s base paint, this color will become the background color of the sign. Using a paint roller for a smoother finish, paint the board.  Be sure to paint the edges of the board for a finished look.  Allow it to dry overnight, if the paint is not completely dry it will cause problems later in step five.  For my signs, I used an off white semi-gloss paint that we had leftover from a previous home project.

Haloween sign - painting the base color

Step five

Determine what color or colors to use for the boarder or trim sections of the sign.   When selecting colors, choose ones that coordinate and compliment the colors of the decal.  Then, when the base paint of the board has completely dried, use painter’s tape to create straight edges for the boarders of the sign.  Allow the paint to dry completely; if the tape is removed too soon the edges can smug.

For the “Trick or Treat” sign I used a metallic green paint for the boarder and black paint for the trim and for the “Eat Drink & Be Scary” sign I used black paint for the boarder and a metallic bronze paint for the trim.

Haloween sign - using painter's tape for border and trim

Haloween sign - painting border and trim

Haloween sign - boarder and trim paint

Step six

When the board is completely dried but before peeling the back off the decal, place the decal in the desired position on the board and add the decorative items.  When you find a visually pleasing arrangement, remove the backing from the self-adhesive decal and carefully attach it to the boards while smoothing out any bumps.  If you need help making the wording level and straight, you can draw a very light pencil mark to aid in the placement of the decal.

Step seven

The final step is to attach the decorative items in their pre-determined places on the board with hot glue for heavier items and stick glue for lighter items.  For the “Trick or Treat” sign I hot glued resin candy canes around the board to create a fun border.  For the “Eat Drink & Be Scary” sign I hot glued a cute pumpkin in a witch’s hat between the words.  I found some fuzzy spiders in the scrapbook section of my local craft store, they had self-adhesive backs and I attached them to the board.  On either side of the board I positioned a spider and drew a black line with a marker to create the illusion of a spider hanging from a web.

Haloween sign - decorative items placement

I was very happy with the results of these two Halloween sign craft project.  The “Trick or Treat” sign was hung in our entry foyer, a picture hook was attached to the back so that it could be hung on the wall.  The “Eat Drink & Be Scary” sign was put on the top of the kitchen cabinets using a standing plate holder and displayed with a ceramic pumpkin and my daughter’s toy black cat.  They both look great and are a fun addition to our Halloween decorations!

Front entry

Kitchen 1