About barbara

I'm sure you are wondering how the blog was named, "The Enchanted Manor". Well, this blog will be like home to me and I wanted a name that reflected my different interests. During a normal day you can find me in several rooms of the house. Maybe I'll be in the living room decorating, or in my craft room working on a project, or in the dining room planning a great dinner party or at the computer in my office planning a great vacation. When you come to visit my blog you might find me in any room! Please return often for ideas and inspiration because this blog will be about decor, craft, celebration and travel. So, welcome to the "Enchanted Manor". Come in, sit down and let's talk!

Craft – Christmas Gift Card Box

If you are looking for a special way to give a Christmas gift card here is a unique idea. The Christmas Gift Card Box needs just a few supplies and easy, simple instructions to make a wonderful presentation.  Craft Note: The stickers and other items that I used for this project might not be available but don’t be discouraged, instead visit your local craft store and be inspired by the stickers and other items in the scrapbook section.

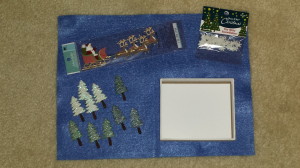
Christmas Gift Card Box – supplies

  • Small box
  • Felt, color is determined by the “scene” in the shadowbox
  • A variety of scrapbook 3-dimentional stickers and/or small plastic Christmas-themed items
  • White glue, it will work better than a glue stick on the felt and accessories

Christmas Shadowbox - supplies

Christmas Gift Card Box – instructions

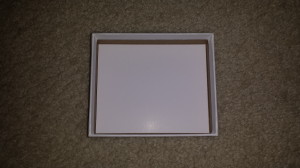
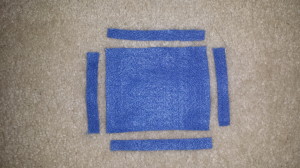
  1. Take the measurements of the inside dimensions of the bottom of the box.  Use these measurements to cut the felt into five pieces, one for the bottom and the four sides of the box.

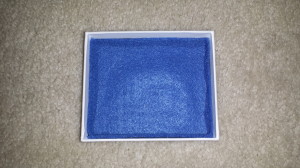
Christmas Shadowbox - bottom of box 1Christmas Shadowbox - bottom of box 22.  Glue these five pieces to the inside of the box to fully line the interior.  By lining the box it will give the shadow box a wonderful background for the stickers or other accessories.Chirstmas Shadowbox - bottom of box 3

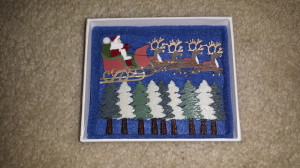
3.  The next step is where the look of the “scene” if determined by the stickers and other items available in your local craft store.  Using 3-dimensional stickers helps to create depth to the shadowbox and avoids the flatness of regular stickers.  Also check out the other sections of the craft store for small plastic Christmas items that could inspire a “scene” for the shadowbox.

Christmas Shadowbox - final

The Christmas Shadowbox gift Box is a beautiful way to present a gift card.  After the shadow box is completed, attach the gift card to the inside of the top of the box.

Decor – My Christmas Decorations from Past Years (Part One)

When we lived in California, I decorated our house for Christmas in a very different way from our Midwest home.  I used artificial pine garland in several of the rooms, including the living room, family room, dining room and kitchen.  Pine garland is a wonderful Christmas decorating accessory to use and it can be very versatile with the use of different items added from one room to another to get a wonderful variety of looks.

As I discussed in last month’s Décor post, Fall decorations, in our previous home in California I used several lengths of pine garland set up in both the living room and dining room decorations with golden roses, berries and oak leaves with pre-strung with lights because the intent was to leave the garland in place until Christmas.  This was meant to save time during the holiday decorating process and the accessories in the garland would be changed from the Fall to the Christmas seasons.  In both rooms there were large oak pieces of furniture, an oak entertainment center in the living room and an oak china cabinet in the dining room, and the garland was secured into place at the top of each.

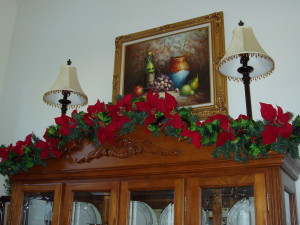
For the 2002 Christmas season, I removed the Fall decorations and added red poinsettias with red berries and holly leaves.  The inspiration for this was a trip had recently made down to Encinitas, California to the Ecke farm that grows poinsettias which are marketed and shipped throughout the United States during the holiday season.  I started the arrangement by inserting several artificial poinsettias into the existing garland and in between the flowers I added holly leaves and red berries.  The contrast of the green pine garland and the red poinsettias was very festive for Christmas.  Both arrangements in the living room and the dining room used the same decorations.

OLYMPUS DIGITAL CAMERA

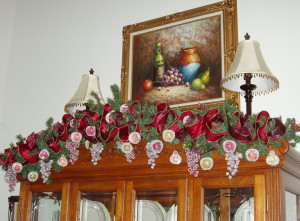
For the 2003 holiday season, I decided to do a different arrangement in the dining room.  I thought it would be appropriate to incorporate artificial fruit into the garland for a food themed arrangement that was reflected in the still life painting over the china cabinet.  I started by lacing red burgundy colored ribbon throughout the artificial pine garland. Next, I secured artificial “sugared” fruit onto the garland; I used grapes, apples and pears.  I think it made a wonderful display and looked very elegant in the dining room and the arrangement was used for both the Fall and Christmas seasons.  (Please check out the craft post, Victorian centerpiece, to see how I repurposed the “sugared” fruit into a lovey arrangement that I used last year in our Midwest home for the holiday season)

OLYMPUS DIGITAL CAMERA

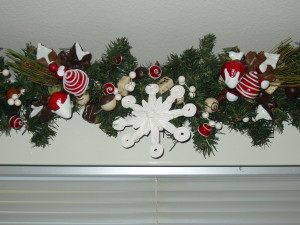
In our California home, I always decorated our kitchen with a gingerbread and candy theme for the Christmas season.  To start the 2002 decorations, I hung an artificial pine garland over the window.  I had found various candy themed items in the local craft stores, such as artificial chocolate candies, white chocolate covered strawberries and white “Icing” snowflakes.  These items were secured to the garland and the decorations looked perfect for the kitchen.

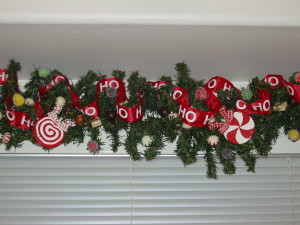
In keeping with my decorating style of constantly changing my holiday displays, for the 2003 Christmas I again used an artificial pine garland and laced a cute “Ho,Ho,Ho” red and white ribbon through the garland.  I still used the artificial chocolate candies but that year I added artificial gumdops, peppermint candies and red and white lollipops.  All these items were secured to the garland and once again the contrast of red and green colors looked great for the Christmas season.  As you can see for the photos of the kitchen garland for one year to the next, the same candy theme was used but with different accessories the garlands had to distinct and different looks.

OLYMPUS DIGITAL CAMERA    OLYMPUS DIGITAL CAMERA

For the last garland arrangement in our California house, I used another artificial pine garland for the fireplace mantel, this Christmas decoration was featured in the Décor post, Displaying a Boyd’s Bear Collection – Part Two.  I had found a string of amber pinecone lights in a local store and strung them through the garland.  Next, I evenly spaced my collection of Boyd’s Bear ornament nestled among the pine boughs.  To finish the display I added several real pinecones and red berries scattered throughout the garland.

As you can see by moving from one house to another I adapted by Christmas decorations and used the items in new and different ways.  I hope this inspires you to take a look as your Christmas decorations as you unpack them from their storage boxes and think about displaying those items in fun and different ways in the rooms of your home.

Craft – Christmas Ornament Displays

As I mentioned in this month’s Décor post, Ornaments Used in Unusual Ways, ornaments are not just for the Christmas tree and they can be used in many different ways throughout the house during the holiday season.  In this post I will show three examples on how ornaments can be displayed in some fun and creative ways.

Ornament Snowglobe

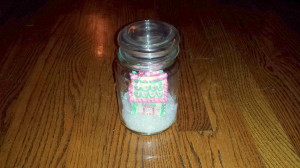
The idea for the Ornament Snowglobe is to use an ornament that can create a winter scene and then be able to turn the jar upside down for the artificial snow to create a falling snow effect.  The gingerbread house is a great example to use for this craft project, other ornament suggestions are: a Santa Claus ornament, a Snowman ornament or a single Christmas tree.

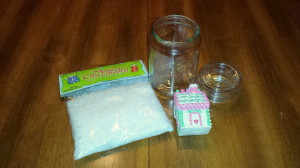
For this display I used a small glass container with a lid, a gingerbread house ornament, some artificial snow, and a glue gun/glue sticks.  Craft NoteWhen purchasing an ornament for this craft project, be sure that the ornament is small enough to fit inside the jar with the lid closed, also check the width of the ornament so it can fit through the jar’s opening.

Snowglobe ornament display - supplies

To start, be sure the inside of the jar is clean and remove any price tags or metal display loop from the top of the ornament.  To remove the display loop, grab hold of the loop with a plier and then twist with an upward movement.

Secure the gingerbread house ornament to the bottom of the jar with glue.  Optional step: For a permanent “snow base”, lay some cotton balls or batting onto the bottom of the jar after attaching the ornament OR paint the bottom of the jar with white paint and let it completely dry before attaching the ornament.

Next, add a small layer of artificial snow to the bottom of the jar.  Then, to finish the ornament snowglobe, securely glue the lid onto the top of the jar so that the jar can be turned for the “snow effect”.

Snowglobe ornament display - final

Framed ornament

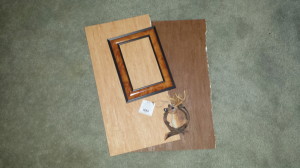
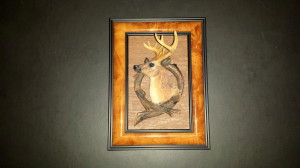
For this display it is important to use ornaments with flat backs, such as the deer or gingerbread ornaments seen below.  I used a wallpaper remnant (but scrapbook paper can also be used) for the background, a frame that matches the ornament and a hot glue gun/glue sticks.

Framed deer ornament - supplies

Disassemble the picture frame, separating the glass and back from the frame.  Cut the wallpaper remnant (or scrapbook paper) to fit the size of the frame.  Then, glue the paper to the glass.  Re-assemble the glass and the frame backing inside the frame.  To finish the display, center and attach the ornament to the paper.

Framed deer ornament - final

Craft Note: The theme of this Framed Ornament is not specific to any holiday and would look wonderful on a side table or bookcase and can be displayed year-round.

Ornaments Under Glass

This project is similar to the ornament snowglobe but the difference is that this larger display can only remain stationary and uses multiple ornaments or accessories.

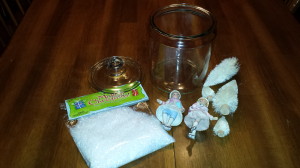
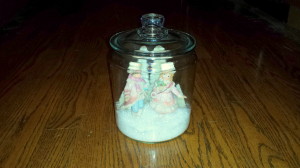
For this ornament display I used a large glass container with a lid, a boy and girl skater ornaments, four small artificial pine trees, artificial snow and a glue gun/glue sticks.  The idea for this craft project is to have one or two ornaments and use accessories like trees and artificial snow to set a winter scene in soft pastels or whimsical with primary colors.

Ornaments under glass - supplies

To start, be sure the inside of the glass container  is clean and remove any price tags or metal display loop from the top of the ornament.

Next, position the accessories, such as the pine trees, and secure into place at the bottom of the glass container with the hot glue gun/glue.  Be sure to leave room for the ornaments by positioning the accessories to the sides of the container and leave the area in the front clear to view the scene inside.

Then, secure the ornaments into place at the bottom of the glass container.  To finish the Ornaments Under Glass display, add a small layer of artificial snow to the bottom of the container to look like fresh fallen snow.

Ornaments under glass - final

So, next time you are shopping in the local retail or craft stores during the holiday season check out the Christmas ornaments and think about a different way of displaying them in fun and creative ways!

Decor – Ornaments Used In Unusual Ways

When decorating the home for the holidays consider using Christmas ornaments in unusual ways.  Christmas ornaments are not just for the Christmas tree, there are so many different ways to incorporate them into holiday decorations.  Listed below are several suggestions –

(Please check out this month’s Craft post, Christmas Ornament Displays, for additional ideas on how to display Christmas ornaments with supply lists and instructions to create one of a kind Christmas decorations for your home)

Chandelier Decorations

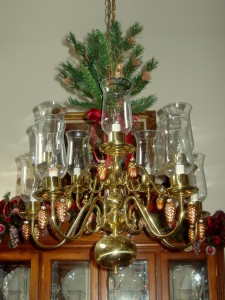
Several years ago I was trying to think of a creative idea to decorate the chandelier in our dining room.  It was a beautiful bronze multiple light fixture with lovely curved arms.  Inspired by seeing other chandeliers with hanging crystals, I thought for the holiday season I would hang small ornaments to add a festive look.  I found some small glass pinecones and acorns at a local retail store and I thought they would be perfect. I hung them from the chandelier’s arms with small ornament hooks.  Another way to hang them would be to use ribbons or silk cord.  So, during the holiday season look for smaller ornaments that fit your holiday decorating theme – maybe candy or gingerbread ornaments, small porcelain or glass snowflakes, small ball ornaments in red and green or silver and gold.  The retail and craft stores have a wide selection of ornaments – shop the sales to keep the cost down – be creative with style and color!!

OLYMPUS DIGITAL CAMERA

Window Decorations

I had purchased several beautiful ivory porcelain ornaments for an unbelievable price at an “After Christmas” sale one year but I didn’t know exactly how I was going to use them.  I had them in my Christmas storage box for a couple of years, just waiting for the perfect idea.  Finally, I was trying to find a way to decorate our windows and I thought the ornaments would add just the right festive touch.  With the curtain pulled slightly back and creating a beautiful frame for the windows, I hung the ornaments from the curtain rods at various lengths with thin ribbon in a matching ivory color.  It was the perfect holiday decoration for the windows!

Ornament Shadowbox

Years ago my Mother gave me several old ornaments from our family Christmas tree.  I never knew what to do with these ornaments because they were very old, made of vintage glass and I didn’t want them to break.  Since my Mother passed away this year, I decided I wanted to do something very special with them.  An ornament shadow box seemed like the perfect way to showcase and keep them protected.  If you have a family heirloom ornament or an ornament too fragile or valuable to hang on the Christmas tree, or a unique hand-painted, one of a kind ornament – consider displaying it in a shadow box.

Some ornaments are so beautiful or have such special meaning – why only display them for such a short time at Christmas when you could enjoy them throughout the entire year!  Sentimental ornaments would also be wonderful in a shadow box.  Consider these ways to display them year-round.  – a baby’s first Christmas ornament could be hung in the nursery – a baby blanket could be used as the background and cut to fit the size of the frame.

A special shadow box ornament would also make a wonderful gift to celebrate life’s special occasions, like a first Christmas ornament for the newlyweds, or to celebrate a new home, or a special milestone anniversary.  There is usually such a nice selection of ornaments available for the holidays, so when you are out doing your Christmas shopping look for unique one of a kind ornaments to give as a special gift.

Tabletop ornament hanger

Another alternative to showcase a special ornament is with a tabletop ornament hanger.  These are usually sold during the holiday season and feature a long curved hook to hand the ornament from and come in a variety of finishes – metal, glass, etc.  I use something a little out of the ordinary, pocket watch display domes – a glass dome with hook at the top and a wood base.  They work perfectly as an ornament hanger.

Wreath decorations

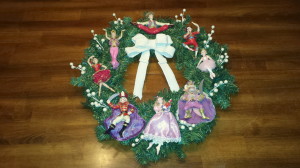
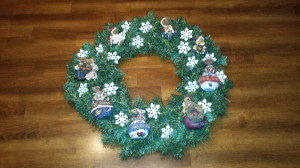
Hallmark and Enesco creates wonderful ornaments every year.  Some of those ornaments are very collectible and available in different themed series.  Every year another ornament in the series is available and soon you can have a collection of several wonderful themed ornaments.  If you display the collection on the Christmas tree separately, they could get lost with all the other ornaments.  Consider highlighting the collection and displaying them together on a themed Christmas wreath.

Nutcracker wreath - final    Boyds Bears wreath - final

(Please see the Craft post, Christmas Wreaths and More Christmas Wreaths, for ideas and instructions on creating unique wreaths using a collection of themed ornaments – two different Department 56 wreaths using small ornament houses from the Dickens and North Pole collections and also a Disney character wreath.  In addition, there is a lovely Nutcracker Ballet wreath using ornaments found in a local craft store and also a collection of Boyd’s Bears ornaments used in another themed wreath)

OTHER USES FOR ORNAMENTS

  • Tied to a luncheon or dinner napkin, use as a party favor for guests to take home.
  • Use as a gift wrap accessory and tie to a present for the perfect finishing touch.
  • Hang from the under a kitchen cabinet as simple holiday decorations.

      NOTE: don’t hang too low to interfere with working on the kitchen counters.

  • Hang from a pine garland to add an extra festive touch to a fire place mantel.
  • Hang ornaments from garlands draped on top of the bathroom mirrors.

There are so many different ideas for using Christmas ornaments in unexpected ways and you are only limited by your imagination and creativity!!  Please send your comments and suggestions; I would love to hear your ideas of other uses for Christmas Ornaments.

Travel – Walt Disney’s Marceline, MO

I grew up as a Disney child, our family has been going to Disneyland since it opened in 1955, but of course that was a few years before I was born!  Over the years I have become fascinated by the man that made such wonderful animated films and television programs, I have read many books about both Walt Disney’s personal and professional life.  The first book I read was the Bob Thomas book, “Walt Disney: An American Original”.  The book covers the life of Walt from his birth in Chicago, IL to his early childhood in Marceline, MO and then follows him to Kansas City as he starts the Laugh-O-Gram Company and then California as he created the Walt Disney Company and later built Disneyland.  (I highly recommend the book!)  Little did I know that many years later I would move to the Midwest and be able to visit the small town of Marceline and some say his inspiration for Disneyland’s Main Street.  So, in honor of Walt’s birthday (Born: December 5, 1901 Died: December 15, 1966) I would like to share our October 2012 visit to Marceline, MO.

Marceline is a small town located halfway between St. Joseph and Hannibal, Missouri.  In 1887 the Atchison, Topeka and Santa Fe Railway began construction on a railroad station and main terminal because of the town’s excellent location between Kansas City and Chicago.  The town quickly grew and by 1906 when the Disney family moved from Chicago, IL to Marceline the population was 2500.
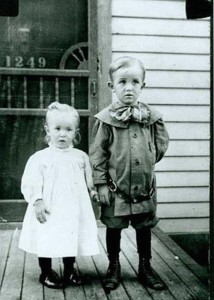
Walt and RuthElias and Flora Disney along with their five children (Herbert age 17, Raymond age 15, Roy age 12, Walt age 4 and Ruth age 2) moved into a farm just outside of town.  Elias purchased the small one-story house and 45 acres of land.  The farm had 5 acres of apple, plum and peach orchards and they grew corn, sorghum and wheat.  They also raised hogs, chickens, dairy cows and horses. While Elias and the older boys would work on the farm and in the fields and Flora did household chores.  Walt and Ruth would sell apples or Flora’s homemade butter in town and during the spring or summer they would swim or fish in the Yellow Creek located nearby.

Even though the Disney family only lived there four years, Marceline left a lasting impression on Walt and he had wonderful memories of his early childhood years.  Walt and his sister Ruth spent many happy hours playing around the farm and Walt would sit under a tree making up stories and dreaming of his future.  Sometimes Walt would walk into town and visit the railroad station; he was fascinated by the trains that came through Marceline on a regular schedule.  Eventually, Walt’s father sold the farm and the family moved to Kansas City, Missouri in 1910.  It is said that Marceline is “where Walt Found the Magic”.

Many years later after Walt and his brother Roy built the successful Walt Disney Company and Walt never forgot his beloved Marceline … and it appears Marceline never forgot Walt.  In 1956, Walt received an invitation from the city stating that they were naming the recreation center and new swimming pool after him.  Walt accepted the invitation and he, Roy and their wives traveled to Missouri for the dedication ceremony.  During their time in Marceline, Walt and Roy visited the old family farm, they also visited Main Street and went to the old Santa Fe train depot and the nearby E.P. Ripley Park.  They also went to Walt’s old school, Park School, and Walt sat at his old desk and found the W.D. that he had carved into the top.  Of course there were many photo opportunities during the visit but the best part was the time Walt and Roy had to reminisce about all their childhood memories.  Walt later returned to Marceline in 1960 when the old school was rebuilt and renamed the Walt Disney Elementary School.
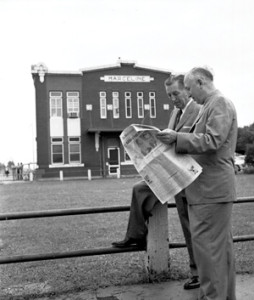
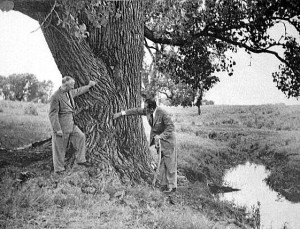
Marceline train station - Walt and Roy    The Dreaming Tree with Walt and Roy

Today, Marceline continues as an agricultural center, industrial community and also has one of the largest publishing companies in the Midwest.  The railroad trains no longer stops in Marceline, although the trains still travel through the town quite frequently.

 Listed below are some of the current Disney sites to see in Marceline:

 Walt Disney Hometown Museum
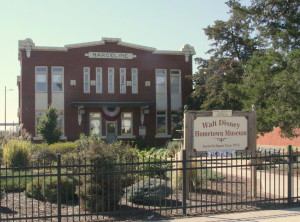
 Walt Disney Hometown Museum

An excellent place to start a visit to Marceline is the Walt Disney Hometown Museum located in the old Santa Fe train depot, which is fittingly the place where Walt and his family first arrived in Marceline back in 1906.  The Museum has a wonderful and unique collection of Disney family memorabilia which were donated by Ruth Disney Beecher, Walt’s sister.  Some interesting items in the museum collection include the following: Walt’s old school desk which visitors can see his carved initials, personal Disney family letters, a phonographic recording from Walt’s parent’s 50th wedding anniversary, family photographs including many from Walt and Roy’s visit in 1956, a framed piece of Walt’s Carolwood Pacific Railroad track from his Holmby Hills estate and an actual Midget Autopia car from the Disneyland ride that was donated in 1966 by Walt and Roy for Walt Disney Park in Marceline.
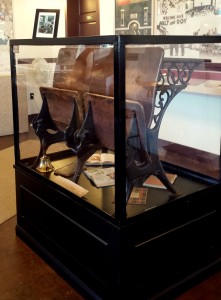
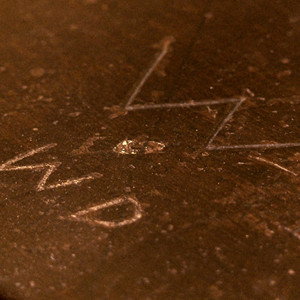
Walt's school desk    Walt's school desk - carved initials

Travel Note: Take the time to walk through the museum and look at the displays and read the Disney family letters which are displayed in chronological order.  Sadly one of the letters written by Walt’s mother, Flora, to Ruth on November 7, 1938 references the new house in California that Walt and Roy bought for their parents.  In the letter she complains about the fumes coming from the furnace, sadly a few days after writing the letter Flora was overcome by the fumes and died.

We enjoyed the museum but what made our visit so special was the volunteer that was our tour guide, Inez.  When Walt and Roy visited Marceline in 1956 they stayed at the home of Rush and Inez Johnson instead of the local hotel because it was the only home in town with air conditioning for the comfort of the Disney family.  Walt and his wife, Lillian, stayed in the room of the Johnson’s 7 year old daughter Kaye.  Kaye and her husband now own the old Disney home in Marceline and Kaye also runs the museum.  Inez had so many wonderful stories to tell about Walt during his visit back to Marceline!

For more information, prices and hours of operation, please check the Museum’s website at www.waltdisneymuseum.org

Main Street USA

The town center of Marceline looks like every other small town in the Midwest but what makes it special is that it has been said that this main street in  Walt’s boyhood hometown was the inspiration for Disneyland’s Main Street USA.  Take a look and you will notice the Zurcher building at the corner looks a lot like the Emporium Store in Disneyland … is it a coincidence, I don’t think so!
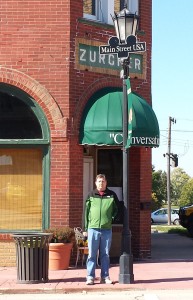
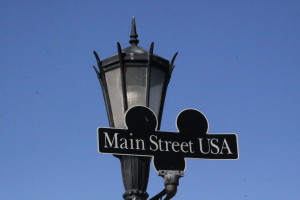
Marceline - Main Street USA    Marceline - Main Street USA 1

Travel Note: From the museum we would suggest taking a short walk over to the center of Marceline, that way you will see the other Disney sites located a short distance away and you don’t have to move your car.

Uptown Theater

Located in downtown Marceline on Main Street USA is the Uptown Theater which had been in operation from 1930 to 2010.  It was the location for two Disney film premiers, “The Great Locomotive Chase” in 1956 which was held during Walt and Roy’s visit back to Marceline and the other was “The Spirit of Mickey” in 1998.  The Theater is now a Bed & Breakfast which has five themed room, the Walt Disney Suite, the Americana Mickey Room, the Santa Fe Room, the Winnie the Pooh Room and the Toonfest Room.  (Toontest is an annual celebration held in Marceline during the third weekend in September that focuses on the art of animation or “cartooning”.  For more information, please see www.toonfest.net)

Walt Disney Post Office
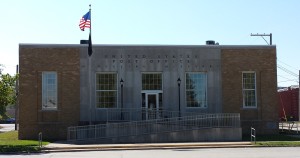
Walt Disney Post Office

Located just off Main Street USA, near the center of Marceline is the Walt Disney Post Office.  In 1968, the US Postal Department issued a Walt Disney commemorative stamp and it was officially released from this location with the entire Disney family in attendance along with thousands of Disney fans.  In August 2004, the US Post Office was officially renamed the Walt Disney Post Office in honor of Marceline most famous person.
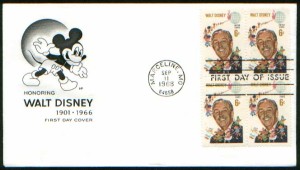
Walt Disney stamp

E.P. Ripley Park

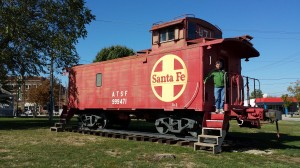
Located across the street from the Walt Disney Post Office is the E.P. Ripley Park which is named in honor of the Santa Fe Railroad’s first president.  In 1898, the railroad donated the land to the city of Marceline.  When Walt was building Disneyland he knew he wanted to incorporate steam trains and named one of them the E.P. Ripley.  Two trains are located at the park, an original Santa Fe 2546 steam locomotive and a red caboose.  (Both of these make a great photo opportunity!)
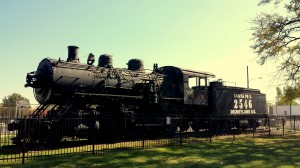
 EP Ripley Park - Santa Fe steam locomotive    EP Ripley Park - red caboose

Also located in the park is a Gazebo which was built in 1898 and it is where band concerts took place every Sunday.  The Disney family attended many of those concerts during their stay in Marceline.  It has been said that the gazebo was the inspiration in the 1935 Disney cartoon, “The Band Concert” which featured Mickey Mouse and Donald Duck.  (Listen carefully and you can almost hear Mickey leading the band in a rendition of the William Tell Overture just like in the movie!)

Walt Disney Park and Pool

Just south of the center of Marceline is the Walt Disney Park and Pool which was officially dedicated in July 1956 with Walt, Roy and their wives in attendance.  The swimming pool is still in use seasonally by the city of Marceline.  The park was also the site of the Midget Autopia ride from Disneyland was donated by Walt and Roy in 1966.  It is the first attraction that has ever left Disneyland and been operated outside of a Disney-owned themed park.  The track was reconstruction on site and was used by the children of Marceline for many years, parts of the track still remain and a restored Midget Autopia vehicle can be seen at the Walt Disney Hometown Museum.

Walt Disney Elementary School
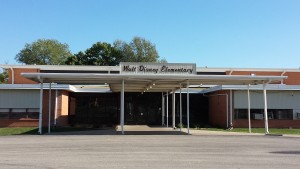
Walt Disney Elementary School

Travel Note:  When the school is in session please respect it as an educational institution and ask permission before entering the building or taking pictures.

Located a short drive from the center of Marceline is the Walt Disney Elementary School.  There are several Walt Disney Elementary Schools across the country such as the Anaheim and Burbank, CA, Chicago IL locations and the first one to receive the honor was in Tullytown, PA.  The Marceline location was very special to Walt because he attended the school with his sister Ruth.  The original school, known as Park Elementary, was a 2-story brick building and when it fell into disrepair it was replace by the current one-story modern building in 1960.  When Walt received a letter from the school officials in Marceline requesting that the new school be renamed in his honor Walt graciously granted permission and he even bought the school new playground equipment.

In addition, he installed a special 55 foot flag pole that was originally used in the 1960 Winter Olympics held in Squaw Valley, CA of which Walt was the Chairman of Pageantry.  During the games there were 30 flagpoles which flew the 30 flag of the participating nations and all the flagpoles had special plaques signed by Disney; visitors can see this plaque on the flagpole in front of the school.  Walt also gave the school an official Disneyland flag and it is the only place outside of Disneyland to fly this special flag.
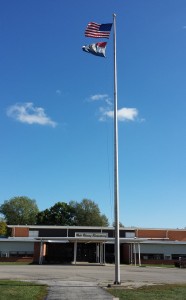
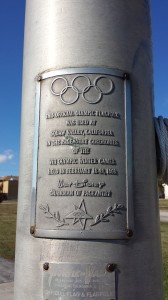
Walt Disney Elementary School flagpole    Walt Disney Elementary School flagpole plaque

Located in the lobby of the school, when it is not on display at the Walt Disney Hometown Museum, is the school desk of Walt from the old Park School with the initials WD carved into the wooden top.  At the time of the school’s dedication, Walt commission one of the Walt Disney Company artists, Bob Moore, to create artwork for the school’s entrance, hallway and gymnasium.  The artwork is still in use and features many of the Disney characters and can be seen throughout the building.  (Take a peak inside from the window’s of the school and you can see some of the murals)
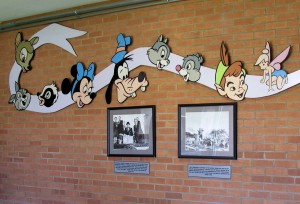
Walt Disney Elementary school - interior

The Old Disney Home, Walt’s Barn and the Dreaming Tree
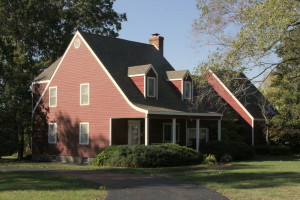
The old Disney family home

Travel Note:  The old Disney home is currently a private residence so please be respectful during your visit.

Located north of town is the old Disney Home and we highly recommend a stop there before ending a visit to Marceline.  Traveling north from the museum, turn left at Broadway.  The house is on the northwest corner and be sure to look carefully for a very small parking area just past the house on the right side of the street.  Hopefully, you will find the path over the foot bridge and through the bushes because at the end are two very special hidden Disney sites.  As you walk along the path there are signs that explain the time period that Walt lived in Marceline.

The first site is the Dreaming Tree which got the name from the time Walt and Ruth spent during the afternoon sitting under the large cottonwood tree daydreaming.  Unfortunately, the tree has not survived over the years in very good condition.  Walt called his time sitting under the tree and observing the nature surrounding him as “belly bounty” and it was to influence him many years later and served as his inspiration for some of the films and television programs that he made.  As you visit the spot, pause and take the time to reflect and imagine Walt all those many years ago.  (Earlier in this post, there is a photo of Walt and Roy at the Dreaming Tree during their visit to Marceline in 1956)
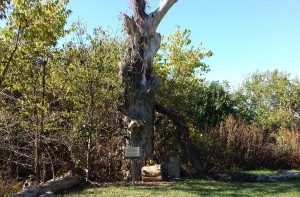
The Dreaming Tree

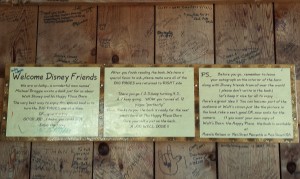
Continue to follow the path past the Dreaming Tree and you will see several more signs that lead toward the second site, Walt’s Barn.  The barn located on the Disney farm was another place where Walt and his sister Ruth would spend their days playing together.  This replica was built in 2001 and features a distinct pitched roof similar in style to the original barn that stood at this location.  As visitors enter the barn, they will be amazed to see thousands of signatures and messages left by devoted Disney fans.  We added our signatures and also took the time to write a message with our heartfelt thanks to Walt!  (Look for our message under the windowsill overlooking the Marceline water tower)
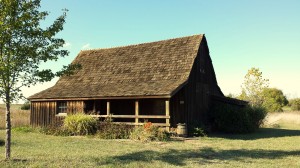
Walt's Barn    Walt's Barn - interior

That concludes our family visit to Marceline and it was a wonderful and very memorable trip for this Disney fan!