Celebration – Queen of Hearts Party

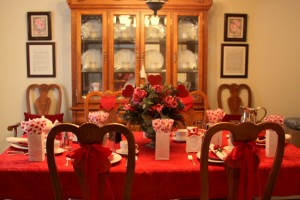
Queen of Hearts Party tableWith Valentine’s Day coming in February, it is never too early to brainstorm a party idea and I have a great theme – Queen of Hearts!  This theme could be used to set the table for a fun family dinner or an elegant tea luncheon or late dinner with close girlfriends.
Valentine’s Day is not always about romance and couples, it can also be a time to show love and support for your family and friends.  With our busy lives and everyone scattered to school, work and athletic activities sometimes we need to stop and spend some quite quality time together.  This would be a great occasion to celebrate with your family and show them how much you love them!  Fix a great dinner or maybe order take-out, it doesn’t matter, just take the time to talk and share together as a family.

Maybe there are other important people in your life that you want to show your love and support.  Another idea to celebrate Valentine’s Day is to invite other mothers in the neighborhood or your child’s school.  What a wonderful afternoon it could be sitting around the table with friends, enjoying a relaxed lunch and sharing the happiness or difficult times of motherhood.  (We’ve got to support each other!)  Or maybe you are single and want to get together with your girlfriends for a celebration.  Schedule a late dinner after work to eat a great meal and sit around a beautifully decorated table talking about love, men and dating … besides who wants to be alone on Valentine’s Day!

Basic supplies

  • Red tablecloth, size is determined by the table dimensions
  • White or ivory napkins for each guest
  • Rose floral centerpiece
  • Red rose buds for each place setting
  • Beautiful plates, glasses, utensils for each place setting
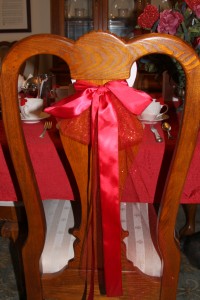
  • Red ribbon and red sparkle netting for chair back decorations
  • The photo shown above shows our dining room table set for a tea luncheon.

Queen of Hearts Party place setting    Queen of Hearts Party floral centerpiece

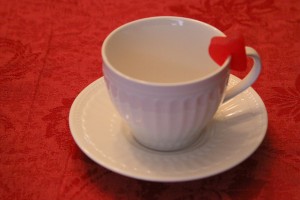
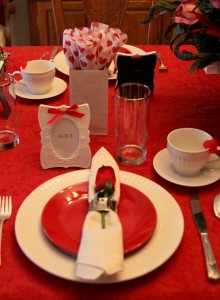
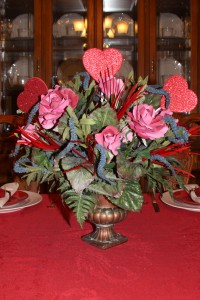
Start by setting the dining room table with a red tablecloth.  Set each place setting with beautiful plates, cup and saucers, glasses and utensils.  I used a large white dinner plate with a smaller red salad plate on top.  As a cute touch I cut a slice large jelly heart and attached it to the rim of the teacup.  Next, I used white napkins with a red rose bud tucked into silver napkin rings.  To complete each place setting, I used small white frames, tied with red ribbons for place cards.  To add festive look to the chair backs, I used two yards each of 1½ wide ribbon and 6 inch wide red sparkle netting tied into bows.  I also cut a large heart of red sparkle foam for each chair and attached it to the chair back.  Finally, to complete the table I wanted to enhance an existing deep pink rose floral arrangement, so I added red feather sprays and three red glittered hearts on sticks.  I think the table looks very festive and I think it is perfect for a Queen of Hearts tea luncheon for friends!

Queen of Hearts Party chair bow Queen of Hearts Party teacup with candy heart

Celebration – Dessert Party

When we lived in California every year we would have a Dessert Party.  It is a fun party where everyone gets together and eats some great desserts.  The basic idea of the party is that you invite a group of friends who make their favorite or best dessert.  They bring it to the party and when they arrive their dessert is given a number, this way everything should remain anonymous.  Guests are given ballots and vote by the number of the dessert.  Awards and prizes are given at the end of the party.

Be creative and find some cute invitations or create your own using some great scrapbook paper and a computer.  Be sure to include the following Dessert Contest Rules so the guests have some idea of the party theme.

DESSERT CONTEST RULES

  1. One dessert entry per person. (Please only homemade desserts, store bought desserts will be disqualified and eaten immediately!!)
  2. Entries will be given a number as you arrive.  This number will identify your dessert.
  3. All entries will be judged by the guests.
  4. Guests will taste each dessert and then judge on a scale of 1 to 10 with 10 being the best!
  5. Guests will judge each dessert in the following categories: taste and presentation.
  6. The following prizes will be awarded:
    • Grand Prize Winner
    • Best Presentation
    • Best Tasting
    • Honorable Mention
  7. Please bring a copy of your recipe if you would like to share with the other guests!

These rules are just a guideline; please feel free to come up with your own dessert party rules.  But, try to keep them as simple as possible because your guests want to enjoy the party and not a complicated ballot!  A simple voting process will also limit the time you spend away from your guests to count the votes and determining the winners will take a shorter time.

Set up a specific area to display the desserts, such as: a large table or kitchen counter.  Keep all the desserts in one area and label each dessert with a number as the guests arrive.  Keep track of the guest’s dessert and corresponding number.  Be sure to provide plates, bowls and utensils on the table for the guests to use.  Set up a separate area to provide drinks, such as: water, soda, punch or alcoholic beverages.  There will be very little preparation time involved in setting up this party and you will be able to enjoy the desserts with your guests.

Have fun and maybe it can become an annual event!

Celebration – Thank You Notes

The Christmas presents have been received and unwrapped.  All the holiday parties and the celebrations are coming to an end.  Now it is time to write those thank you notes for the presents received and for the hospitality given with parties.

Thank you notes are not sent as often as in the past.  I remember having to write thank you notes when I was a child.  My mother always made us write them, especially for presents received from relatives back east.  Then, when I got married there seemed to be a never ending amount of thank you notes to write for shower or wedding presents received.  When my children were born there were more thank you notes to send for birthdays and special events.  Eventually my children were taught to write their own thank you notes.

Now in today’s world, e-mails or texts are sent instead and they tend to be very short and abrupt.  Gone are the days when people take the time to write a thank you note and acknowledge someone’s thoughtfulness and generosity.

There are four points that should be remembered when writing a thank you note.

  1. Thank you notes should be written in black or blue ink.  It is best to send a thank you note within a week or two after receiving a present or someone’s hospitality.  The note should always start with the date and a simple greeting.
  2. Start the note by saying thank you and be specific as to what you are thanking them for.  Mention the present received or the hospitality given.  If you receive a monetary gift, thank the person for their generosity rather than stating the amount.  It is always polite to mention what the money is being used for.
  3. People always love to receive kind words as long as they are heartfelt, send the gift giver a sincere compliment.  Mention something in the future, anticipate another event coming up.  When writing about a gift, be sure to let them know how or when you plan to use it.
  4. In closing the note, reiterate your gratitude for the present sent.  Concluded the note with a sincere regard.  Don’t forget to proof read the note and check for any spelling or grammar errors.  Make sure to send the note to the correct current address and be sure to include your address.

TIP:  A thoughtful gesture is to enclose a photo, such as: opening the present, holding the present or wearing or using the present.

There are so many wonderful note cards or papers with matching envelopes for sale in retail stores or stationary shops.  By purchasing a supply ahead of time, it is easier to write and send thank you notes in a timely manner.

Celebration – New Year’s Eve / Day

I remember when I was a little girl; I couldn’t wait to be old enough to stay up for midnight on New Year’s Eve.  One year I had a girlfriend sleeping over and just before midnight we took pots, pans and wooden spoons from the kitchen, went outside and banged the heck out of them to make noise to celebrate the New Year.  Those pots and pans where dented beyond repair and my Mother was so mad that we had ruined them!!  (I wasn’t going to name names but … Sally!)  One of my New Year’s Eve traditions since I was a teenager is watching “Dick Clark’s New Year’s Rockin’ Eve” every year.  The show always had the best pop and rock bands – and it was much cooler then the Guy Lombardo show that my parent’s watched!!

New Year’s morning I was always in front of the TV sitting on the floor in our living room watching the Pasadena Rose Parade – I loved the floats and enjoyed the marching bands.  I could never understand why it was such a big deal when the announcers talked about the great weather in “Sunny California” until we moved to the Midwest!   I must admit looking out the window at the snow and seeing the cold temperature on the thermometer, I am jealous of the warmer weather back home in California!  As a child watching the parade on TV, I wished that someday I could see the parade in person.  Finally I had my chance when the year of the 100th anniversary of the Rose Parade, my son and I left the house at 2AM and drove to Pasadena.  We camped out on Colorado Blvd with thousands of other people to watch the parade live – it was so exciting!  My next big wish was to actually work on a Rose Parade float.  A few years later I got the chance when my husband and I volunteered to be on the floral decorating crew of the AAA Southern California Auto Club float and we actually got to help decorate and put the flowers on their float – it was so cool!

Now that I’m older, on New Year’s Eve I’m lucky to stay wake and you will probably find me dozing off on the couch or sound asleep in bed before the clock strikes midnight!!

NEW YEAR’S TRIVIA

  1. Since 1907, a crystal ball has been dropped in New York City’s Times Square.  The Waterford Crystal ball, weighing 11,875 pounds and measuring 12 feet in diameter, begins to descent at 11:59 PM and at the stroke of midnight it reaches the bottom and the crowds go wild in Times Square while millions of people watch on TV.  From 1981 to 1988, the ball was designed in the shape of a large apple to honor New York City’s nickname, the Big Apple.
  2. From 1972 to 2011, Dick Clark has produced and hosted “Dick Clark’s New Year’s Rockin’ Eve”.  Except for 2005, when he suffered a stroke in early December and his voice and mobility were severely affected so he was unable to be there in Times Square.  Ryan Seacrest was the substitute host that year and has remained as co-host and executive producer since then.  Dick Clark returned the next year and appeared on the show until sadly he died in April 2012 of a heart attack.  It will be a bittersweet celebration this year without him.
  3. Father Time and Baby New Year have symbolized the yearly change for centuries and were often used in political cartoons.  Father Time is shown as an old bearded man dressed in a long robe, carrying a scythe, wearing a sash with the year ending across his chest and he symbolizes the year that is ending.  At the end of the old year and the start of the New Year, Father Time will hand over his duties to the brand new Baby New Year.  The Baby New Year is shown as an infant dressed in only a diaper, top hat and wearing a sash across his chest that shows the new year that is just starting.

Happy New Year!

Barbara Jones

Celebration – Gift Wrap 101

After several trips to a favorite retail store or braving the crowds at the local mall, you’ve made your purchases for family and friends, everyone is checked off the Christmas list and the shopping is finally done!  Now, with some simple materials and a few suggestions and tips the presents can be wonderfully gifted wrapped in some unique ways to make your presents very memorable.

When gift wrapping presents for the holiday season, be creative with style, color and the use of embellishments.  Don’t limit yourself to the rolls of gift wrap paper in the Christmas aisle in your local retail store.  The local craft store or fabric store are a great source for gift wrap supplies, think about using fabric for wrapping, silk or wired ribbons, flowers or feathers for decorations on the presents.  The sewing notion section is an unusual source for gift wrap embellishments such as buttons, tassels, zippers, etc.  The scrapbook section in your local craft store is also a great source for creating gift tags and other decorations for finishing off those holiday gifts.

SAFETY CAUTION: When using small items for gift wrap decorations please be aware if you have small children in the house that can get ahold of the presents.  Store these gifts in a safe place until it is the time to open gifts or keep them out of reach and store in a high place that children cannot get to.  

Listed below are suggestions for several styles of gift wrap choices –

ROMANTIC STYLE

When gift wrapping a present for a mother, wife or sister consider a romantic style.  I would describe a romantic style as classic and feminine.  Use soft jewel tones such as: tiffany blue, fuchsia, sage green and rose or metallic colors such as: silver, gold and bronze.  Think about patterned paper, such as: floral and toile prints or textured wrapping papers, such as: flocked or embossed velvet.  Look to the fashion runway ball gowns for inspiration for wrapping presents in a romantic style.

As an alternative for traditional wrapping paper, check out the local fabric store for elegant fabrics to use in wrapping the presents, such as silks or satins.  The ribbon aisle is a wonderful source for silk and wired ribbons in hundreds of colors and prints to tie up a present.  Silk flowers can add a beautiful finishing touch; just tuck a shortened stem into the knot of a bow.  Check out the costume jewelry department in a local retail store for beautiful sparkling broaches to pin onto a present.

HINT:  Fabrics can be tricky to work with at first when wrapping a gift.  Normal gift wrap tape will not adhere to the fabric so try double sided tape on the fabric surfaces to secure.  (Celebrity stylists use this old Hollywood Red Carpet trick for their client’s clothes and it can work for gift wrapping as well)  Practice folding the fabric in a traditional gift wrapping style or if this proves too tricky simply gather the fabric at the top of the present, secure and tie with a ribbon.

MASCULINE STYLE

For a masculine style be inspired by menswear when wrapping a present for a father, husband or brother. Use darker colors, such as: hunter green, burgundy and navy blue.  Look for wrapping paper in plaids, herringbone and pinstriped patterns.

Check out your local fabric store for masculine fabrics to use, such as: corduroy, flannel, suede or simulated leather.  Be inspired by fabric normally used in menswear, such as: tartan plaids, black and white herringbone and grey or navy pinstripe fabrics.  The ribbon aisle is a great source of different styles of ribbons, such as: suede, leather or menswear patterns.  Once again, check out the sewing notions department in the local craft store for unique buttons to attach to the present.

When gift wrapping presents such as formal tailored shirts use the accessories as gift wrap accents.  Think about using the coordinating tie purchased with the shirt tied with a traditional Windsor knot and secured to the outside of a present or if he uses a bow tie instead consider pinning it on the outside of the present.  One suggestion is use a one or two inch wide solid color ribbon or a leather or suede strip around the present vertically and glue several buttons down the front to simulate a shirt front.  The matching pocket square can also be attached to complete the look.

(Please refer to the hint above when working with fabric for wrapping gifts)

EDGY STYLE

An eddy style of gift wrapping is perfect for the teenager or young adult.  Black will be the obvious color used with accents of metal or leather for a bold look.  Neon colors of hot pink, tangerine orange and lime green could also be used as a trendy alternative. Also look for wrapping paper in bold and geometric patterns for a modern look.  Check the ribbon aisle in the local craft store for ribbons that are appropriate for an edgy style.

Black wrapping paper can be hard to find, so if you can’t find any in the stores use regular black scrapbook paper in a cool “torn” effect over colored or patterned wrapping paper.  Select a strip of black paper long enough to go around the entire present.  Use a straight-edge ruler on top of black paper and gently tear the paper for a rough edge look with tattered edges. Attach the torn black paper around the present.

Check the sewing notion aisle in the craft store for zippers to use as decoration.  Cut up a zipper at the bottom and this will give you two separate pieces to use.  Zippers come in all different lengths so you will be able to find for the present or tie two pieces together if you need a larger length. Coil the zipper and it can become a cool edgy flower!

NATURE-INSPIRED STYLE

For those nature or outdoor loving family or friend’s presents, consider using supplies from nature.  Start by wrapping the present with simple brown craft paper or solid colored paper such as: green for the forest or blue for the sky and ocean.  Use grosgrain and silk ribbons to add texture and color to the presents.  You can gather materials from the forest or seashore but the local craft store is also a good source.  Items to look for as accessories would be – pinecones, artificial pine branches, holly branches or poinsettias for a traditional Christmas look or feathers and seashells for a non-traditional look.

HINT:  When gathering materials from the forest or seashore to use for gift wrapping, please be advised that they could contain bugs or other creatures.

TIPS AND SUGGESTIONS

TIP #1

Shop early for gift wrap supplies – that means shopping the Christmas sales the year before.  If you shop when these items first go on sale there is a better selection.  Find some space in a hall closet or a seldom used room to store these supplies until the next year.  When shopping for supplies look for wrapping paper, ribbon, gift tags and embellishments to create a fabulous wrapped gift.

TIP #2

Instead of purchasing yards of fabric, for smaller presents look in the home furnishing section of the local retail store for fabric dinner napkins.  Napkins are usually available in an assortment of colors, fabrics and even holiday prints.