Crown Jewels of England (Part Two)

Last month I posted the Crown Jewels of England (Part One) that featured interesting information about the royal regalia that is used during the coronation ceremony of the British Monarch.  Today’s post will have detailed information about a few of the other items in the royal collection, such as the Imperial State Crown, the Imperial Crown of India, the   Queen Victoria’s small diamond crown and the Crown of Queen Elizabeth, the Queen Mother.

The Imperial State Crown

Imperial State Crown
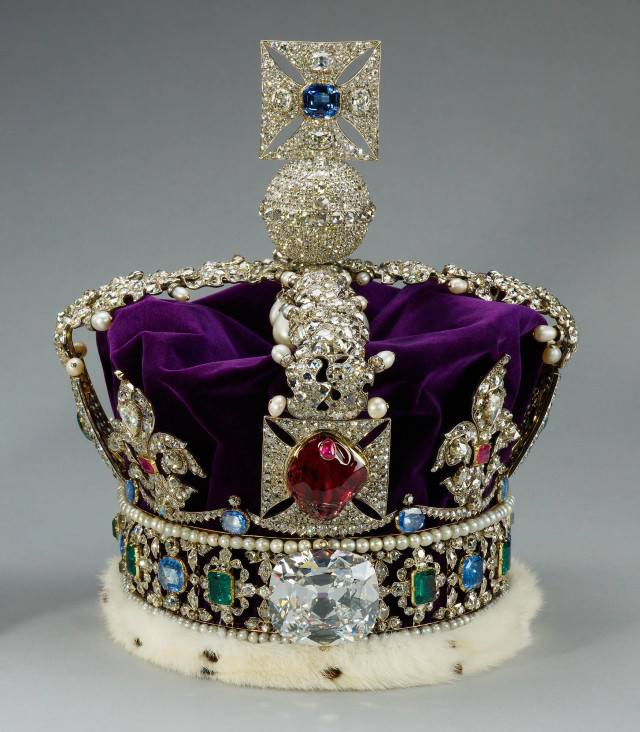
One of the most famous crowns in the royal collection is the Imperial State Crown.  The original crown was made for Queen Victoria in 1838, but when the crown became un-repairable an exact copy was made in 1937 for the coronation of King George VI.  Then in 1953, the crown was altered to fit the smaller head of Queen Elizabeth II.

The Imperial State Crown is made with a gold frame with four crosses, four fleurs-de-lis and two crossing arches that were lowered by about one inch to give the crown a more feminine appearance for Queen Elizabeth.  At the top of the arches is a cross pattee and the crown includes 2,868 diamonds, 272 pearls, 17 sapphires, 11 emeralds and 5 rubies.  Several of the stones are historically famous; such as two of the four dangling pearls were once worn by Queen Elizabeth I, in addition there is the Black Prince’s Ruby, St. Edward’s Sapphire and the Stuart Sapphire.  The most famous gemstone in the Imperial State Crown is known as the Second Star of Africa which is the second largest stone cut from the world renowned Cullinan Diamond.

The Imperial State Crown is traditionally worn during the recessional of the Coronation ceremony when the monarch leaves Westminster Abbey.  The Crown is also worn by the monarch for the annual State Opening of Parliament.  Traditionally, the crown and other royal jewels worn for the occasion are transported to the Robing Room within the Parliament building and this is where the Crown, jewelry and royal robes are put on before the ceremony begins.

The Imperial Crown of India

Imperial Crown of IndiaThe Imperial Crown of India was created for George V as the Emperor of India to wear at the Delphi Durbar in 1911.  In theory, when the monarch is crowned during the coronation ceremony in Westminster Abbey in London he becomes king or queen of England and all the Commonwealth countries.  But King George was advised by his ministers that his presence was need in India after the coronation and the Durbar was arranged but due to the tradition that the Crown Jewels are never to leave the United Kingdom this new crown was specially made for the occasion.   Due to the heavy weight the Imperial Crown of India was never worn again.

The crown has a silver frame laminated in gold and set with 6,100 diamonds.  The band is set with larger diamonds, emeralds and sapphires surrounded by more diamonds.  Above the band are four cross pattee set with rubies and four fleur-de-lis with emeralds surrounded with even more diamonds.  The eight half-arches are topped with a cross pattee with an emerald in the center, most British royal crowns traditionally have only four arches.

Queen Victoria’s Crown

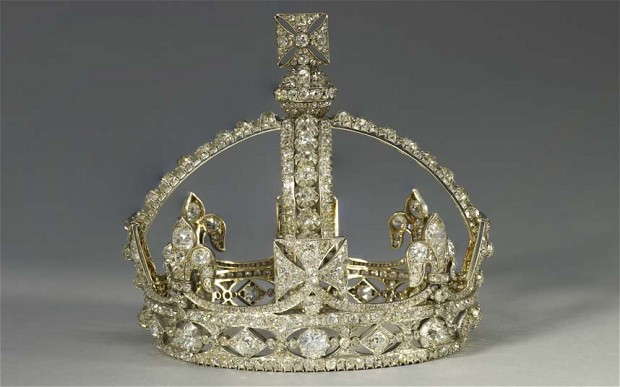
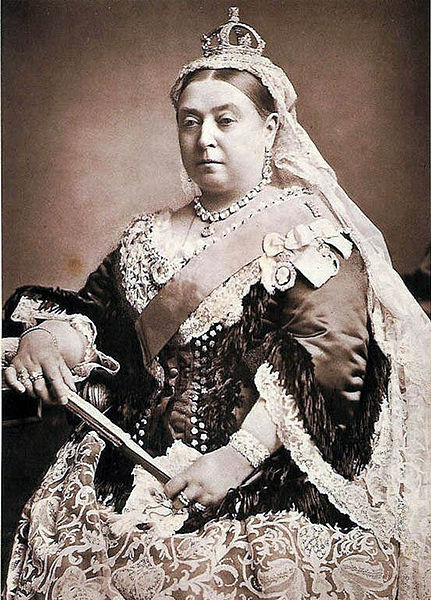
Following the death of Prince Albert in 1861, Queen Victoria left London for the seclusion of her other homes and withdrew from any public engagements.  Out of respect for her beloved husband, she wore mourning clothes for the rest of her life. Deciding that her elaborate jewels were not appropriate for her status as a widow, she had a smaller diamond crown made that was more suitable and usually wore it over a veil of Honiton lace.  This is the image of the older Queen Victoria that is depicted in portraits, sculptures, photographs, coins and currency in the last decades of her reign.

The small crown, less than 4 inches in diameter was made in 1870, has a silver frame laminated in gold and wet with 1,187 diamonds.  When Queen Victoria died in 1901, the crown was placed on her coffin as it traveled from Osborne House to the state funeral in London.  Subsequently, the crown was worn by Queen Alexandra who later gave it to Queen Mary.  In 1937, King George suggested that the crown should be added permanently to the display of Crown Jewels at the Tower of London and it has not been worn seen that time.

Queen Victoria crown 1 Queen Victoria wearing her crown
 The Crown of Queen Elizabeth, the Queen Mother

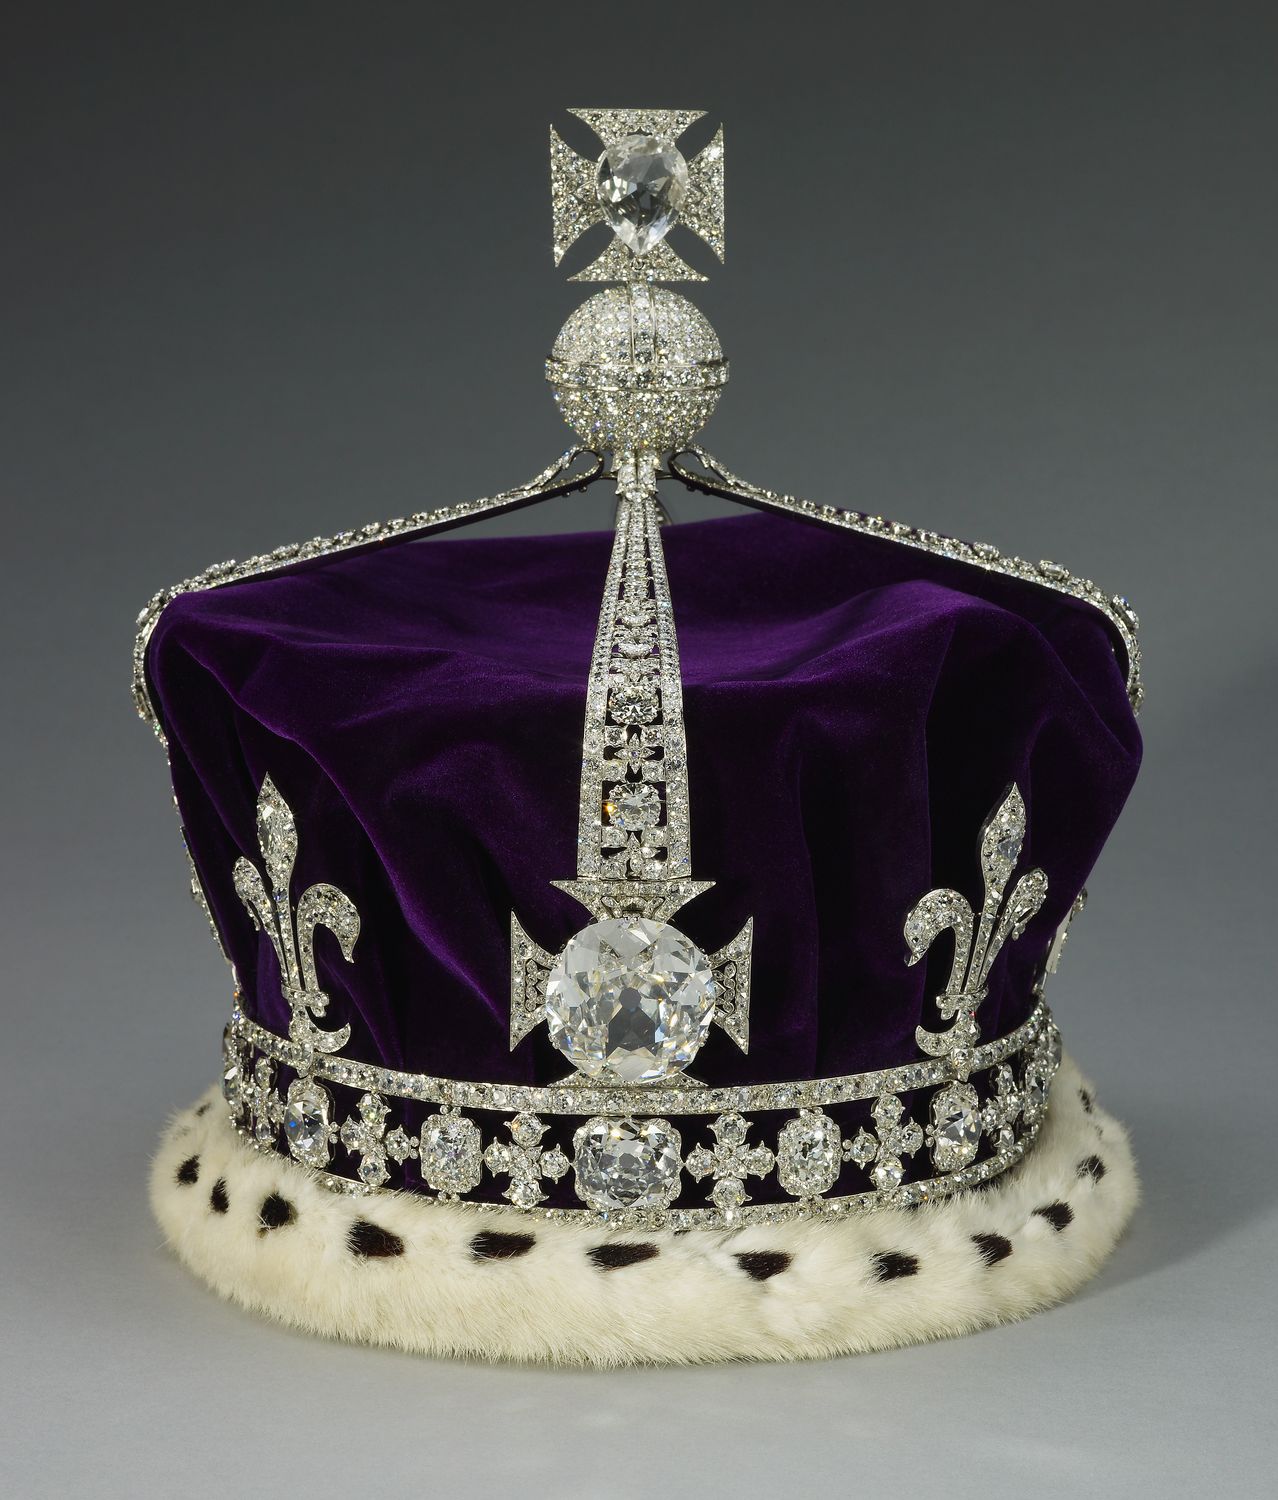
For the coronation of King George VI in 1937, a special crown was made for the Queen Consort.  The crown is made of platinum with a band set with diamonds with four alternating cross pattee and fluer-de-lis of four each and features four arches that are detachable which allows it to be worn as a circlet.  This is how it was worn by the Queen Elizabeth for the State Openings of Parliament during the reign of George VI and also how it was worn in 1953 for the coronation of her daughter, Queen Elizabeth II.

The crown is set with 2800 diamonds; the most notable one is the 105 carat Koh-I-Nor diamond displayed in the middle of the front cross.  The diamond was given to Queen Victoria in 1877 when she became Empress of India.  The crown also contains the almost 23 carat Lahore Diamond which was given to Queen Victoria by the East India Company in 1851 and a 17 carat diamond that was also given to Queen Victoria by the Sultan of the Ottoman Empire in 1856.

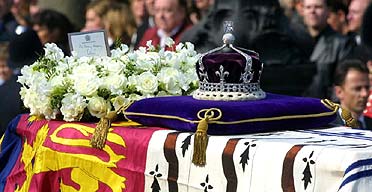
In 2002 when Queen Elizabeth, the Queen Mother died at the age of 101 the crown was set on her coffin during her state funeral.  The crown is now displayed with the Crown Jewels in the Tower of London.

Queen Elizabeth, the Queen Mother crown Queen Elizabeth, the Queen Mother crown at funeral
 For more information about additional items in the royal collection, please check out last month’s post, The Crown Jewels of England (Part One).  In this post there is detailed information about the royal regalia used for the coronation ceremony of the English kings and queens since 1660.

Also, if you are interested in more information about the Royal Family and their jewels, please click on the links to the following posts:  The Queen’s Jewelry Collection (Part One and Part Two) and the Cambridge Emeralds.


Craft – Words into Art

2013-09-08 09.53.41I was recently inspired by a photo I saw on Pinterest.  It was a simple piece of artwork using words arranged in a pattern and displayed in a beautiful frame.  It looked like an easy craft project to try with only a few supplies required.  The “Words as Art” took less than 30 minutes and the completed artwork looks great hanging in the hallway in our home.

2013-09-06 06.40.51

Words into Art – supplies

  • Frame
  • Scrapbook word or letters stickers
  • Scrapbook paper used as decorative backing
  • Scissors
  • Glue (optional if self-adhesive stickers are used)
  • Mat frame (optional)

Words into Art – instructions

  1. Remove glass and backing from frame.  If you are using a mat, purchase one with an 8 X 10” opening to fit a larger frame, this will create a border around the “words”.
  2. Cut scrapbook paper to fit the 8 X 10” opening of the frame or mat.  (Scrapbook paper generally comes in two popular sizes, 12 X12” or 8.5 X 11”)  For the selection of scrapbook paper I would suggest a solid color because it won’t distract from the “words”.  For color selection there are two choices, one is a background that blends with the “words” color for a soft effect or the other is a background that contrasts with the “words” color for a bold effect.
  3. Scrapbook word stickers are available in a variety of sizes and fonts.  Some are pre-packaged with different words; look for ones that are a solid color with a slight depth to create the dimension needed for this project.  If you can’t find the “words” you want, create them from individual letters made of foam or cardboard.
  4. Prior to attaching the “words” to the scrapbook paper, select the placement to fit into the 8 X 10” area.  Experiment with a variety of different positions until you are pleased with the arrangement.  If you are using a mat, be sure to lay the mat over the scrapbook paper and “words” to be sure that everything fits within the mat opening and does not cut-off the “words”.  Once you determined the placement of the “words”, attach them to the scrapbook paper working from the center to the outer edges.
  5. Attach the scrapbook paper with “words” to the frame backing.  I would suggest only replacing the glass if it is the non-glare type, if it is a standard glass type the glare of the glass will be distracting to reading the “words” and not as visually appealing.

This craft idea would also make a great gift for a birthday, new baby, wedding or housewarming gift; just choose the appropriate “words” for the occasion.  Another idea is to choose one word and repeat it several types in a variety of different sizes and fonts.  Use the person’s first name for a birthday or new baby gift and the last name for a wedding or housewarming gift.


Travel – United States Mint

U.S. Deptartment of the Treasury Seal

Today in history the U.S. Treasury Department was established in 1789.  This post will discuss the history of the Treasury Department and the functions of the Bureau of Engraving and Printing located in Washington, D.C. and the U.S. Mint which has several locations across the United States.

 A Brief History of the U.S. Treasury Department

Established by an act of Congress in 1789, the Department of the Treasury is an executive department of the U.S. federal government.  The first Secretary of the Treasury was Alexander Hamilton.  He was appointed by President George Washington and sworn in on September 11, 1789.  During his five years as the Treasury Secretary, he established the nation’s first financial system.

Currently, the U.S. Treasury Department prints all paper currency and postage stamps at the Bureau of Engraving and Printing located in Washington, D.C. and the U.S. Mints create all coins in circulation throughout the United States.  The Treasury Department manages all the United States federal finances, supervises the national banks and lending institutions, advises on domestic and international financial, economic and trade policies, and enforces and collects all federal taxes while investigating and prosecuting tax evaders through the Internal Revenue Service.

The Bureau of Engraving and Printing

The Bureau of Engraving and Printing is a government agency of the U.S. Treasury Department which designs and produces a variety of secured products for the United States Government, mainly the Federal Reserve Notes (paper currency).

Bureau of Engraving Printing in Washington, D.C.

The Bureau began in 1861 during the Civil War and was authorized by Congress to issue paper currency instead of coins due to the lack of funds needed to support the war.  The paper currency was basically a government IOU and were called Demand Notes which were payable “on demand” in coin at the Treasury facilities.  At the time, a private company produced the Demand Notes in sheets of four, then clerks would sign the individual notes by hand and workers would trim and cut the sheets into individual Demand Notes.

Initially the currency processing operations of the Treasury Department were not formally organized until the formation of the Bureau of Engraving and Printing which was officially recognized by congressional legislation in 1874.

By 1918 the plate capacity used in the printing presses increased from four to eight notes per sheet to meet the production requirements needed during World War I.  Then in 1929, there was the first major design change in paper currency.  The bill design was standardized and the size of each bill was reduced and the Bureau converted from the eight to twelve notes per sheet.  This redesign helped to reduce paper costs and counterfeit deterrents were implemented for the general public to recognize the bills features.

In 1952, there were further improvements with new faster-drying inks that enable printed back sheets to be kept damp until the front sheets were printed allowing less distortion since the sheets needed to be dampened before each printing.  The size of each sheet was also increased from twelve to eighteen notes per sheet.  Then in 1957, the Bureau began printing currency with the dry intaglio method which uses special paper and inks and further increased from eighteen to thirty-two notes per sheets.  Since 1968, all currency has been printed using this method of the dry intaglio and the need to wet each paper prior to printing was permanently eliminated.

With the dry intaglio process, the note engravings were transferred to steel plates.  With this new method the ink is applied directly to the plates and then wiped clean leaving the ink only in the engraved lines.  The plate is pressed against the sheet of paper allowing the ink to be applied.  Both faces are printed and overprinted with the Treasury Seals and serial numbers.

In addition to paper currency, the Bureau has designed and printed a variety of secured products for the U.S. federal government over the years.  These items have included military commissions and award certificates, invitations for White House events, passports for the State Department, money orders for the Post Office Department and many different types of identification cards, forms and special security documents for all types of government agencies.

In 1894, the Bureau took over the production of postage stamps for the United States government and by the end of that first year the stamp production was more than 2.1 billion stamps.  Then in 2005, the United States Postal Service switched to private postage stamp printers and thus ended 111 years of production by the Bureau.

The Bureau of Engraving and Printing has two locations.  The main location in Washington, D.C. offers a free 30-minute guided tour which features information regarding the various phases of currency production. Tours are available Monday through Friday. There is an additional Bureau location in Fort Worth, Texas with visitor tours available during business hours. The Bureau locations are closed for all federal holidays and the week between Christmas and New Year’s Day.

The United States Mint

The United States Mint was created by Congress with the Coinage Act of 1792 and was originally a part of the Department of State. In 1799, the Mint was made an independent agency and later in 1873 it became part of the Department of the Treasury.

The function of the U.S. Mint is to design and produce coins, commemorative medals, and special coins, in addition to safeguarding, controlling and disbursing gold and silver bullion for authorized federal government purposes.

Currently there are four coin producing locations, the Mint’s headquarters in Philadelphia, PA.   and additional facilities in Denver, San Francisco and West Point, New York and a gold bullion depository at Fort Knox, Kentucky.  Several additional facilities across the United States have opened and closed since the creation of the U.S. Mint.

The Philadelphia Mint –

The Philadelphia Mint is the largest mint and the current facility opened in 1969, there have also been three previous buildings located in Philadelphia.  The Philadelphia location is also the site of the master die production for the U.S. coinage and the design and engraving departments of the U.S. Mint are also located there.

United States Mint Philadelphia

The Denver Mint –

The Denver location began in 1863 as the local assay office five years after the discovery of gold in the area and by the early 1900s the office was bringing in over $5 million in annual gold and silver deposits.  In 1906 the Mint officially opened the new Denver Mint and became coin production.

United States Mint Denver

The San Francisco Mint –

The San Francisco location opened in 1854 during the California Gold Rush but moved to a new location in 1874.  This building was one of the few that survived the 1906 earthquake and closed in 1937 when the current facility was built.  Currently the facility is producing only proof coinage and not general circulation coins.

United States Mint San Francisco

West Point, New York –

The West Point facility is the newest mint location as of 1988.  Originally the West Point Bullion Depository opened in 1937 and cents (pennies) were produced there from 1973 to 1986.  Currently the West Point facility is still used for storage of a portion of the United States gold bullion reserve and produces gold, silver and platinum American Eagle coins.

Fort Knox –

Fort Knox does not produce coins but is a storage facility for the majority of the United States gold and silver bullion reserves.

Fort Knox

In general all coins produced at U.S. Mint facilities are given mintmarks.

Here is the current mintmark information for each coin:

  • Cent: Unlike all other coins, which had their mintmarks on the reverse until 1964, the Lincoln cent or penny has always had the mintmark on the obverse side below the date to the right of Lincoln’s bust since its 1909 introduction.
  • Nickel: The mintmark was located near the rim of the obverse side to the right of Thomas Jefferson’s bust from 1968 to 2005.  With the 2006 redesigned of the obverse of the nickel, the mintmark is now located below the date on the lower right. Many earlier nickels from 1938 to 1964 are still in circulation, and their mintmarks can be found on the reverse side to the right of Monticello, with the exception of the 1942-1945 war nickels.
  • Dime: The mintmark is above the date on the obverse side to the right of Franklin Delano Roosevelt’s bust.
  • Quarter: The mintmark is to the right of George Washington’s bust.
  • Half dollar: The mintmark is below the center of John F. Kennedy’s bust, above the date.
  • Presidential dollar: first issued in 2007: The mintmark and date are found on the rim of the coin.

Tour information regarding the Department of Treasury facilities

The Bureau of Engraving and Printing –

Free tours are offered at both facilities, Washington, D.C. and Fort Worth, TX.  In general, the tours feature the various steps involved in the production of our national currency.  The process starts with large blank sheets of special paper and ends with the finished bills.   For more information regarding hours and dates of each facility, please see the website, www.moneyfactory.gov/tours

The U.S. Mints –

Visiting one of the United States Mints is an exciting experience for all ages.  Free tours cover the history of the Mint and visitors will be able to see the process that takes from the beginning of designing the coins, creating sculptured dies to the actual making of the coins.  For more information regarding hours and dates of each facility, please see the website, www.usmint.gov/mint_tours

Travel tips and suggestions

  • Check ahead at each facility for safety and security restrictions.  Some may require for adults to provide government-issued photo identification for security purposes.
  • If the Department of Homeland Security level is elevated to CODE ORANGE, the United States Mint at Philadelphia will be CLOSED to the public unless otherwise noted.
  • The United States Mint reserves the right to deny access to anyone at any time; in addition, members of the general public touring the facility may be subject to search by the United States Mint Police.
  • Restrictions regarding cameras and cellphones, purses and backpacks may be prohibited.
  • Photography inside the Department of Treasury buildings is prohibited.
  • TRAVEL NOTE: Advanced planning is a good idea, especially when planning a short visit to the specific cities, and when possible it is a good idea to make reservations if available.

We have been fortunate to have visited the Bureau of Engraving and Printing when we were in Washington, D.C. in 2002.  We also have visited two of the U.S. Mints on our road trips across the United States, the ones in Philadelphia, PA and the Denver, CO.  Taking the tours with the family is always exciting and interesting!!