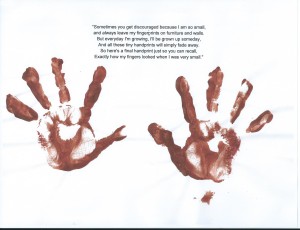
 Mother’s day is coming up this month and here is an easy and inexpensive craft project to do with the kids to create a very sentimental Mother’s Day gift. This idea is also a great gift idea for Father’s Day, Grandparent’s Day or Christmas.
Children handprints, especially when they are very young, always make interesting art work for a home. When children are at the preschool or kindergarten age their hands are very small and they make excellent tools for these simple art projects.
Follow these simple steps for a perfect handprint craft/art project.
- Before starting this craft project, be sure to assemble all the materials that you will need. I used both acrylic black and brown paint for several sets of handprints. (I wasn’t sure which color I wanted to use so I took a couple of sets in each different color so that I would have more options to decide from when I did this project with my daughter)
- You will also need a paint brush to apply the paint onto the palm of the child’s hand.
- A very important tip when making handprints and using paint is to cover the work area completely with newspaper or a plastic tablecloth. Another tip is to use an inexpensive apron to cover you and the child’s clothing while taking the handprints or another inexpensive solution is an oversized t-shirt, just be sure it is one that can be thrown out if it gets too much paint. Position the work space within easy reach of a sink with running water and have paper towels on hand for spills and clean-up. These simple steps will keep the project from getting too messy and therefore the clean-up time will be kept to a minimum.
- For this particular craft project pre-select a poem to use with the handprints. The internet is a good source to find an appropriate poem, do a search for “handprint poem” and select one that you like. Center the poem near the top of the page to allow enough room at the bottom for the handprints. Be sure to include the name of the child and the year the handprint was taken. Print several copies from a computer. (I recommend at least four copies to start, this should be enough to allow for mistakes and to get at least one set of good handprints)
- Before starting the project take the time to explain to the child what will happen during the handprint process, children tend to cooperate more if they know what to expect. A simple trick to taking good handprints is for the child to relax their hands and not roll their fingers into a ball. This can be a very messy process if you have to move their fingers into a straight position.
- An important tip when taking handprints is to use a minimum amount of paint to create smudge-free prints. Place the palm of the hand near the wrist down first and then place the fingers slowly down on the paper. Once the hand is completely placed, gently press down on all the areas of the hand with equal pressure for an even print. Rest the hand for a moment and then lift straight up, this trick will help to eliminate smudges. After you get a good handprint of the first hand move onto the second hand.
- After the both handprints are taken, allow it to dry for at least 24 hours. Once the handprint is completely dry.
Please check out last month’s Craft post, Zoo Animal HandPrints, for another fun craft project using children’s handprints.
