
 I was recently inspired by a photo I saw on Pinterest. It was a simple piece of artwork using words arranged in a pattern and displayed in a beautiful frame. It looked like an easy craft project to try with only a few supplies required. The “Words as Art” took less than 30 minutes and the completed artwork looks great hanging in the hallway in our home.
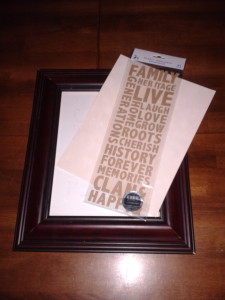
Words into Art – supplies
- Frame
- Scrapbook word or letters stickers
- Scrapbook paper used as decorative backing
- Scissors
- Glue (optional if self-adhesive stickers are used)
- Mat frame (optional)
Words into Art – instructions
- Remove glass and backing from frame. If you are using a mat, purchase one with an 8 X 10” opening to fit a larger frame, this will create a border around the “words”.
- Cut scrapbook paper to fit the 8 X 10” opening of the frame or mat. (Scrapbook paper generally comes in two popular sizes, 12 X12” or 8.5 X 11”) For the selection of scrapbook paper I would suggest a solid color because it won’t distract from the “words”. For color selection there are two choices, one is a background that blends with the “words” color for a soft effect or the other is a background that contrasts with the “words” color for a bold effect.
- Scrapbook word stickers are available in a variety of sizes and fonts. Some are pre-packaged with different words; look for ones that are a solid color with a slight depth to create the dimension needed for this project. If you can’t find the “words” you want, create them from individual letters made of foam or cardboard.
- Prior to attaching the “words” to the scrapbook paper, select the placement to fit into the 8 X 10” area. Experiment with a variety of different positions until you are pleased with the arrangement. If you are using a mat, be sure to lay the mat over the scrapbook paper and “words” to be sure that everything fits within the mat opening and does not cut-off the “words”. Once you determined the placement of the “words”, attach them to the scrapbook paper working from the center to the outer edges.
- Attach the scrapbook paper with “words” to the frame backing. I would suggest only replacing the glass if it is the non-glare type, if it is a standard glass type the glare of the glass will be distracting to reading the “words” and not as visually appealing.
This craft idea would also make a great gift for a birthday, new baby, wedding or housewarming gift; just choose the appropriate “words” for the occasion. Another idea is to choose one word and repeat it several types in a variety of different sizes and fonts. Use the person’s first name for a birthday or new baby gift and the last name for a wedding or housewarming gift.